Manage Internet Threat Protection (ITP) Policies
How-to guideCreating, editing, and prioritizing ITP policies in SonicWall Cloud Secure Edge (CSE)
- Last validated: Oct 16, 2026
- 7 minutes to read
-
Contributors

- ITP Policy Overview
- How ITP rules are processed
- Create an ITP Policy
- Migration from URL Allowlist and Explicit URL Blocking
- Edit or Delete an ITP Policy
- Prioritizing ITP Policies
- Exclude Users from ITP Policies
- ITP policy sync status
- Lookup Domain
- Disabling ITP
ITP Policy Overview
Internet Threat Protection (ITP) policies are designed to protect users and devices from untrusted internet resources. Admins can create and manage ITP policies in the Command Center. Admins assign ITP policies to users and devices via Roles, similar to other protected services in the Cloud Secure Edge (CSE).
In CSE, admins decide which content categories, which domains, and which apps they want to block or allow. Additionally, a selection of common threat categories are pre-selected and always toggled on for protection against. Admins then associate the ITP policy with a device or a group of devices.
How ITP rules are processed
ITP rules are evaluated in a fixed order on every request:
- Bypasses are evaluated first. Any traffic that matches a Domain and URL Bypass entry, an Application Bypass entry, or another bypass type is excluded from ITP inspection. Bypassed traffic is not sent to the SWG agent and does not appear in logging.
- Blocks are evaluated next. Category Blocking, Domain and URL Blocking, Application Blocking, Geo-Blocking, and the auto-enabled threat protection categories all run after bypasses. If a request matches any block rule, the request is blocked.
- Risk-based URL inspection runs on remaining traffic when TLS decryption is enabled and Risk-based URL Blocking is on. See Risk-based URL Filtering.
- File Analysis runs on remaining downloads when TLS decryption is enabled and File Analysis is on. See Malware Download Protection.
Because bypasses are always processed first, the Domain and URL Bypass field is the single place to add any URL or domain you want to exclude from every ITP rule — including category filtering, domain blocks, threat protections, risk-based URL filtering, and file analysis.
Create an ITP Policy
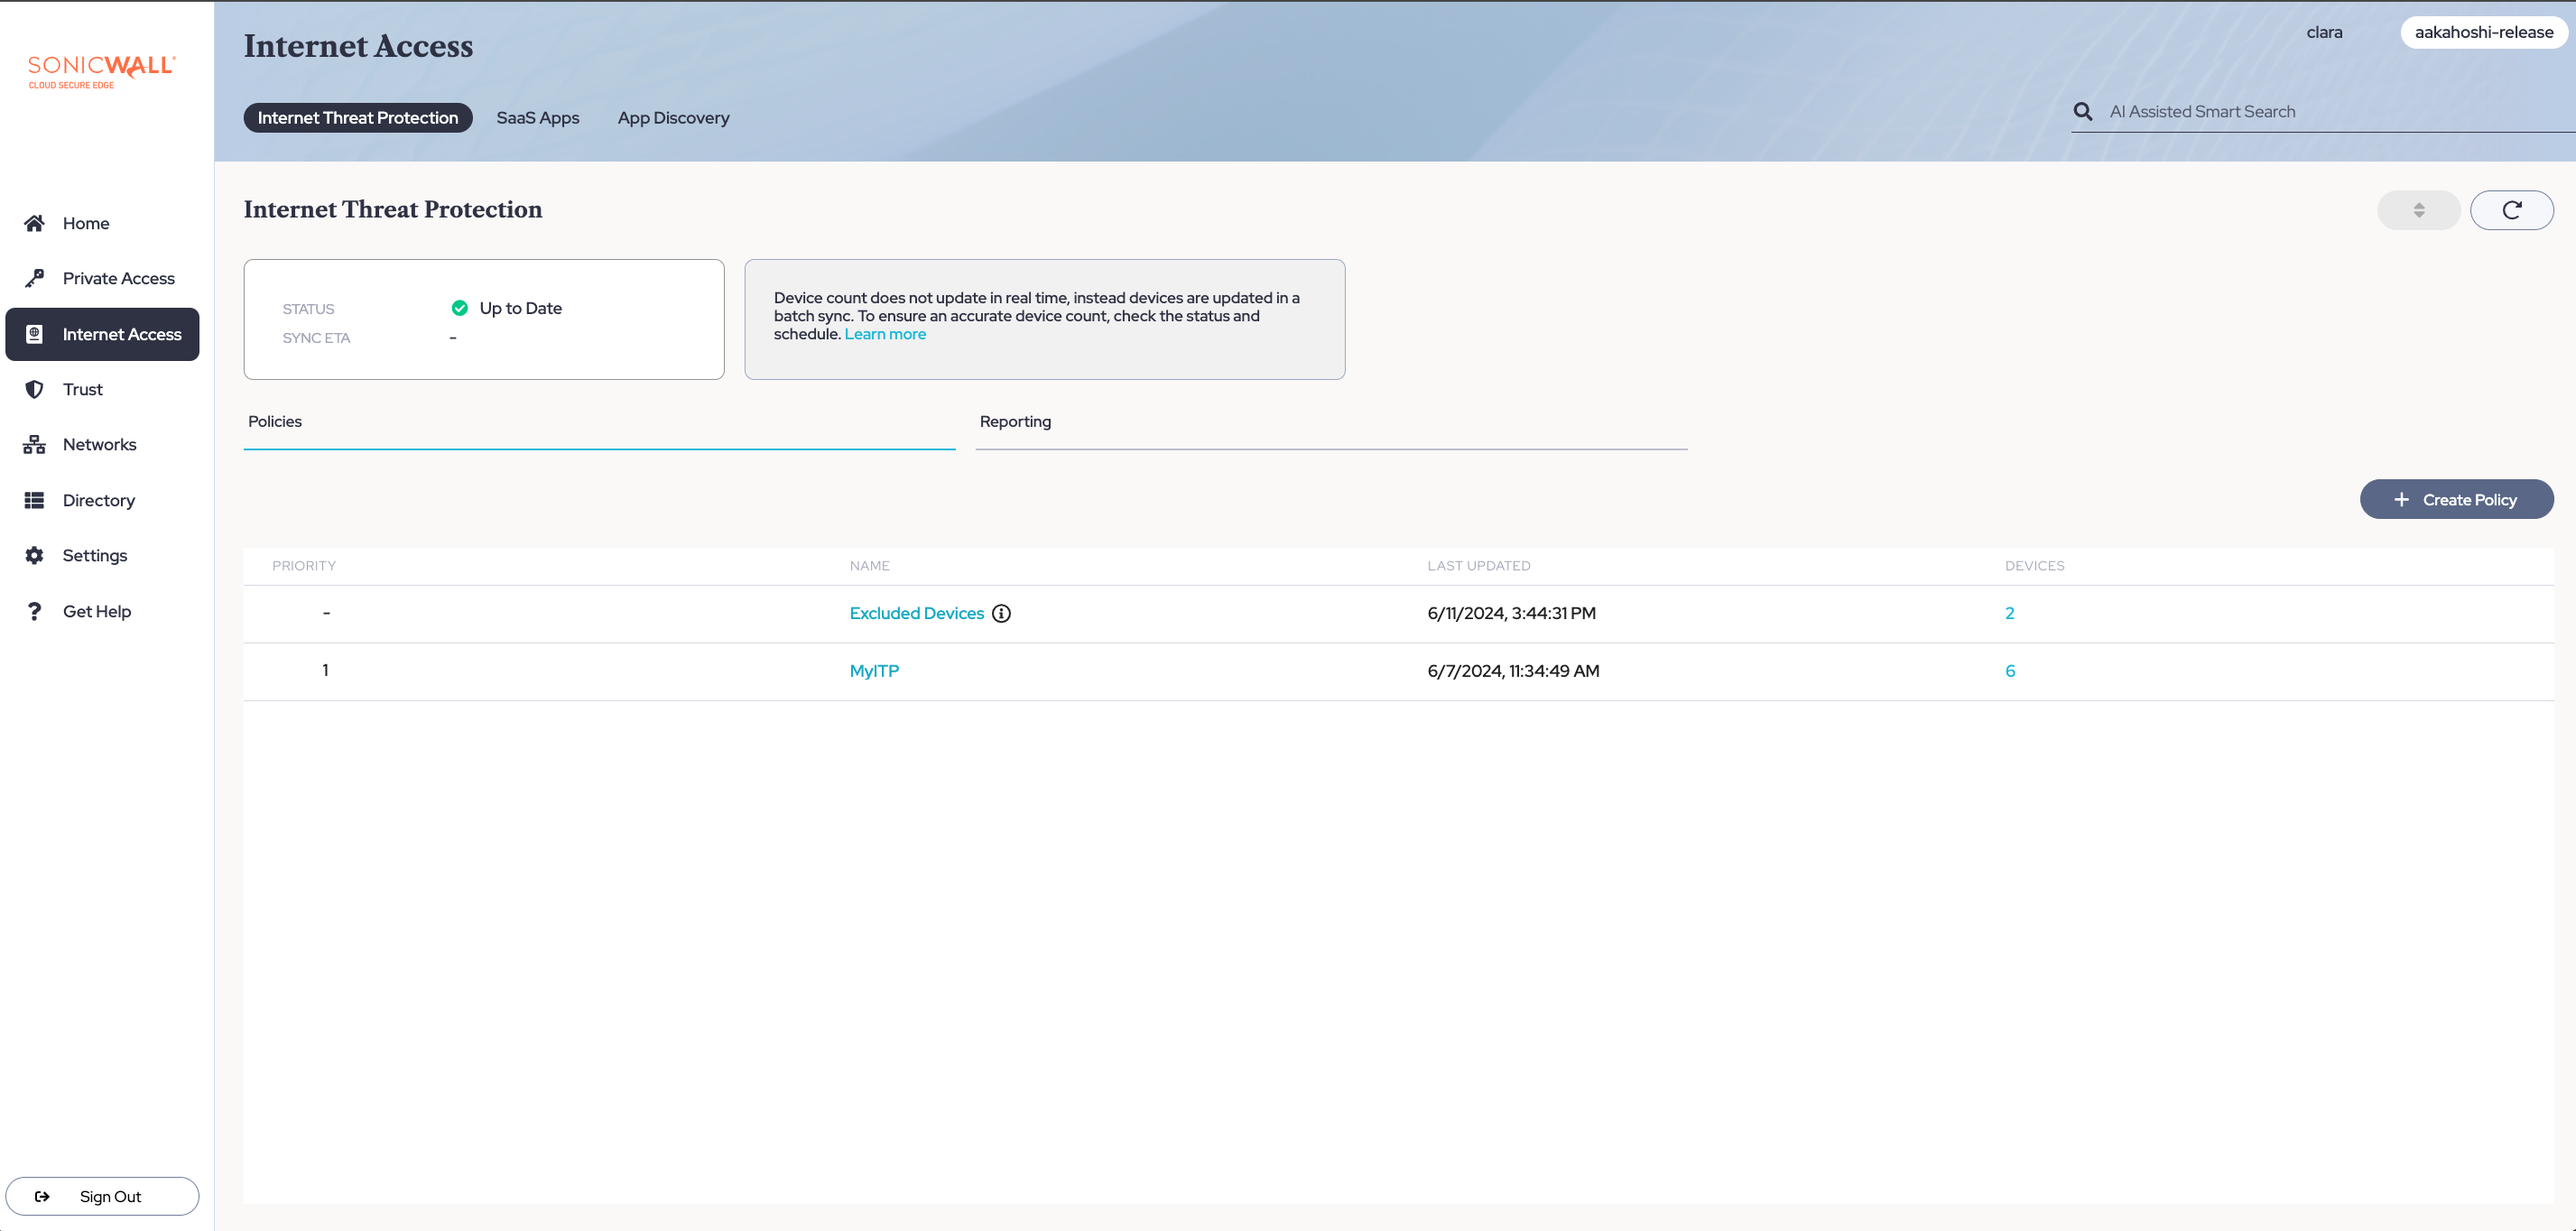
In the Command Center, go to Internet Access > Internet Threat Protection, and then select + Create Policy. The policy wizard has three steps: Assignment, Blocking, and Bypass.
Step 1: Assignment
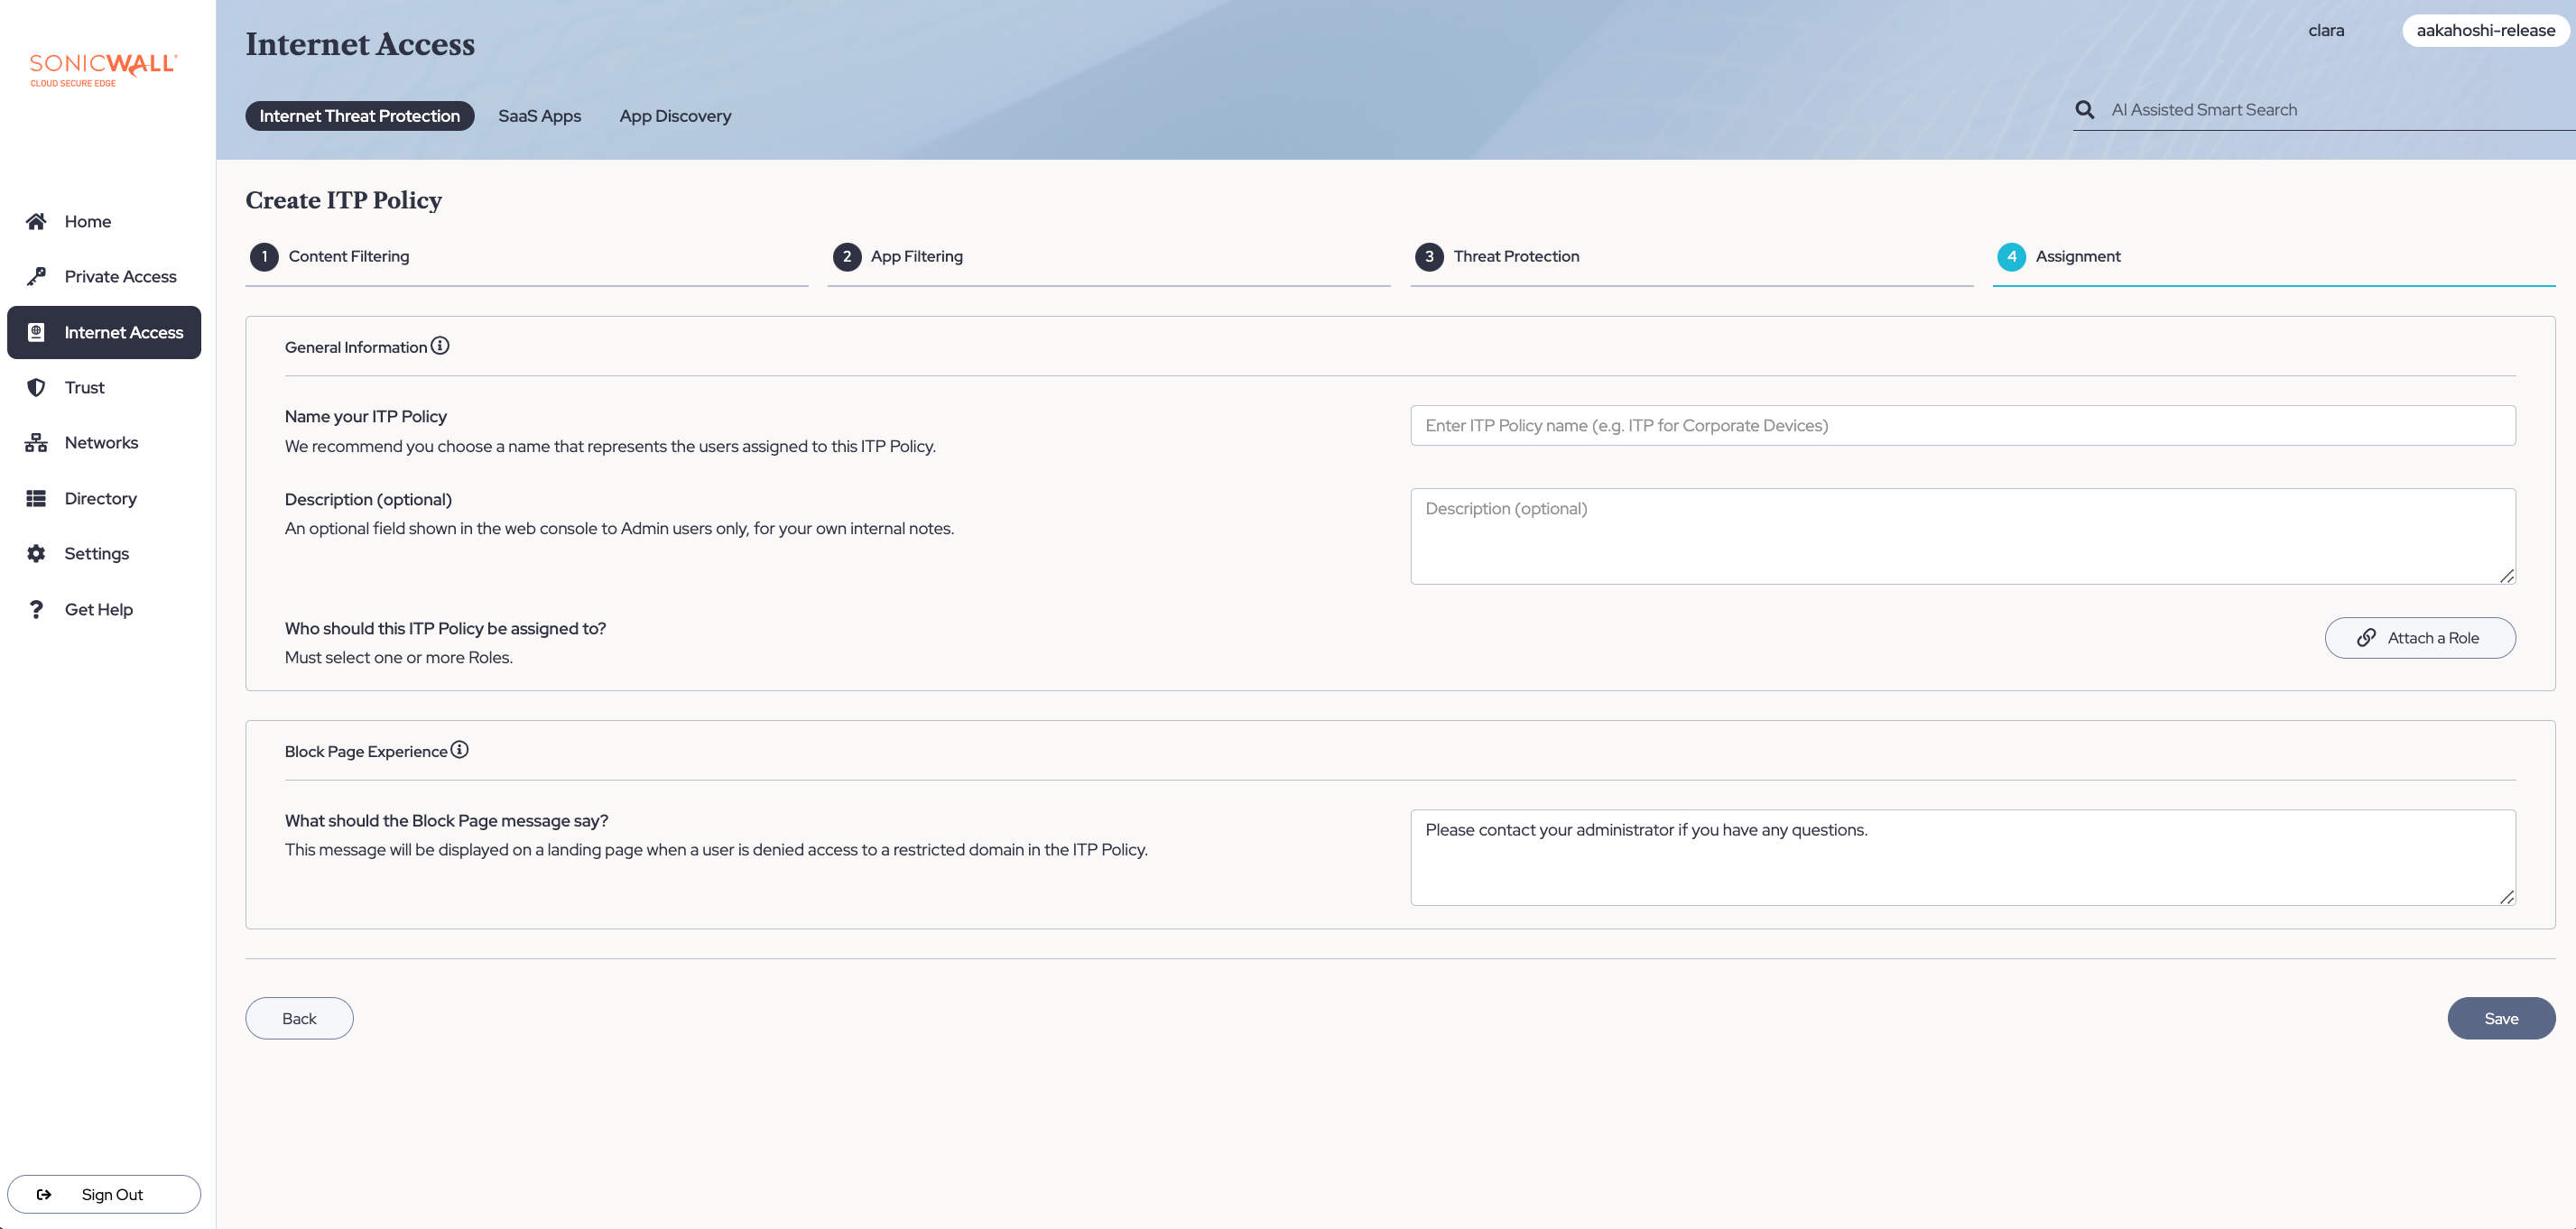
1.1 Under General Information, enter a name in Name your ITP Policy. Choose a name that describes the users the policy applies to, so other admins can tell policies apart in the list.
1.2 Optional: Enter a Description. Only admins see it in the Command Center.
1.3 Select Attach a Role, and then select one or more roles. The policy applies to the devices of users in those roles. You must attach at least one role.
1.4 Turn Enable Advanced Configurations on or off. This toggle turns on TLS decryption for the policy, and it does nothing else.
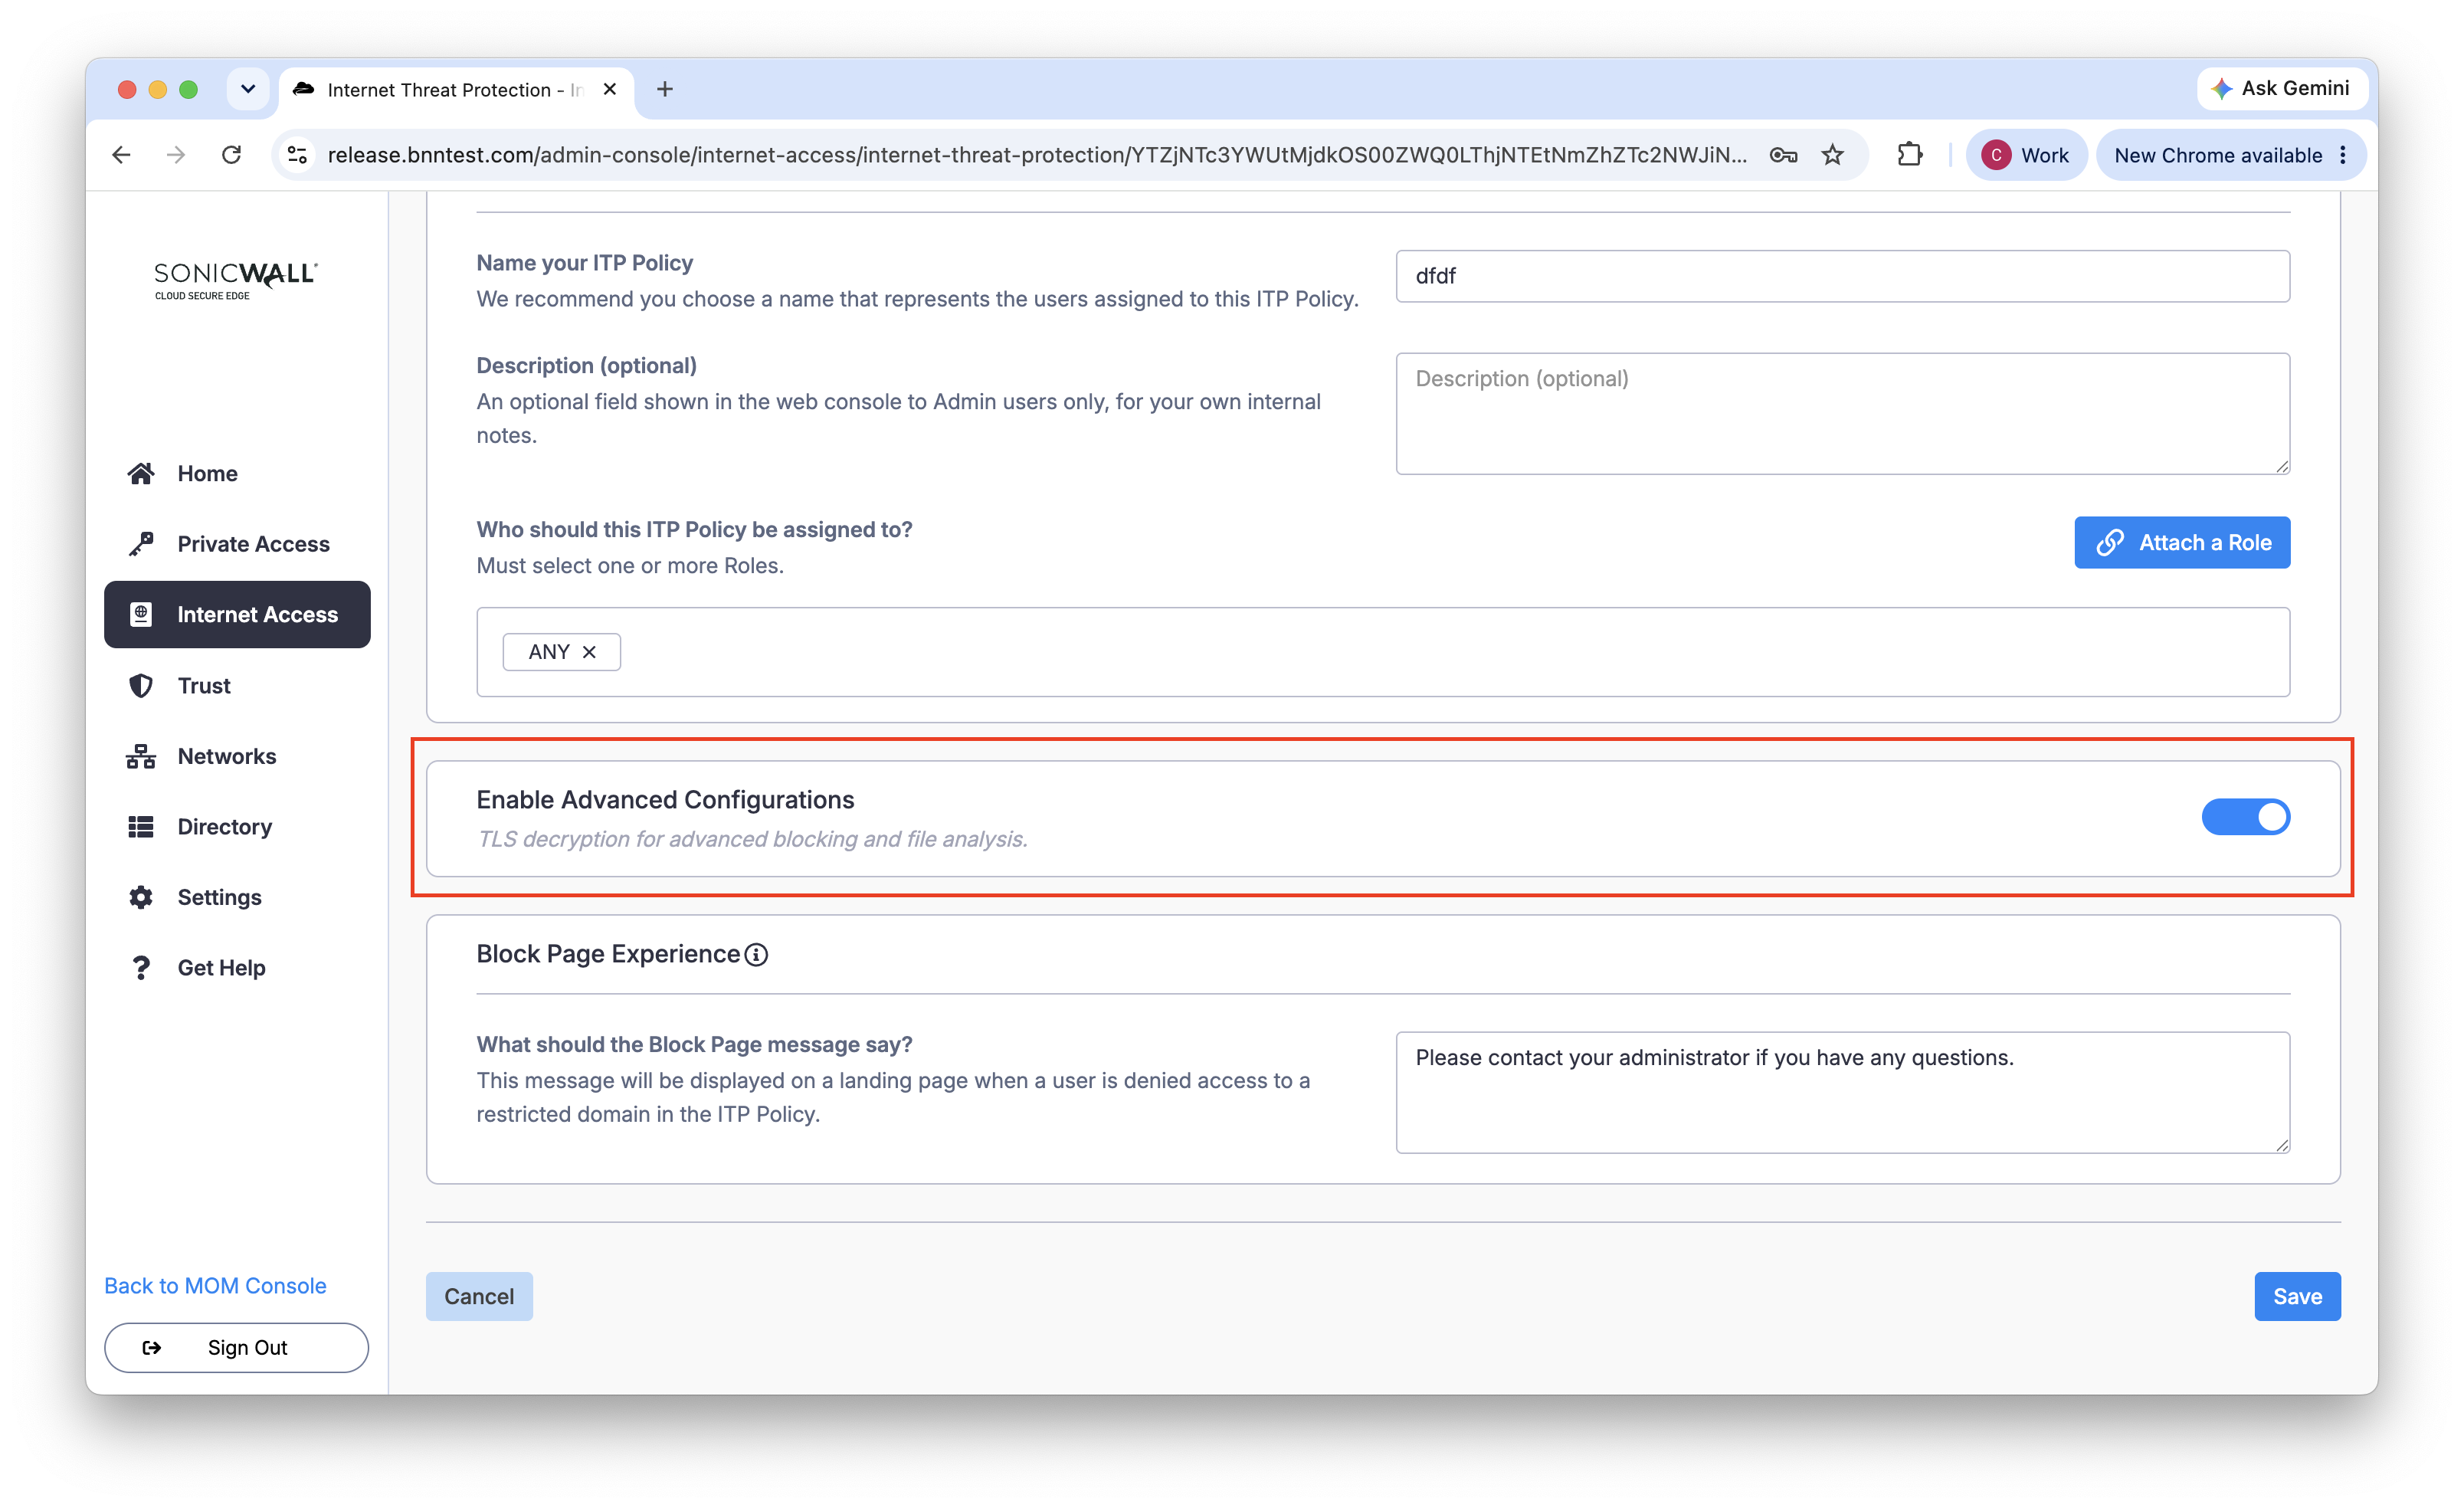
- On. The Blocking step shows Domain and URL Blocking, which accepts domain entries and URL entries. It also shows Require Approved Accounts for AI Apps, Risk-based URL Blocking, and File Analysis. The Bypass step shows Domain and URL Bypass.
- Off. The Blocking step shows Domain Blocking and hides the three toggles that need decryption. The Bypass step shows Domain Bypass. URL entries already on the policy stay there, but ITP does not enforce them.
Note: If the policy already has URL entries when you turn the toggle off, the console shows a warning. If you continue, the console outlines the URL entries in red and shows an inline error saying they are not enforced. If you turn the toggle back on, ITP enforces those URL entries again without re-entry.
1.5 Under Block Page Experience, enter the message that users see when ITP blocks a site.
1.6 Select Next.
Step 2: Blocking
The Blocking step lists the types of traffic you can block. Which toggles appear depends on Enable Advanced Configurations in Step 1:
- Off. The step shows Category Blocking, Application Blocking, Domain Blocking, and Geo-Blocking.
- On. Domain Blocking becomes Domain and URL Blocking, and three more toggles appear: Require Approved Accounts for AI Apps, Risk-based URL Blocking, and File Analysis.
Turn on each type of blocking you want:
2.1 Optional: Turn on Category Blocking, and then select the content categories to block.
2.2 Optional: Turn on Application Blocking, and then select the apps to block.
The apps you can select come from the CSE catalog of more than 6,000 categorized applications, plus any custom applications you created. Application Blocking matches named applications, not categories. To block a whole category, such as generative AI, filter App Discovery by that category, and then select each application here.
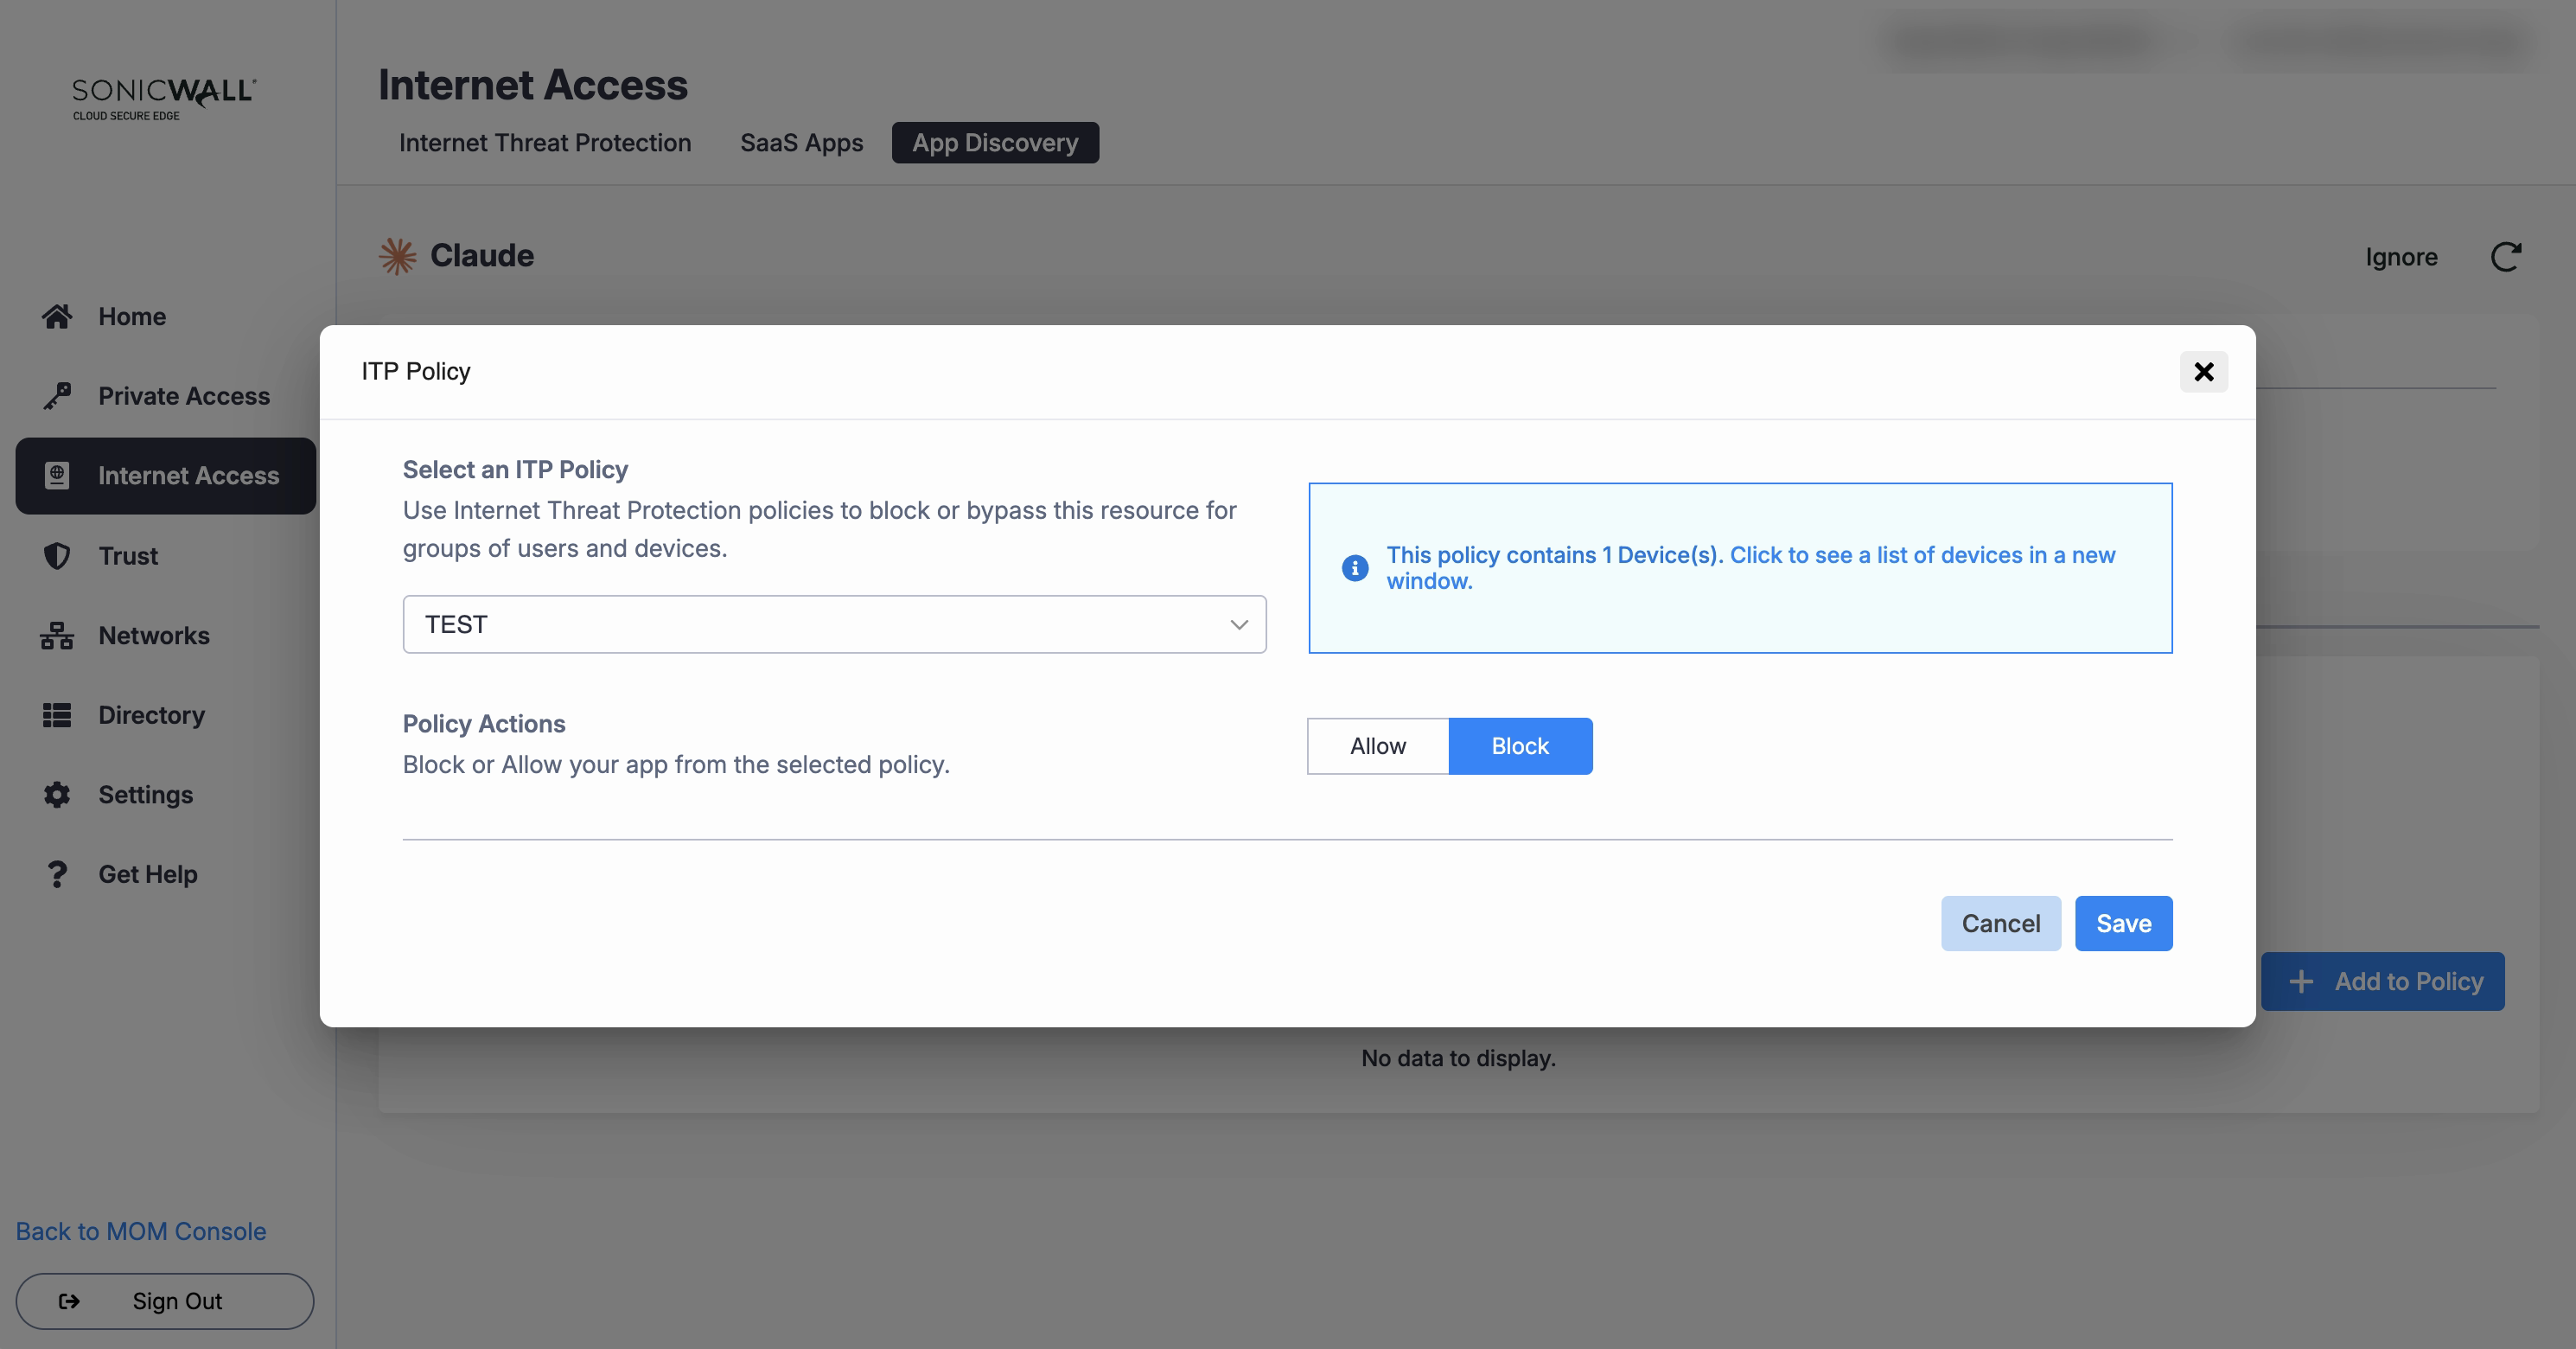
You can also add an application to this policy from its App Discovery page, without opening the policy. In Internet Access > App Discovery, select the application, select Add to Policy, and pick this policy. Then select Block to add the application to Application Blocking, or Allow to add it to Application Bypass. The access log on the same page shows which users the change affects.
2.3 Optional: Turn on Domain Blocking, or Domain and URL Blocking if TLS decryption is on, and then enter each domain or URL to block. To add another entry, select +.
Note: ITP enforces URL entries only when TLS decryption is on. It enforces domain entries in both modes.
2.4 Optional: Turn on Require Approved Accounts for AI Apps to require that users sign in to AI apps with a company account. Under Approved email domains, enter each email domain your organization signs in with.
ITP blocks prompts sent from a personal, free, or anonymous account on a supported AI app. The rest of the user’s access to that app is unaffected. The console lists the supported apps, which currently are Microsoft Copilot, Claude, Google Gemini, and ChatGPT.
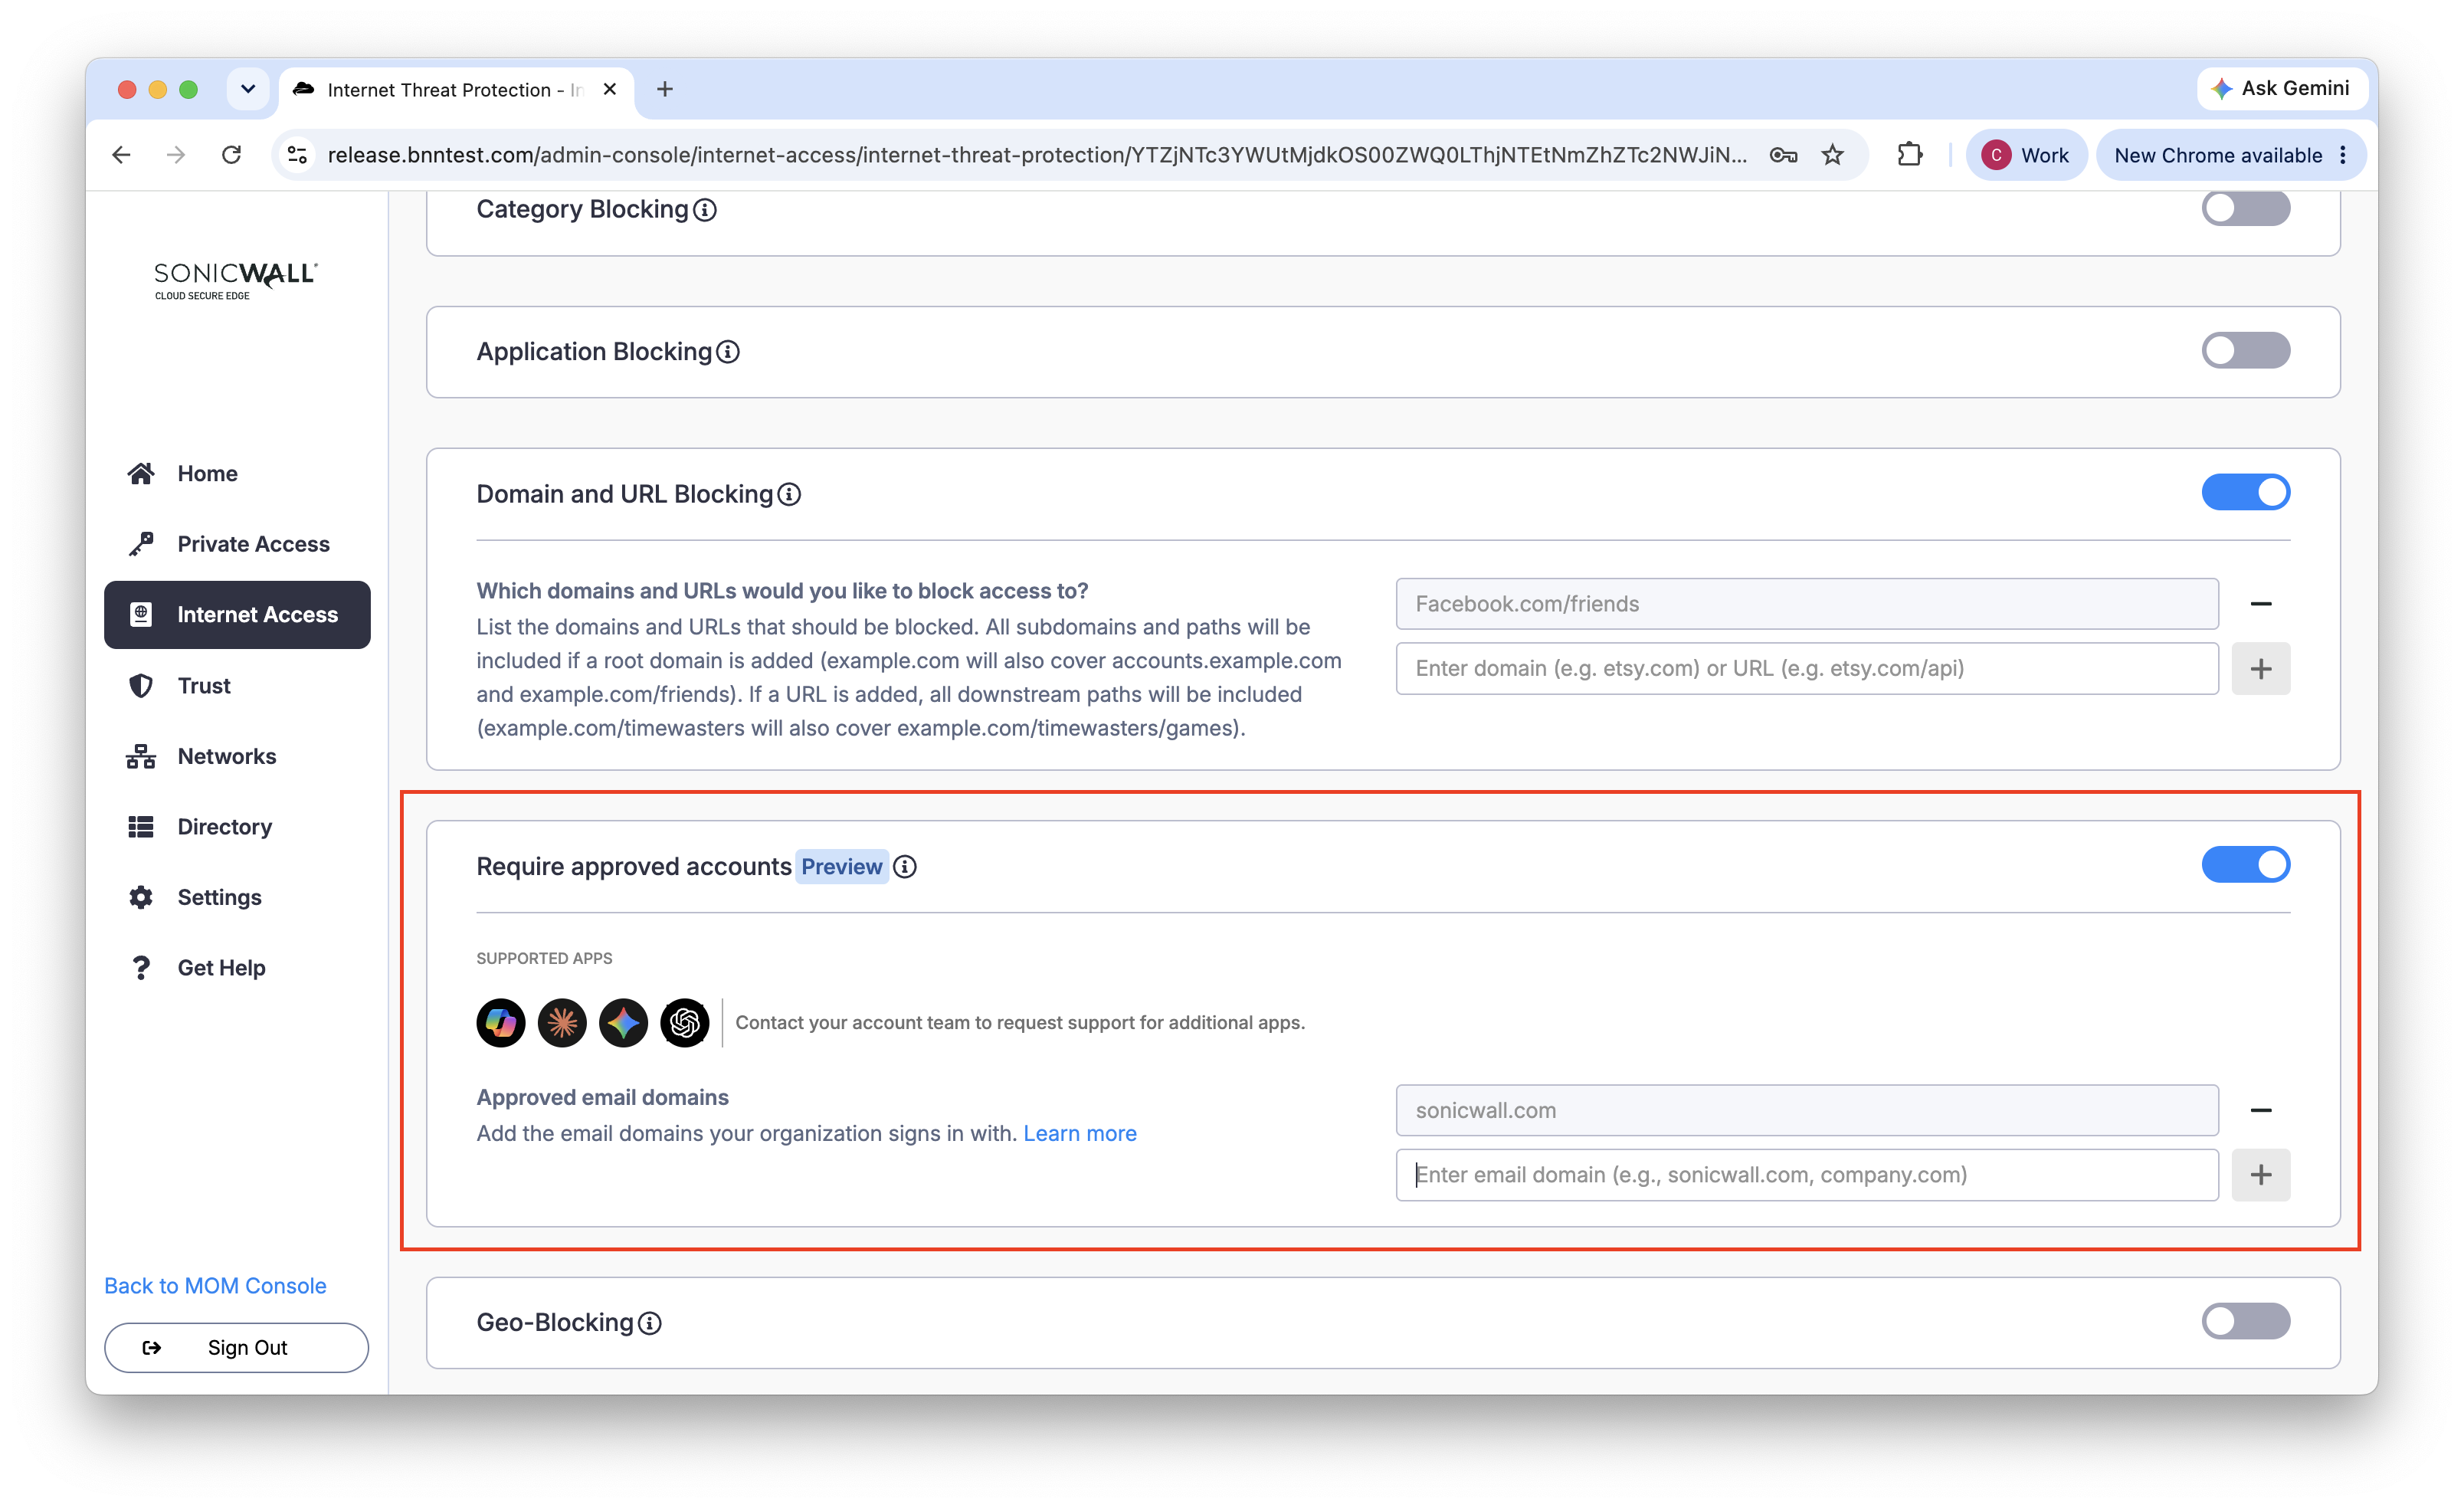
Note: Require Approved Accounts for AI Apps is a preview feature. It needs an SIA Advanced license, and it appears only when TLS decryption is on. For what users experience and the current preview limitations, see Require Approved Accounts for AI Apps.
2.5 Optional: Turn on Geo-Blocking to block IP ranges associated with specific countries. Select + Select countries, and then select the countries. To remove a country, select the x next to its name.
Note: Geo-Blocking needs an SIA Advanced license.
2.6 Optional: Turn on Risk-based URL Blocking to block URLs that ITP rates as risky. This toggle appears only when TLS decryption is on. See Risk-based URL Filtering.
2.7 Optional: Turn on File Analysis to scan downloaded files for malware and block malicious files. This toggle appears only when TLS decryption is on. See Malware Download Protection.
2.8 Review Auto enabled threat protection. Expand the card to see the threat categories that ITP blocks for every policy:
- Bots / Cryptomining
- Dangerous Configuration / History
- Dangerous 3rd Party Infrastructure
- Dangerous Nameserver
- Malicious SSL Cert
- Malware & Ransomware
- Malware C2
- Phishing
- Risky DNS Transactions
- Spam / Ad Fraud / Spyware
- Other Known Bad (Community Intelligence)
- New Domains, which are domains created within the last 30 days
You cannot turn these categories off. The one exception is the troubleshooting window described in Disabling ITP. While ITP is disabled on a device, all filtering on that device stops, including these categories, until ITP turns back on.
2.9 Select Next.
Step 3: Bypass
Bypassed traffic skips every ITP rule, including the auto-enabled threat protection categories, and it does not appear in logging. Keep bypass entries as narrow as you can.
3.1 Optional: Turn on Domain Bypass, and then enter each domain that should skip ITP, such as salesforce.com. To add another entry, select +. If TLS decryption is on, this setting is Domain and URL Bypass and also accepts URL entries.
Include all of your internal domains. ITP resolves DNS from public resolvers, which do not have the records for your internal resources, so users cannot reach internal domains that are not bypassed.
Each entry also covers everything under it. URL entries work only when TLS decryption is on.
| You enter | ITP also bypasses | ITP does not bypass |
|---|---|---|
example.com |
accounts.example.com, example.com/corporatepage |
Nothing on the domain |
example.com/brandcampaign |
example.com/brandcampaign/register |
example.com/corporatepage |
To bypass only part of a site, enter the narrowest URL that works. A domain entry bypasses the whole site.
3.2 Optional: Turn on Application Bypass, select + Select Apps, and then select the apps that should skip ITP.
Warning: Adding a supported AI app to Application Bypass, or adding one of its domains to Domain Bypass, turns off Require Approved Accounts enforcement for that app. A parent domain such as google.com counts. See Bypassed apps and domains.
3.3 Select Save.
Migration from URL Allowlist and Explicit URL Blocking
Earlier versions of the ITP policy split URL exceptions and URL blocks into separate URL Allowlist and Explicit URL Blocking sections under Risk-based URL Filtering. Those sections have been consolidated:
- Entries previously listed in URL Allowlist are now part of Domain and URL Bypass.
- Entries previously listed in Explicit URL Blocking are now part of Domain and URL Blocking.
Migration is automatic. No action is required from admins on existing policies — your URL entries are preserved in the new fields. Policies that previously had Risk-based URL Filtering or File Analysis enabled retain those settings, gated on TLS decryption staying on.
Edit or Delete an ITP Policy
In the Command Center, navigate from Internet Access > Internet Threat Protection. From your list of ITP policies, select the Name of one you want to edit or delete.
Edit
1. To edit, select the pencil icon in the top right corner of the ITP policy page.
2. Adjust your toggles on the Assignment, Blocking, or Bypass tab.
3. Select Save.
Delete
1. To delete your ITP policy, select the trash icon in the top right corner of the ITP policy page.
2. A modal will pop up, double-checking if you want to delete your policy. Select Delete.
Prioritizing ITP Policies
Devices are not required to have an ITP policy associated with them; however, each device can only have one policy active at a time. ITP policies can be prioritized: higher priority policies will take precedence when two or more policies apply to one device (i.e., a device with multiple Roles and separate ITP policies applicable to each Role).
Exclude Users from ITP Policies
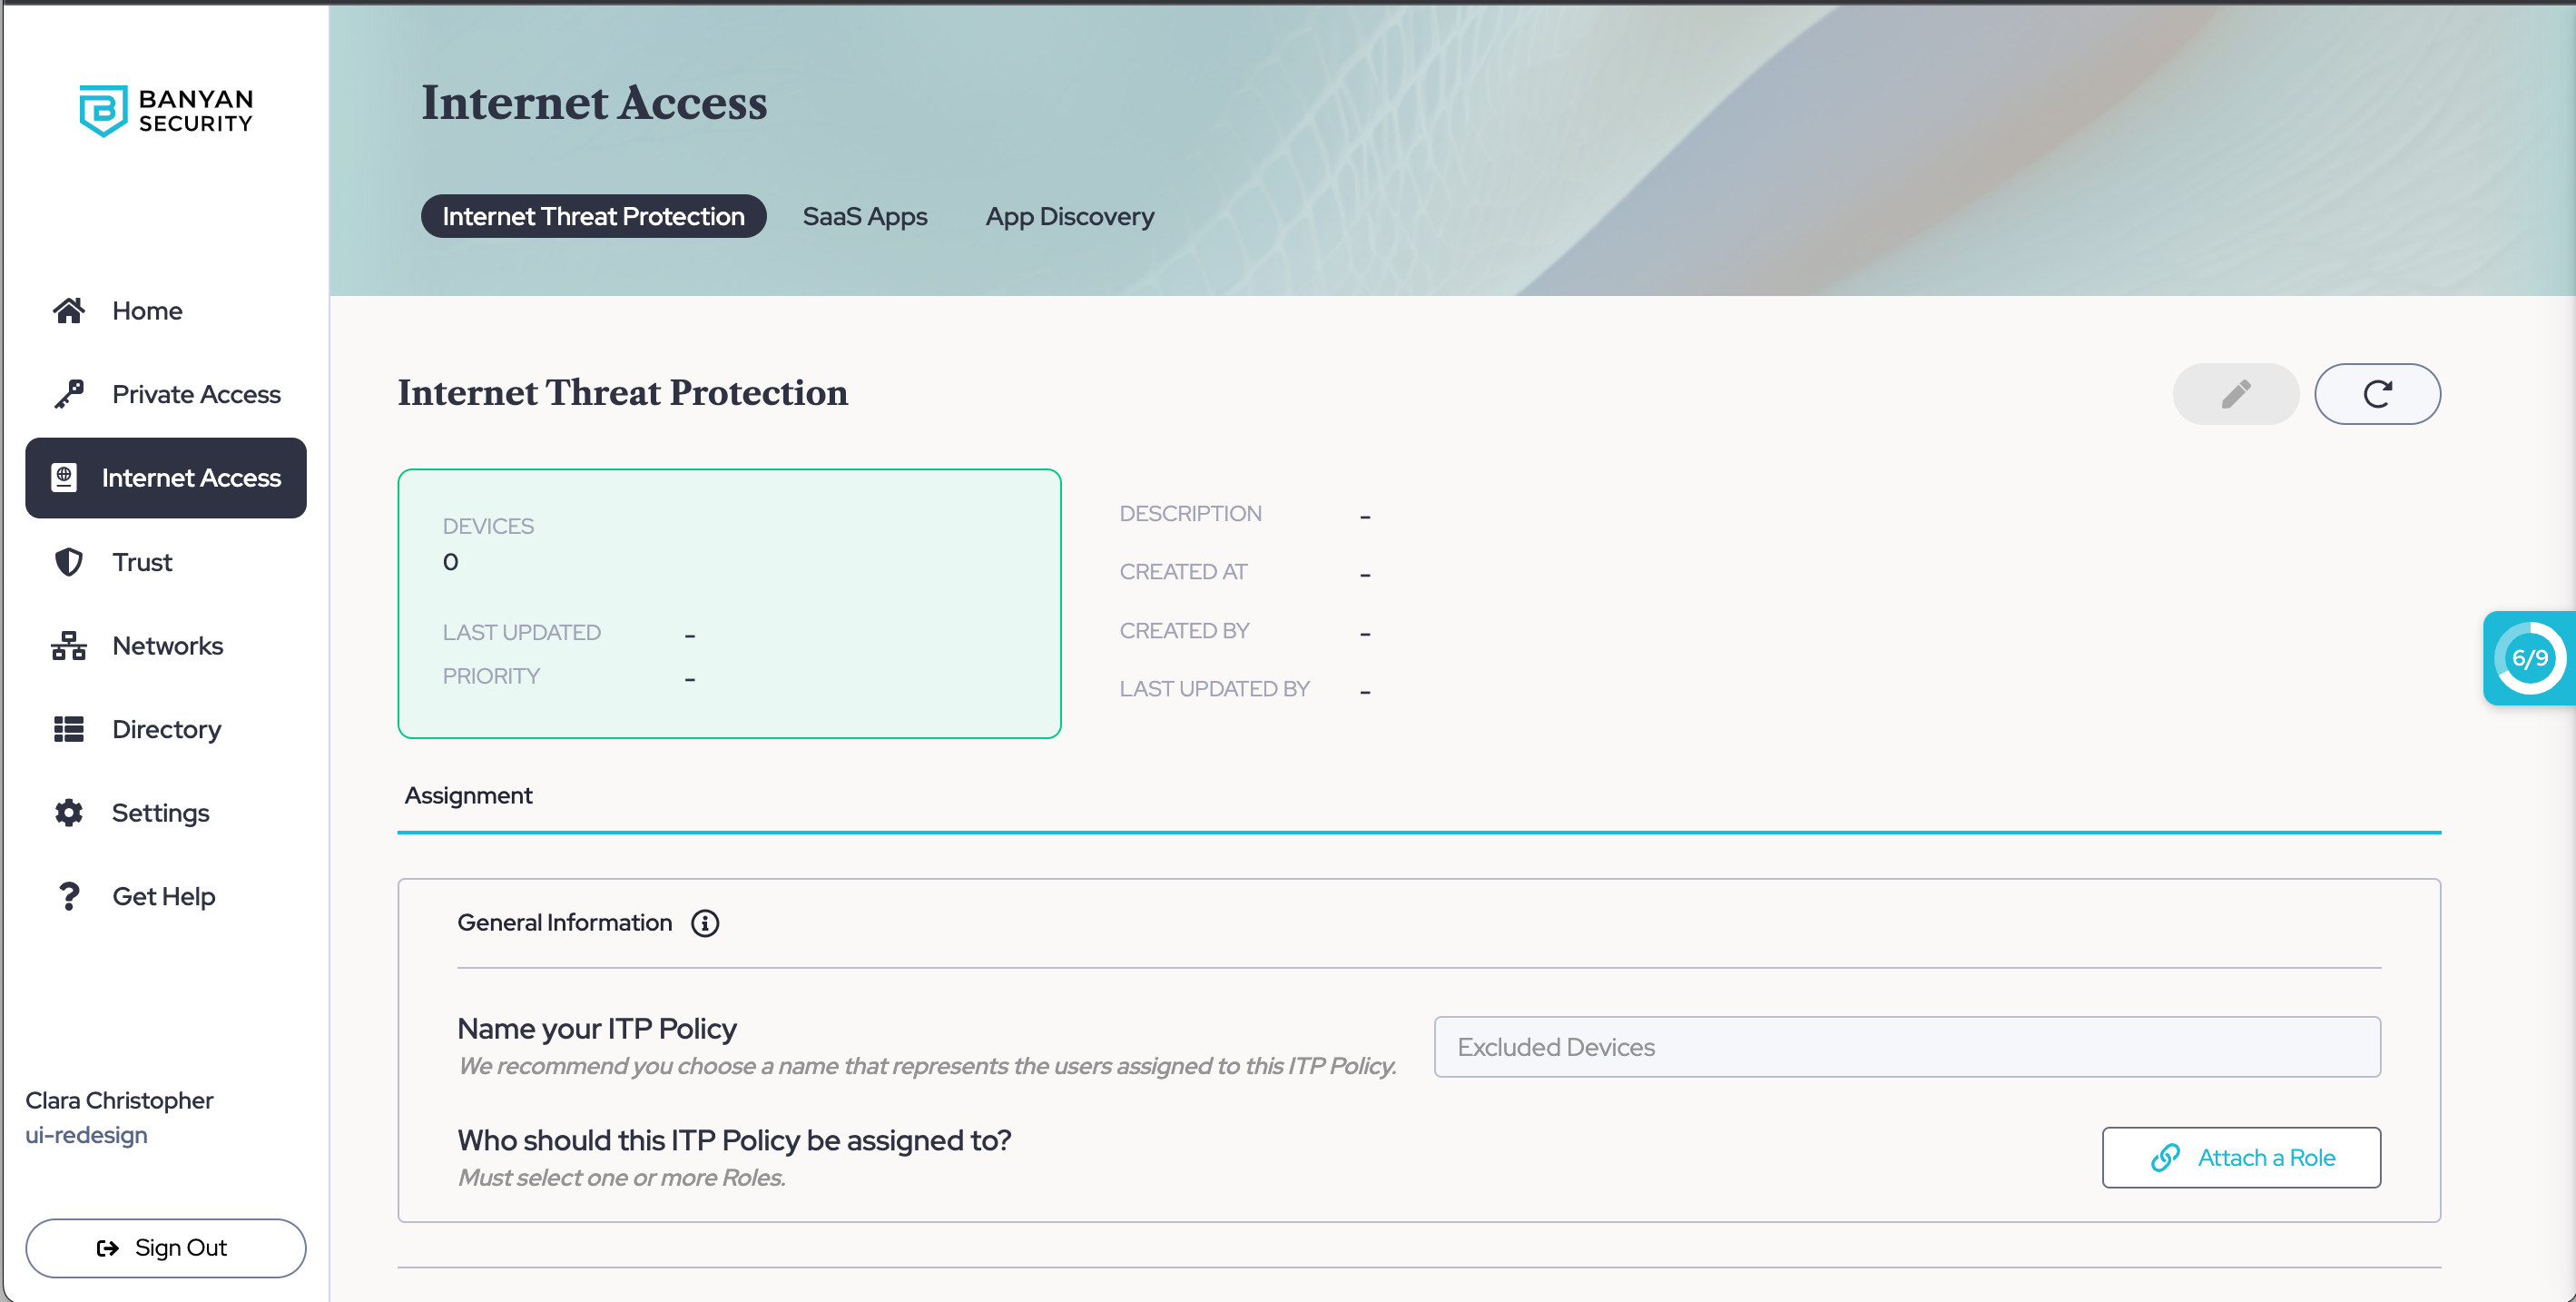
The exclude ITP policy (i.e., Excluded Devices) is always the highest priority and cannot be re-prioritized or deleted. The exclude policy will by default include a role called Mobile Devices that cannot be removed.
1. In the Command Center, navigate from Internet Access > Internet Threat Protection.
2. In your list of ITP policies, select the default Excluded Devices policy, and attach whichever Roles you want to be excluded from all ITP policies.
3. Select Save.
How to prioritize ITP policies
1. In the Command Center, navigate from Internet Access > Internet Threat Protection.
2. Select the Reorder button in the top right corner of the page (i.e., the button with an up and down arrow).
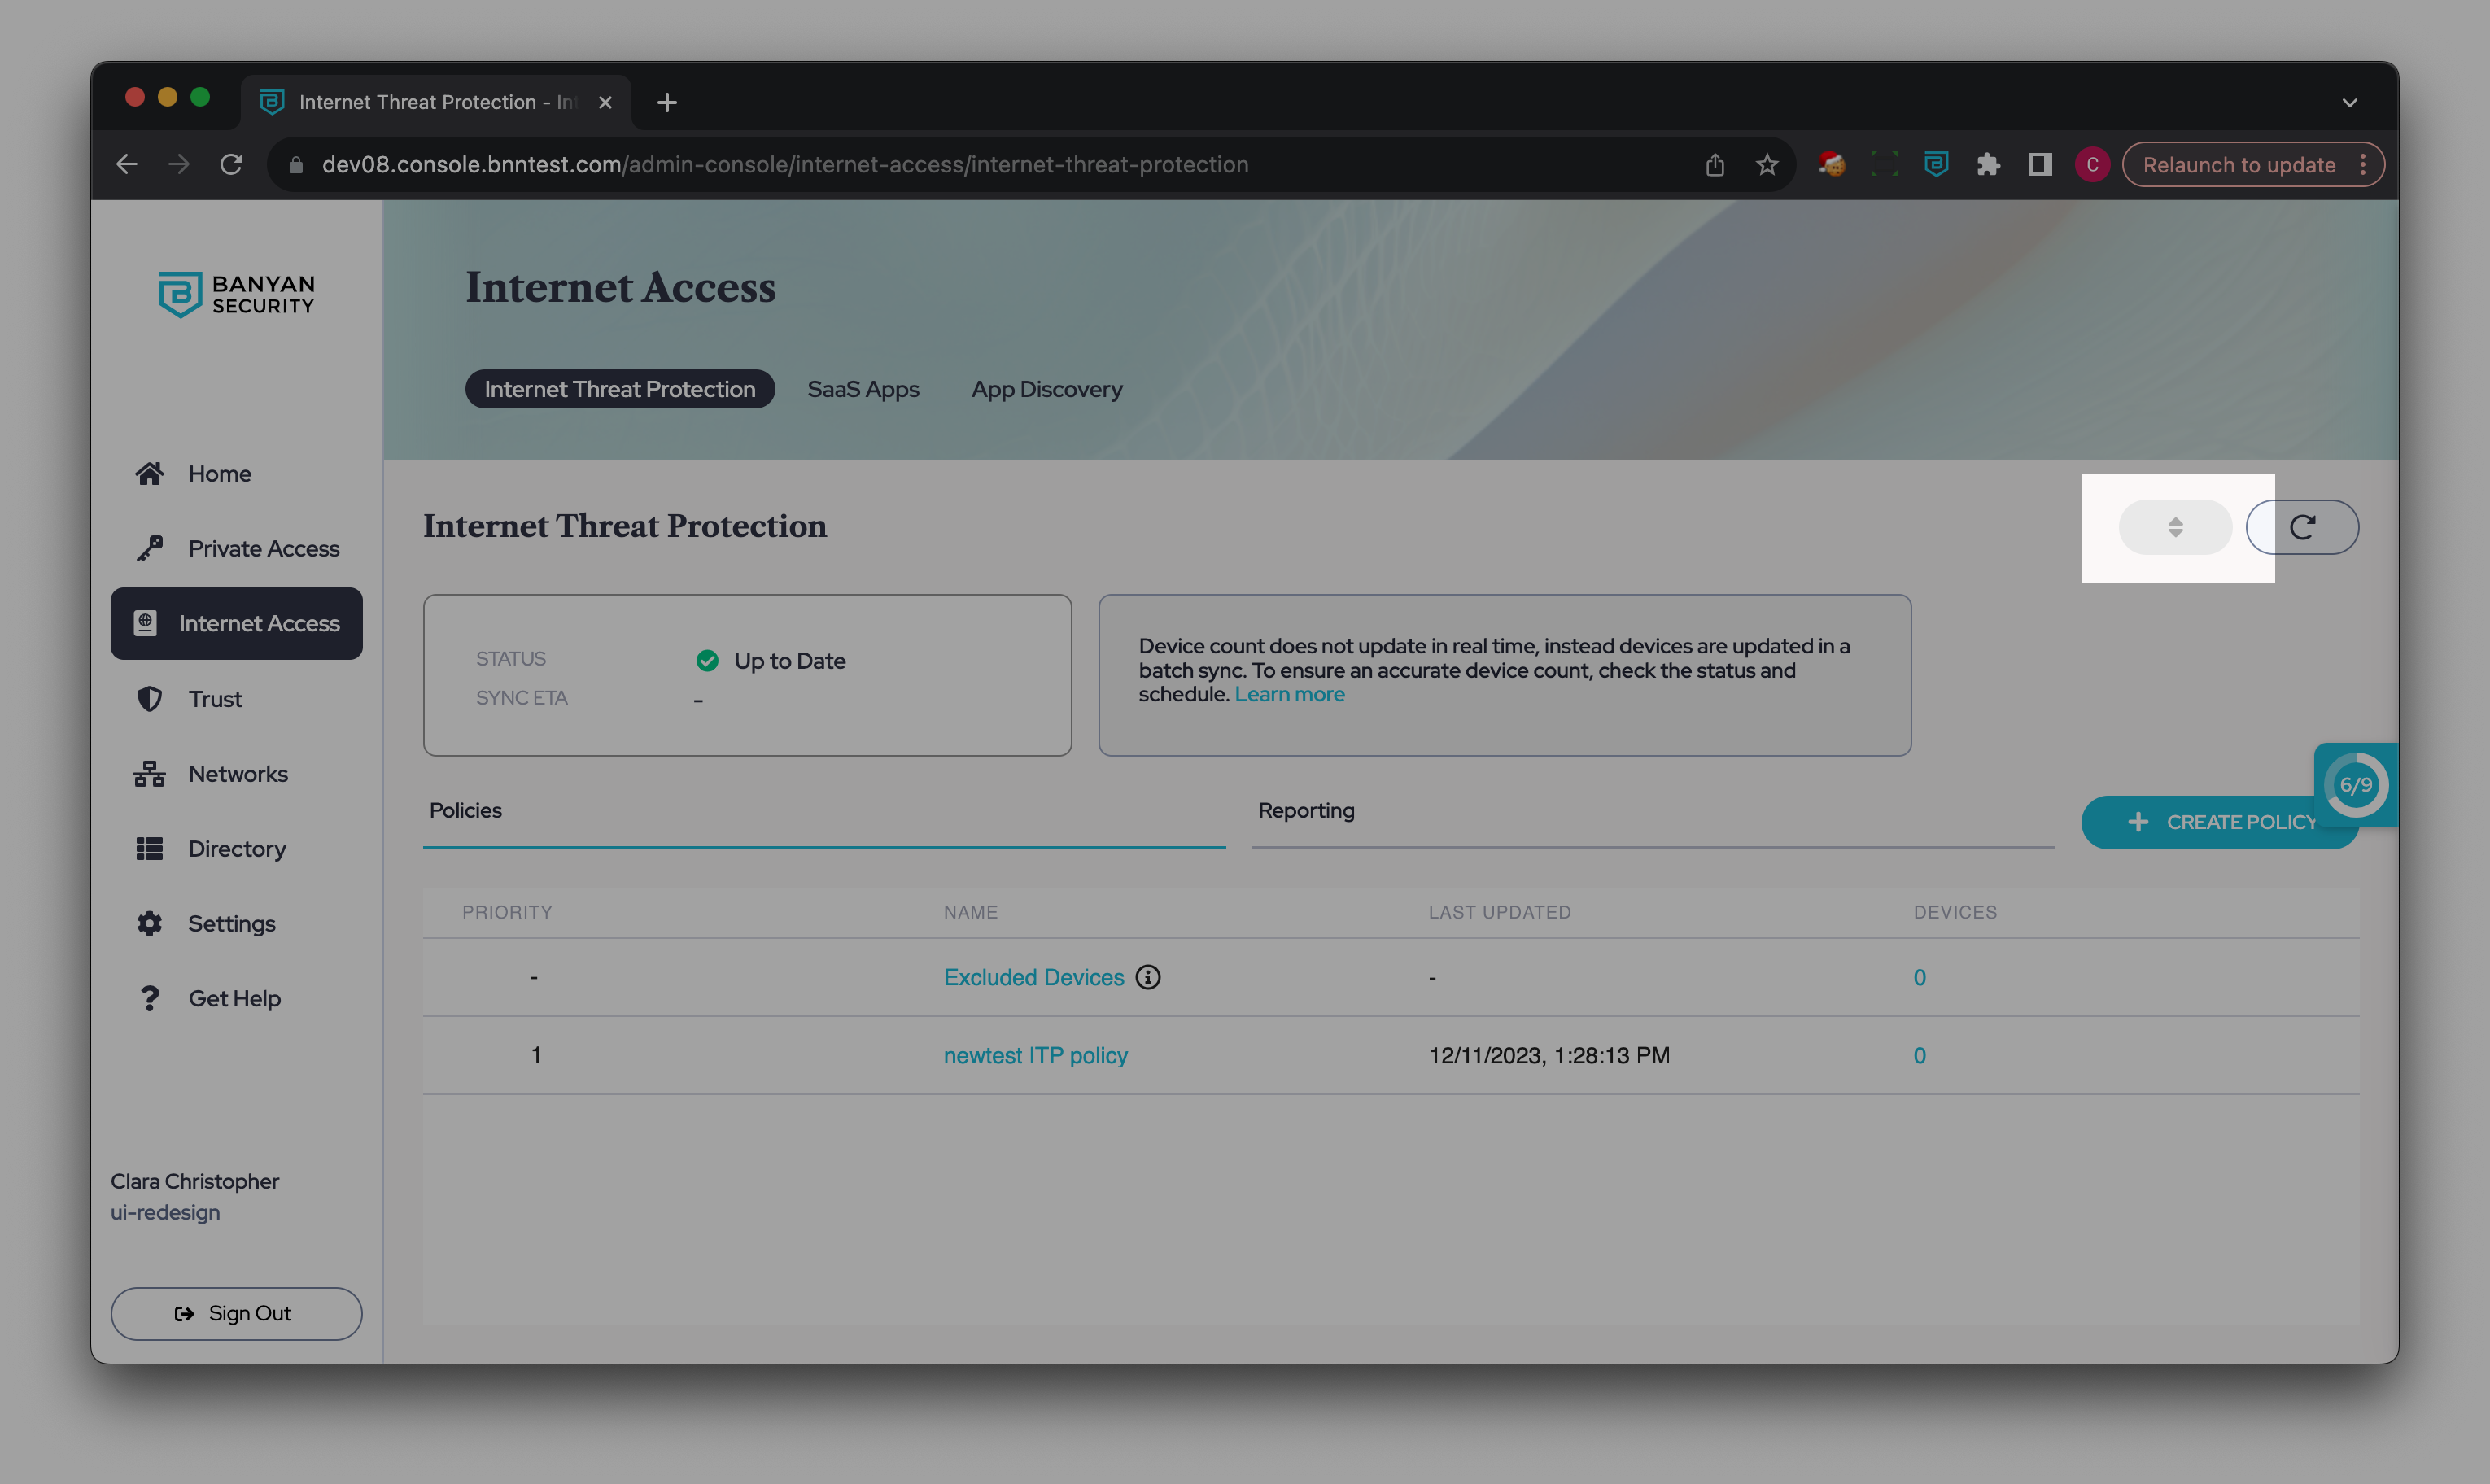
3. Drag your ITP policies into your preferred order of priority, where 1 is the highest priority.
4. Select Save.
ITP policy sync status
When ITP policy assignments are edited or policies are re-prioritized, the console does not typically reflect these changes immediately; for larger environments with many devices, syncs tend to take longer, and updates are only reflected in the console when CSE completes the next sync.
CSE’s sync status indicates whether the ITP policies page in the console is up-to-date or in progress. If a sync is in progress, then an ETA will also be available, so that admins can expect when ITP policy updates will be reflected in the console.
If the ITP policy sync status fails to complete, contact SonicWall CSE support.
Lookup Domain
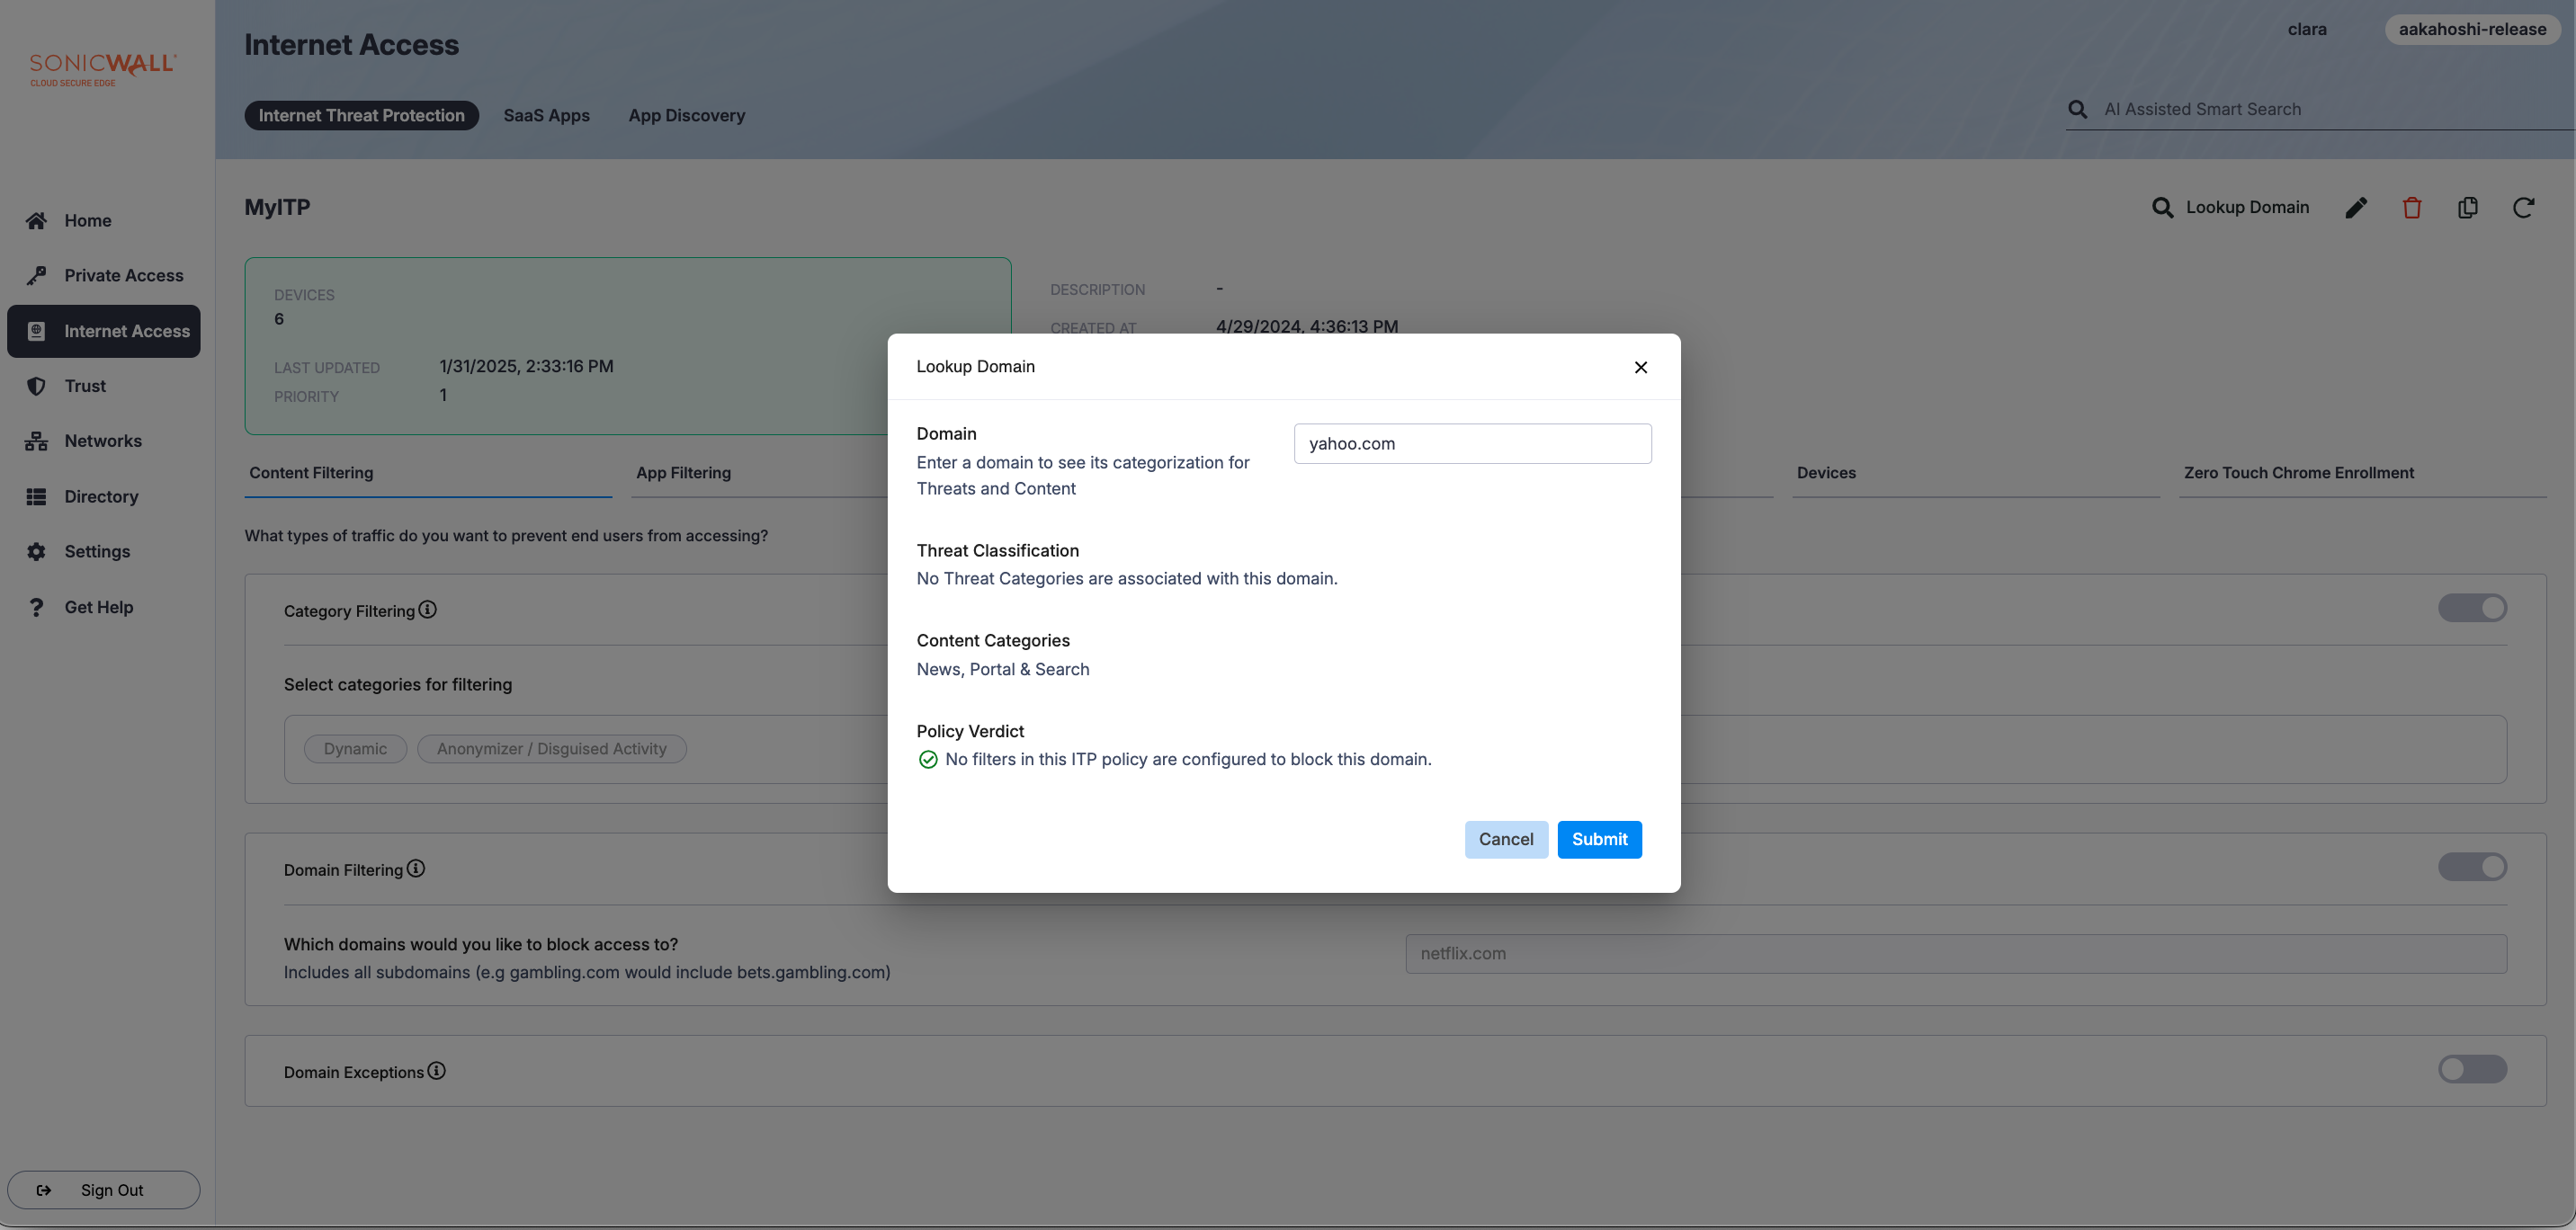
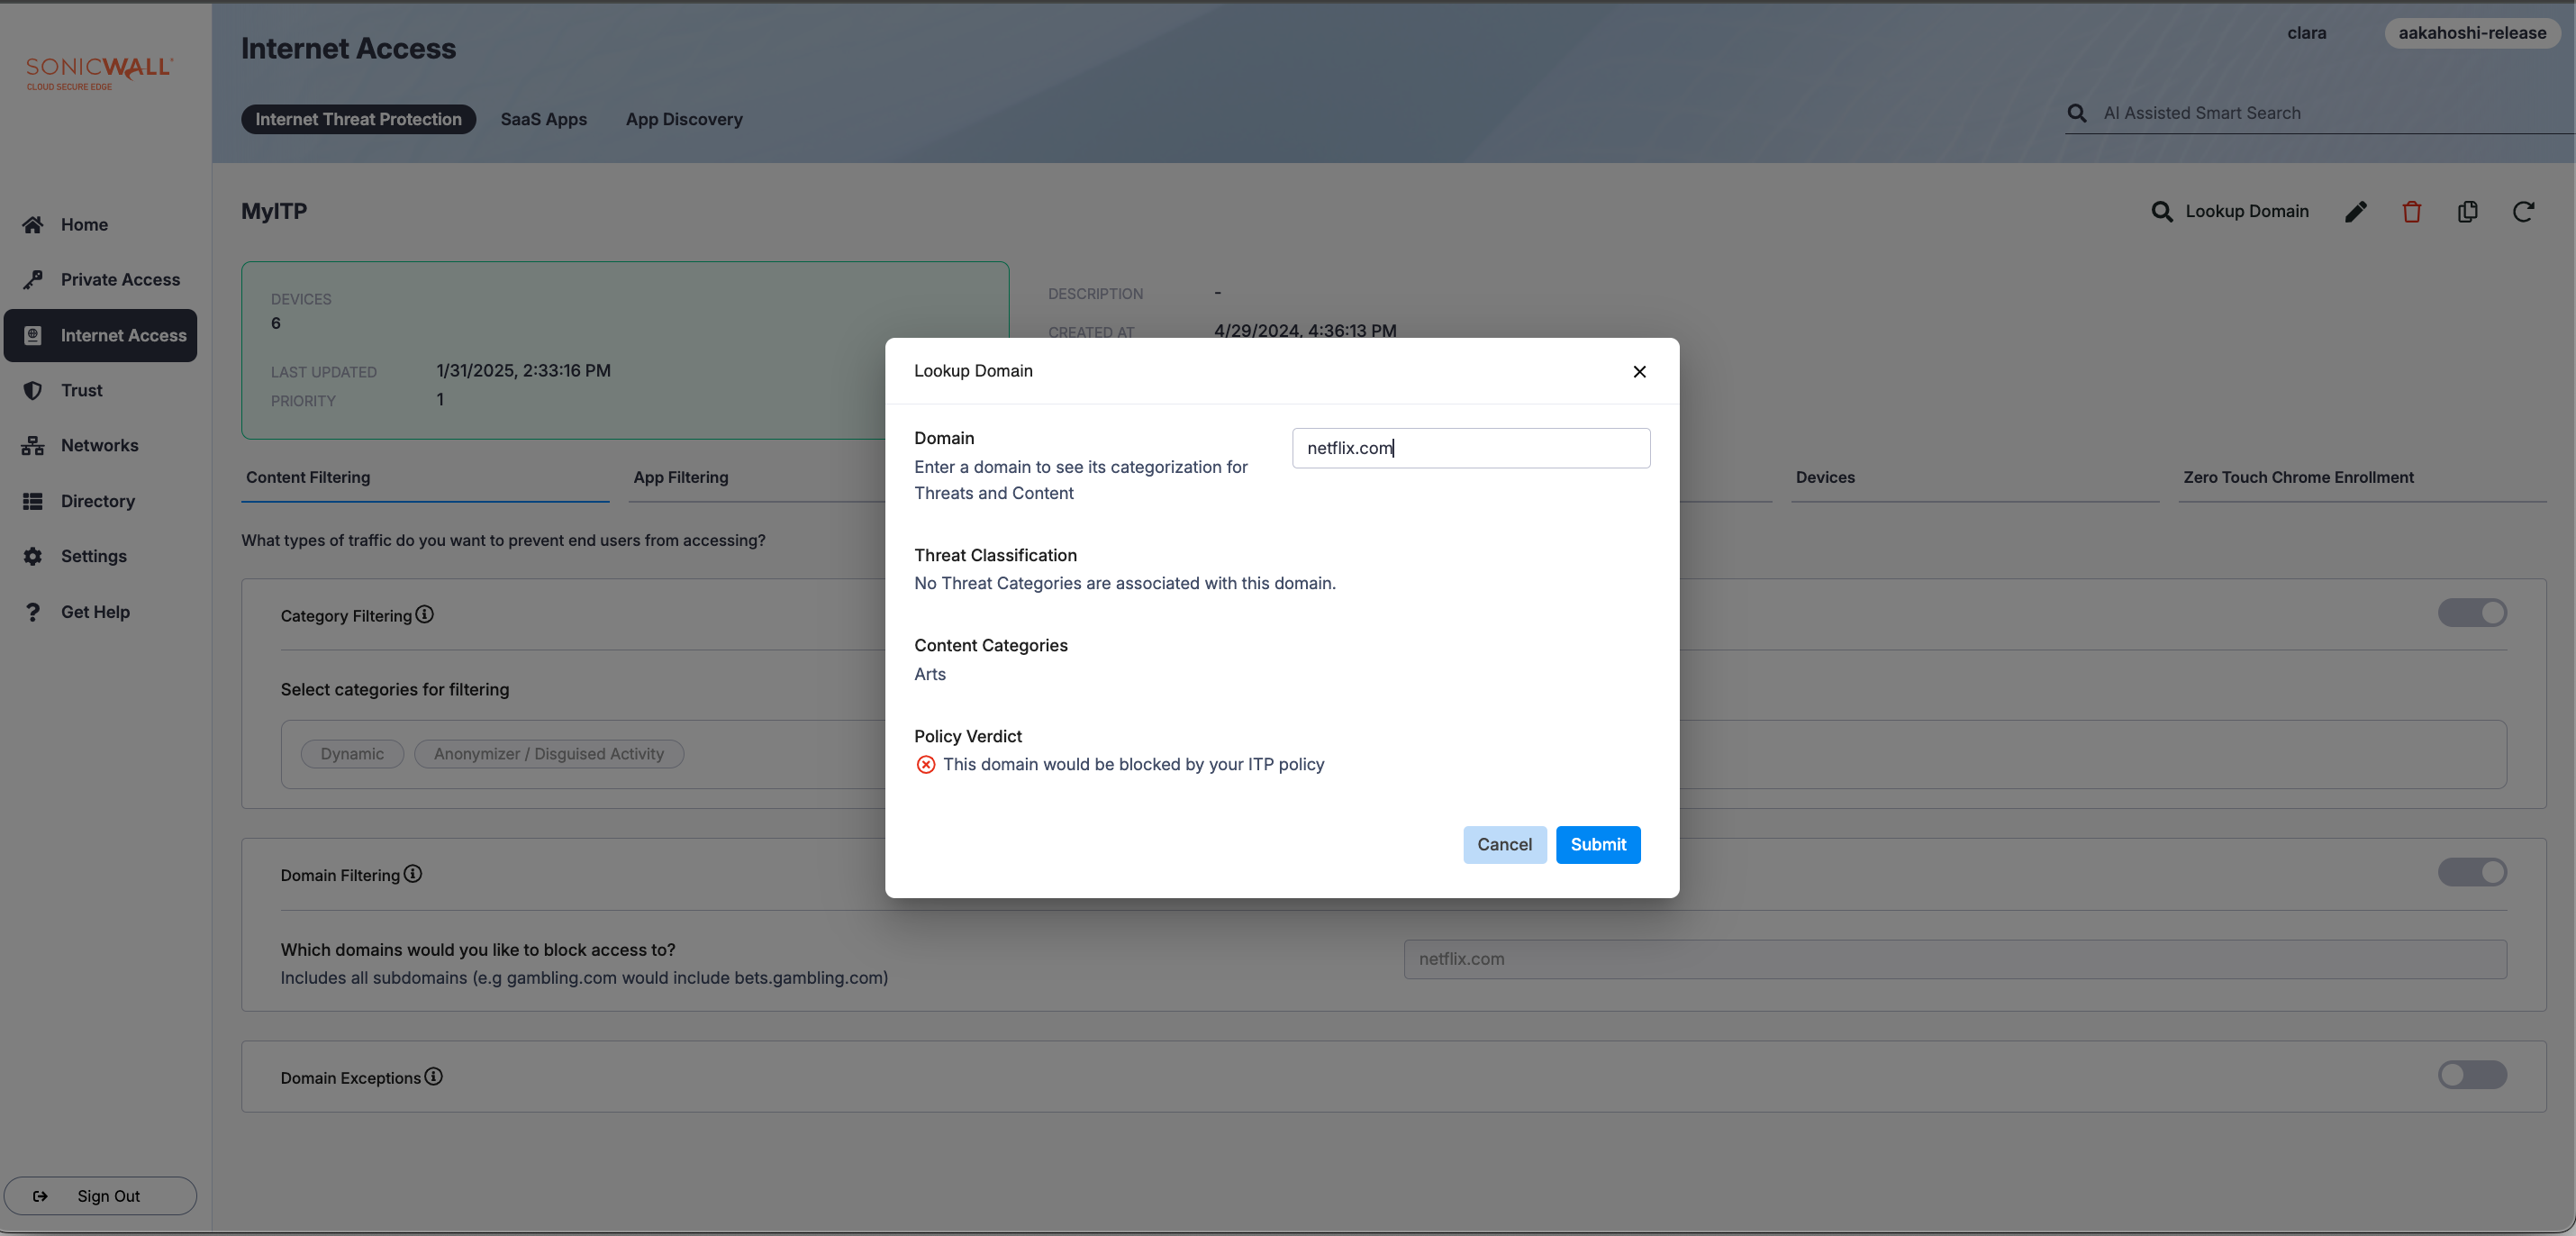
Lookup Domain allows admins to view which Content Categories and Threat Classification a given domain falls under. It also offers a Policy Verdict, indicating whether your ITP policy is configured to block or allow the searched domain. Lookup Domain is available as a feature for those who have enabled Internet Threat Protection in CSE.
To use Lookup Domain, navigate to an Internet Threat Protection (ITP) policy in the Command Center.
Disabling ITP
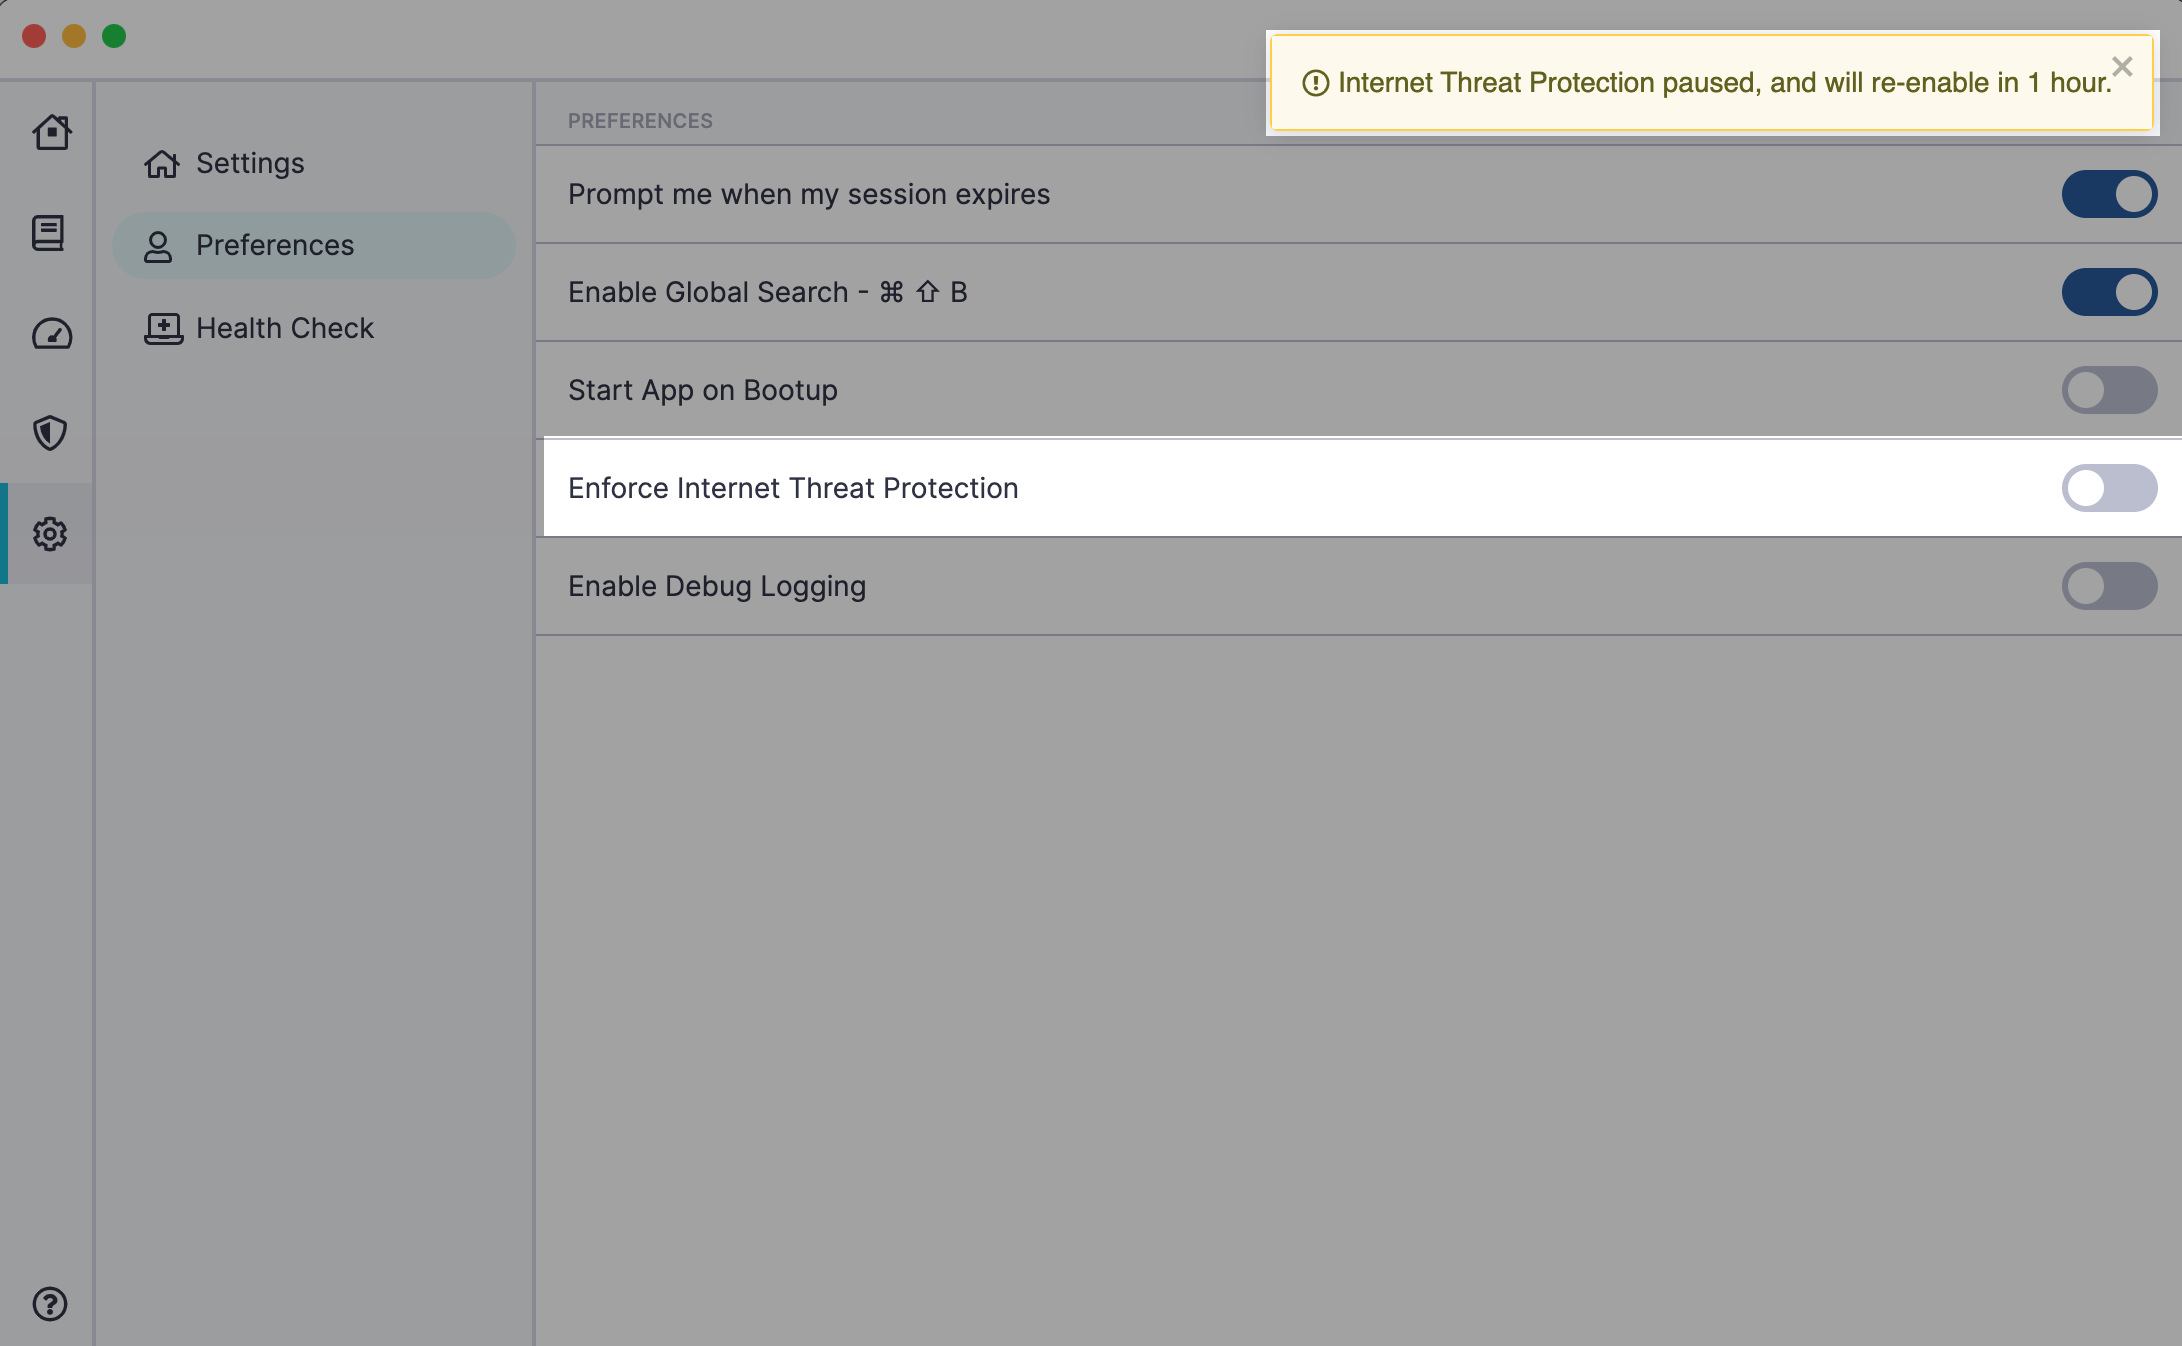
If an ITP policy is disabled by an end user in their device’s app, it will automatically be re-enabled after 1 hour. CSE generates logs detailing when the ITP policy was disabled and when it was re-enabled. These logs can be found under Events in the Command Center.
Require a passcode to disable ITP
Admins can require end users to enter a one-time passcode before ITP can be disabled on their device. This prevents end users from disabling ITP on their own, and is typically used for troubleshooting: when a user needs ITP temporarily disabled, an admin supplies the passcode rather than the user disabling it unassisted. This control applies on top of the automatic re-enablement described above.
This option is disabled by default for all organizations. An admin turns it on, and it applies to devices that have an ITP policy attached.
ITP enforcement does not depend on the end user being logged in; it is always in force. The one exception is the disablement window granted through this passcode flow: while it is active, ITP is genuinely not enforced for that device.
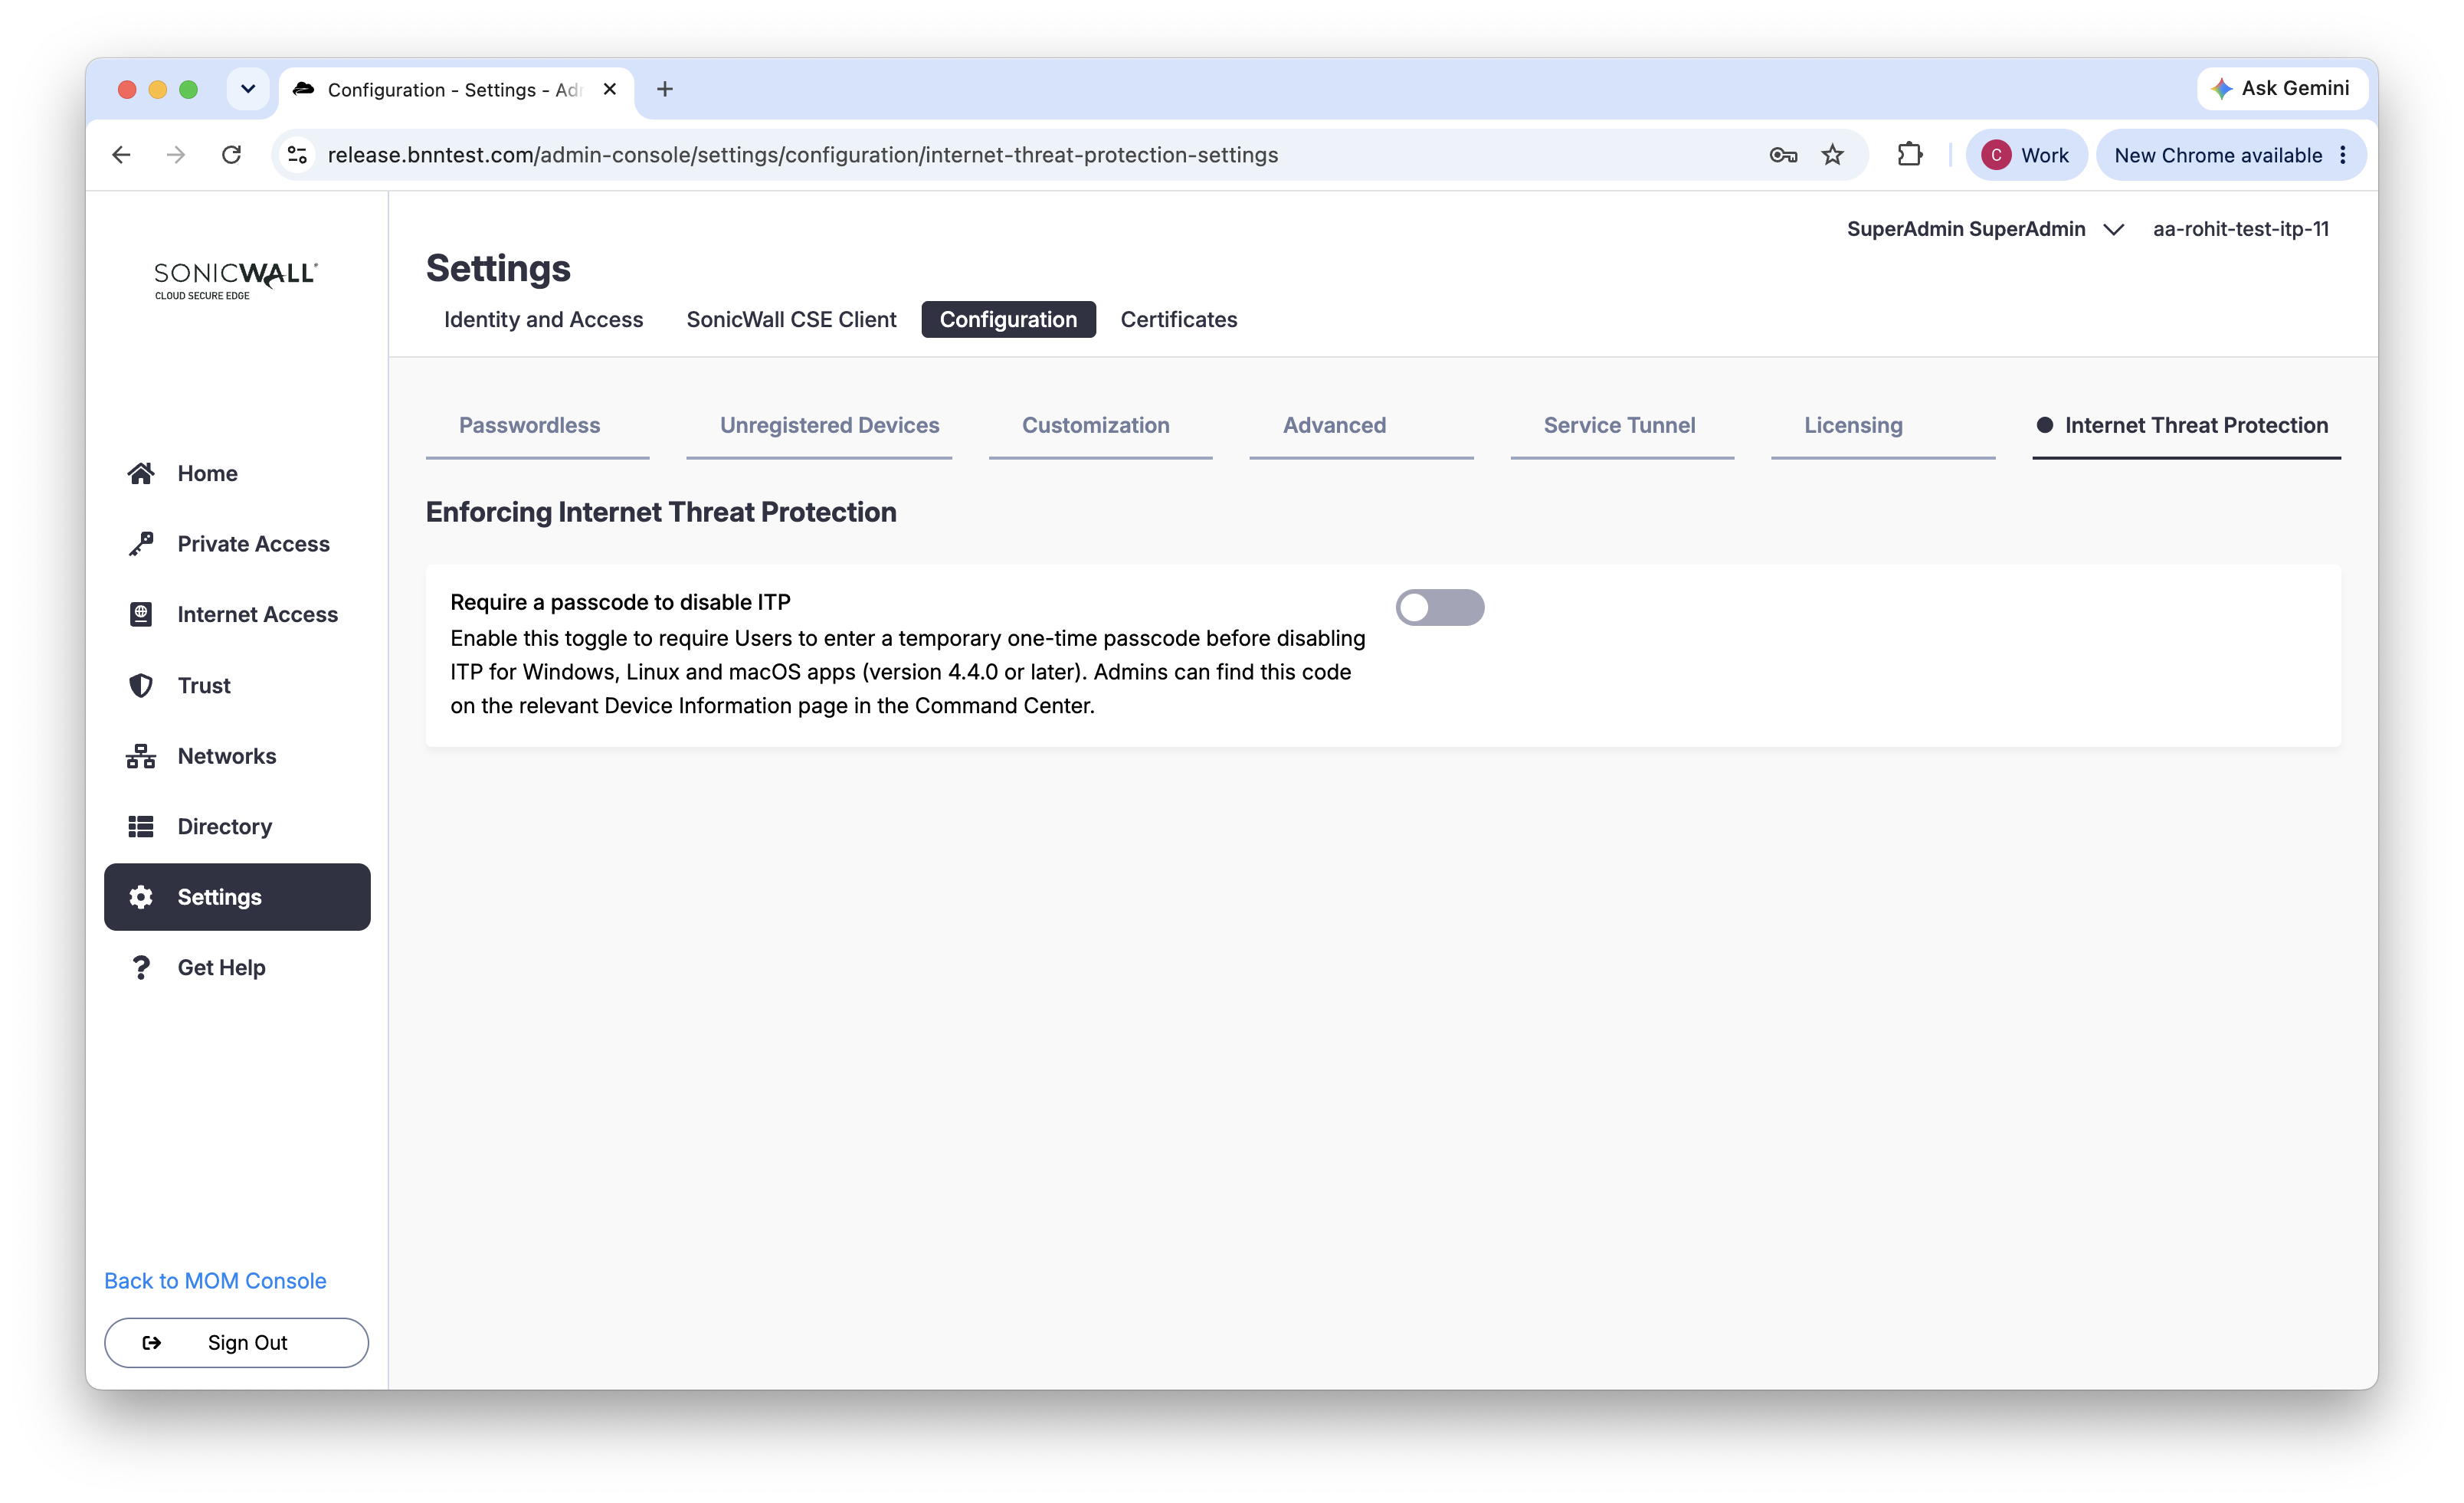
1. In the Command Center, navigate from Settings > Configuration > Internet Threat Protection.
2. Under Enforcing Internet Threat Protection, toggle on Require a passcode to disable ITP.
When this setting is enabled, end users on the Windows, Linux, and macOS CSE apps (version 4.4.0 or later) must enter a one-time passcode before they can disable ITP. On attempting to disable ITP, the user is prompted for the passcode; the user requests it from an admin, who reads the current passcode from the device’s Device Information page and provides it to the user.
Note: This setting is applied at the org level. Enabling or disabling it may take up to 15 minutes to take effect on end users’ devices.
Once a device is disabled using the passcode, ITP automatically re-enables after 1 hour, as described above. There is no way to extend this window; if the user needs ITP disabled again, they must request a new passcode from an admin.
Note: Disabling ITP through this flow also disconnects the device’s Service Tunnel. The user must manually reconnect the Service Tunnel afterward.
Admins retrieve the passcode for a device from that device’s Device Information page in the Command Center, in the ITP One Time Passcode field. This field appears only while ITP is enabled on the device. A new passcode is generated every 10 minutes, and each passcode remains valid until the end of the following window — up to 20 minutes in total, depending on when it was generated. For this reason the expiry countdown shown on the Device Information page can read longer than 15 minutes.
If an end user enters an incorrect passcode 10 times within a rolling 15-minute window, they are locked out from entering the passcode for 15 minutes.