Use IdP Federation to enforce zero trust policies on all SaaS Applications integrated with OneLogin
Use federation capabilities in OneLogin to enforce CSE Policies on your SaaS applications
- Last validated: Aug 3, 2026
Overview
This guide details the steps required to set up OneLogin and CSE TrustProvider to enable device registration and authentication for any SaaS application. Additionally, this guide covers how to add policy enforcement in CSE TrustProvider at the SaaS application level.
Doc status: CSE-side steps were re-verified against the CSE console on 2026-07-14, and third-party console steps were updated against vendor documentation on the same date. The third-party IdP console steps follow the vendor’s own documentation and should be confirmed against the live admin console, which can change without notice. For OneLogin console fields and procedures, treat OneLogin’s documentation as the source of truth for their UI.
How It Works
Standard SSO (without CSE)
sequenceDiagram
    autonumber
    participant UA as Web Browser
    participant SP as SaaS Application
    participant IDP as OneLogin SSO
    UA->>SP: Access application
    SP->>IDP: Generate SAML request
    IDP->>UA: Prompt user & password
    UA->>IDP: Submit credentials
    IDP->>UA: Prompt MFA
    UA->>IDP: Complete MFA
    IDP->>SP: Issue SSO token
    SP->>SP: Create user session
    SP->>UA: Set app session cookie
    UA->>SP: Access application
IDP-First Flow (with CSE)
sequenceDiagram
    autonumber
    participant UA as Web Browser
    participant SP as SaaS Application
    participant IDP as OneLogin SSO
    participant TP as CSE TrustProvider
    UA->>SP: Access application
    SP->>IDP: Generate SAML request
    IDP->>TP: IdP routing rule
    TP->>TP: Device check
    TP->>IDP: Federate back for authentication
    IDP->>UA: Prompt user & password
    UA->>IDP: Submit credentials
    IDP->>UA: Prompt MFA
    UA->>IDP: Complete MFA
    IDP->>TP: Issue SSO token
    TP->>TP: Policy check
    TP->>IDP: Issue Trust Token (inbound SAML)
    IDP->>SP: Issue SSO token
    SP->>SP: Create user session
    SP->>UA: Set app session cookie
    UA->>SP: Access application
In the IDP-first authentication flow, you configure your OneLogin to federate authentication requests to CSE’s TrustProvider component. CSE TrustProvider federates right back to OneLogin for user authentication but, because CSE is now in the authentication flow, it is able to enforce Zero Trust security policy.
The IDP-first flow above comes in two variations, depending on where the user starts. Both route through CSE for policy enforcement:
Service Provider-initiated
End users launch the SaaS application directly.
- 1.1 SaaS application redirects the user to OneLogin with Special Query parameter for Application and Trusted IdP
- 1.2 User is redirected to OneLogin
- 1.3 OneLogin selects the CSE Trusted IdP
- 1.4 User is redirected to Trust Provider
- 1.5 Trust Provider validates the certificate
- 1.6 Trust Provider is redirected the user to OneLogin for authentication (SAML Connector)
- 1.7 User enters credentials and OneLogin posts the SAML Response to Trust Provider
- 1.8 Trust Provider exchanges the access token and issues the token to OneLogin
- 1.9 OneLogin redirects the user to Application Portal
Identity Provider-initiated
End users launch the SaaS application from the OneLogin catalog.
- 2.1 User logs in to OneLogin
- 2.2 User is redirected to application catalog
- 2.3 User clicks on SaaS Application (Proxy App)
- 2.4 Proxy Application routes the user to Trust Provider with Application Redirect URL and Group Id as SAML Assertion Claims
- 2.5 Trust Provider verifies the device certificate and applies Policy
- 2.6 On success, user is redirected to application redirect URL
At the time of writing, OneLogin may not redirect the end user back to the intended SaaS application after an IdP-initiated sign-in; in that case the end user must click the SaaS application again from the OneLogin Portal. OneLogin’s documentation does not describe this limitation — confirm the behavior in the vendor console against your live tenant.
Prerequisites
Before proceeding with the setup steps below, please ensure you have:
Setup
About the screenshots and example values: The screenshots in this guide were captured in an example tenant. Wherever a URL, subdomain, or tenant identifier appears in an image or a code sample, substitute the value from your own environment — your OneLogin subdomain (for example, https://<your-subdomain>.onelogin.com) and your production CSE tenant URLs. Do not enter the example or lab values literally.
At a high level, configuring OneLogin IdP federation to CSE can be broken out into three phases:
Phase 1. Configure CSE as a OneLogin Trusted IdP
This phase establishes trust between OneLogin and CSE’s TrustProvider.
- Configure OneLogin Trusted IdP
- Configure CSE IDP-routed Service
- Prepare your CSE-registered app details for OneLogin
- Update OneLogin Trusted IdP Configuration
Phase 2. Configure SP-initiated Access
This phase sets up all apps federated with OneLogin to use CSE TrustProvider for ZeroTrust policy checks.
- Configure OneLogin SaaS Application
Phase 3. Configure IdP-initiated Access
Phase 3 is only required if your end users will launch the SaaS application from the OneLogin application catalog.
This phase sets up applications launched from the OneLogin catalog to use CSE TrustProvider for ZeroTrust policy checks.
- Configure Proxy SaaS Application
- Assign Users to Application
- Disable Original Application from OneLogin Catalog
Values to exchange
The federation is a SAML data contract between CSE and OneLogin. The tables below summarize which value goes where, using only the placeholders and labels already defined in this guide. Copy each value exactly; a mismatch in any of these fields is the most common cause of a broken sign-in flow.
From OneLogin into CSE
| OneLogin value | Where to find it | Where it goes in CSE |
|---|---|---|
| Trusted IdP SP Entity Id | Authentication > Trusted IdPs > [CSE SAML IdP] > Settings (Step 1.3) | Audience URI (Service Provider Entity ID) of the IDP-routed Service (Step 2.3) |
| OneLogin subdomain | Your OneLogin instance base URL | Redirect URL (the SAML ACS URL) https://<your-subdomain>.onelogin.com/access/idp (Step 2.3) |
From CSE into OneLogin
| CSE value | Where to find it | Where it goes in OneLogin |
|---|---|---|
X509Certificate from CSE SaaS app metadata |
Metadata XML (Steps 2.6, 3.2-3.3) | Trusted IdP X.509 Certificate field (Step 4.1) |
<SingleSignOnService Location> URL |
Metadata XML (Step 3.4) | Trusted IdP IdP Login Url (Step 4.1) |
| CSE SaaS Application Metadata URL | CSE Command Center (Step 2.6) | Trusted IdP Issuer (Step 4.1) |
| SaaS app Client configuration / Application ID | CSE Command Center (Steps 2.5, 6.5) | Proxy app serviceId parameter (Step 6.5) |
Phase 1. Configure CSE as a OneLogin Trusted IdP
Step 1. Configure OneLogin Trusted IdP
This step creates the Trusted IdP object in OneLogin that represents CSE TrustProvider, and captures the SP Entity Id that CSE needs to identify OneLogin in the SAML exchange. These are OneLogin console steps; refer to OneLogin’s documentation if the labels or navigation differ in your tenant.
1.1 In the OneLogin Admin Portal, navigate to Authentication > Trusted Idps and then click New Trust.

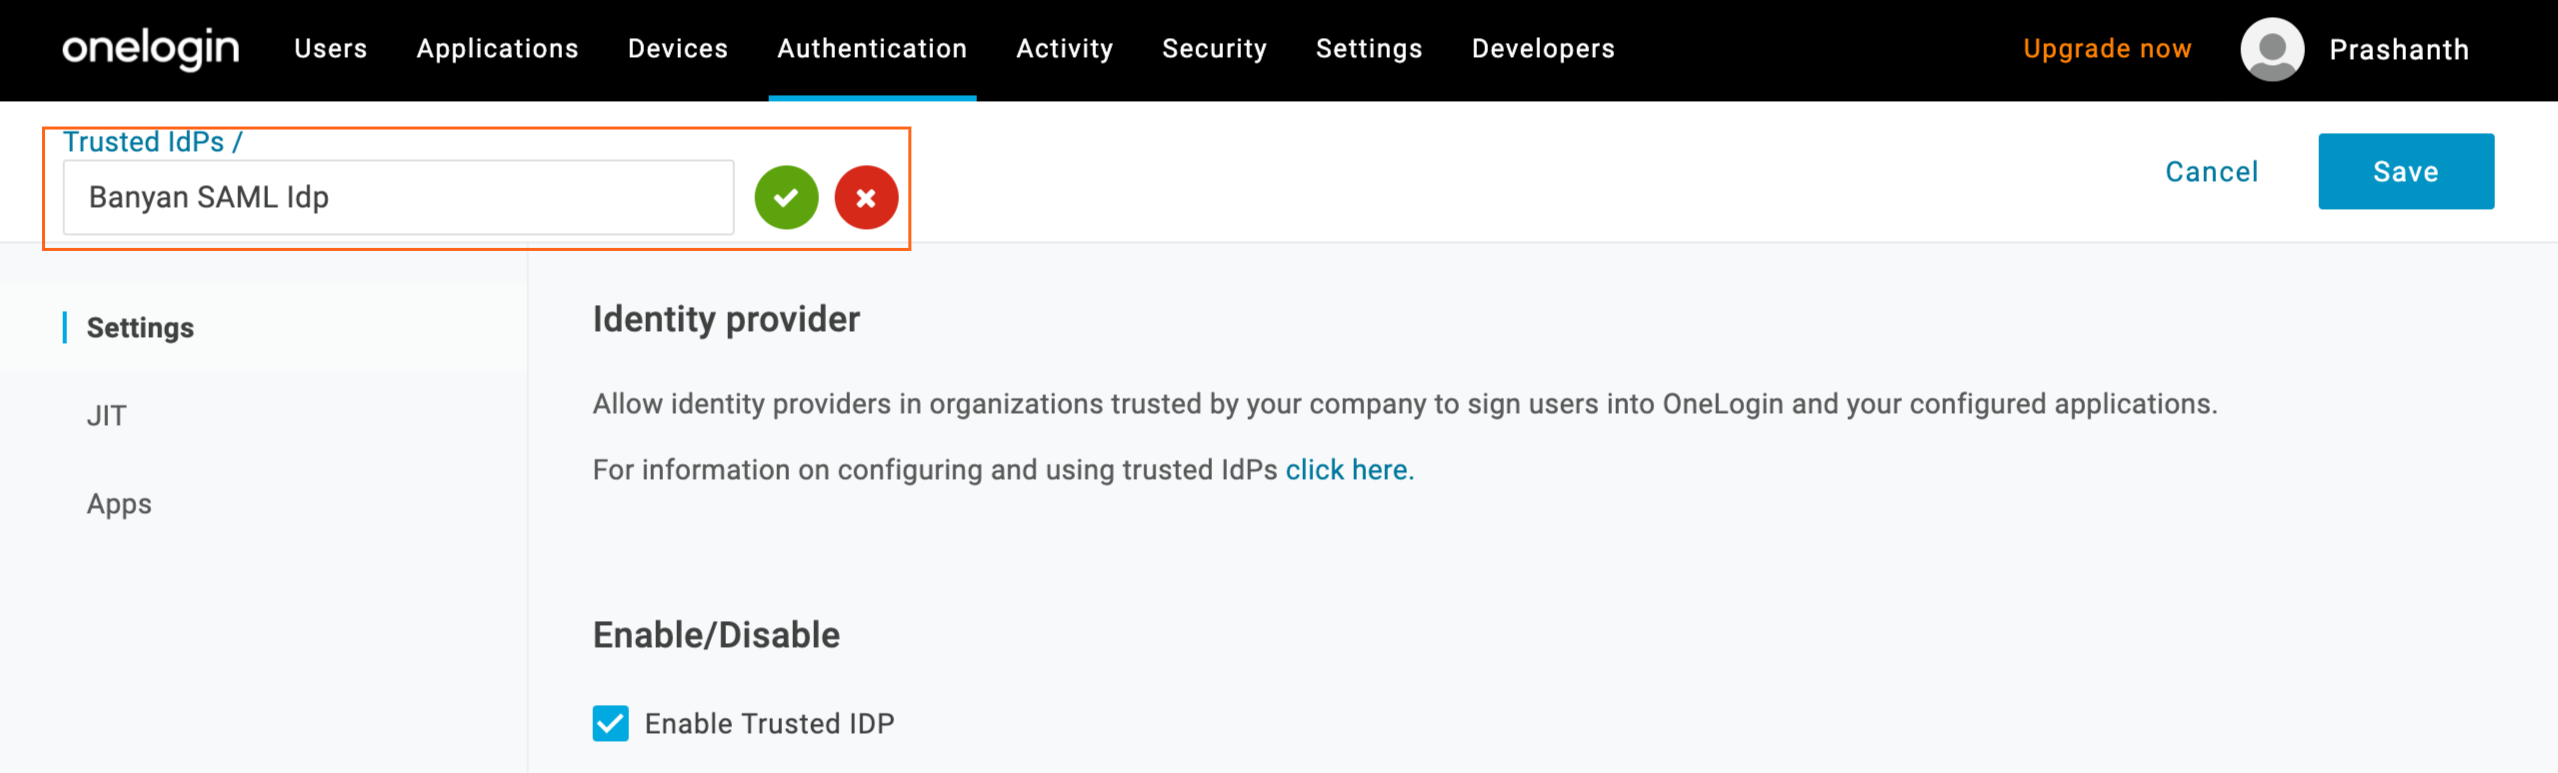
1.2 Enter the Trust Provider name “CSE SAML IdP” and then click the green checkmark.
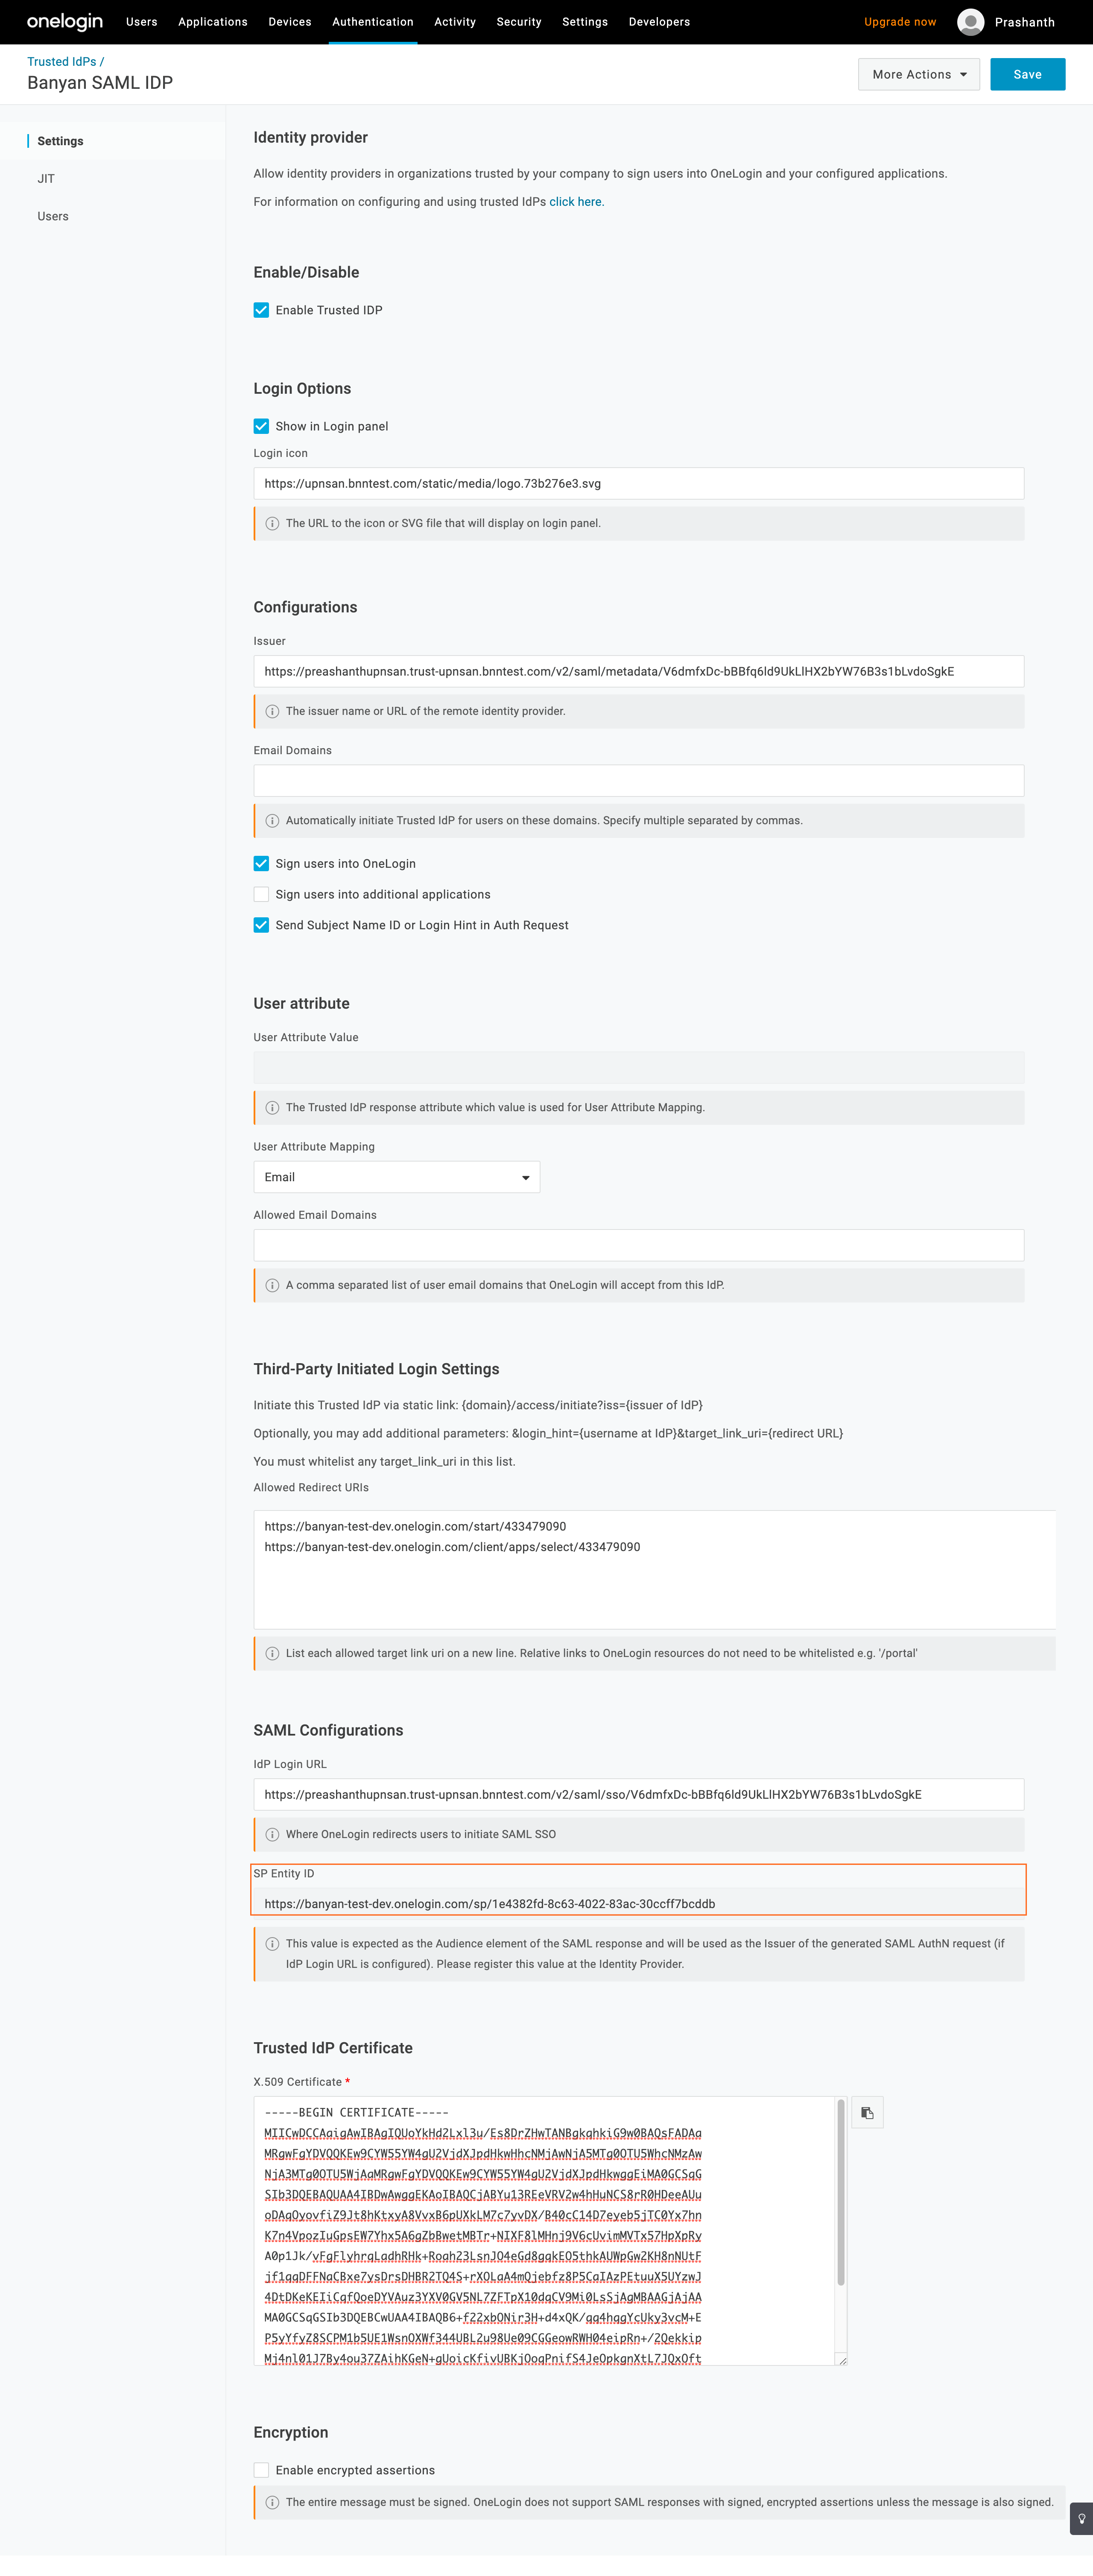
1.3 Navigate to the Settings tab and then copy the SP Entity Id, which you will use in the steps below.
Step 2. Configure CSE IDP-routed Service
This step publishes the IDP-routed Service in CSE that inserts TrustProvider into the OneLogin authentication flow so Zero Trust policy can be enforced. It also produces the certificate, SSO URL, and metadata that OneLogin consumes in Step 4.
2.1 In the CSE Command Center, navigate to Internet Access > SaaS Apps and then select Publish SaaS Application.
2.2 Select the IdP Routed template to route OneLogin to CSE.
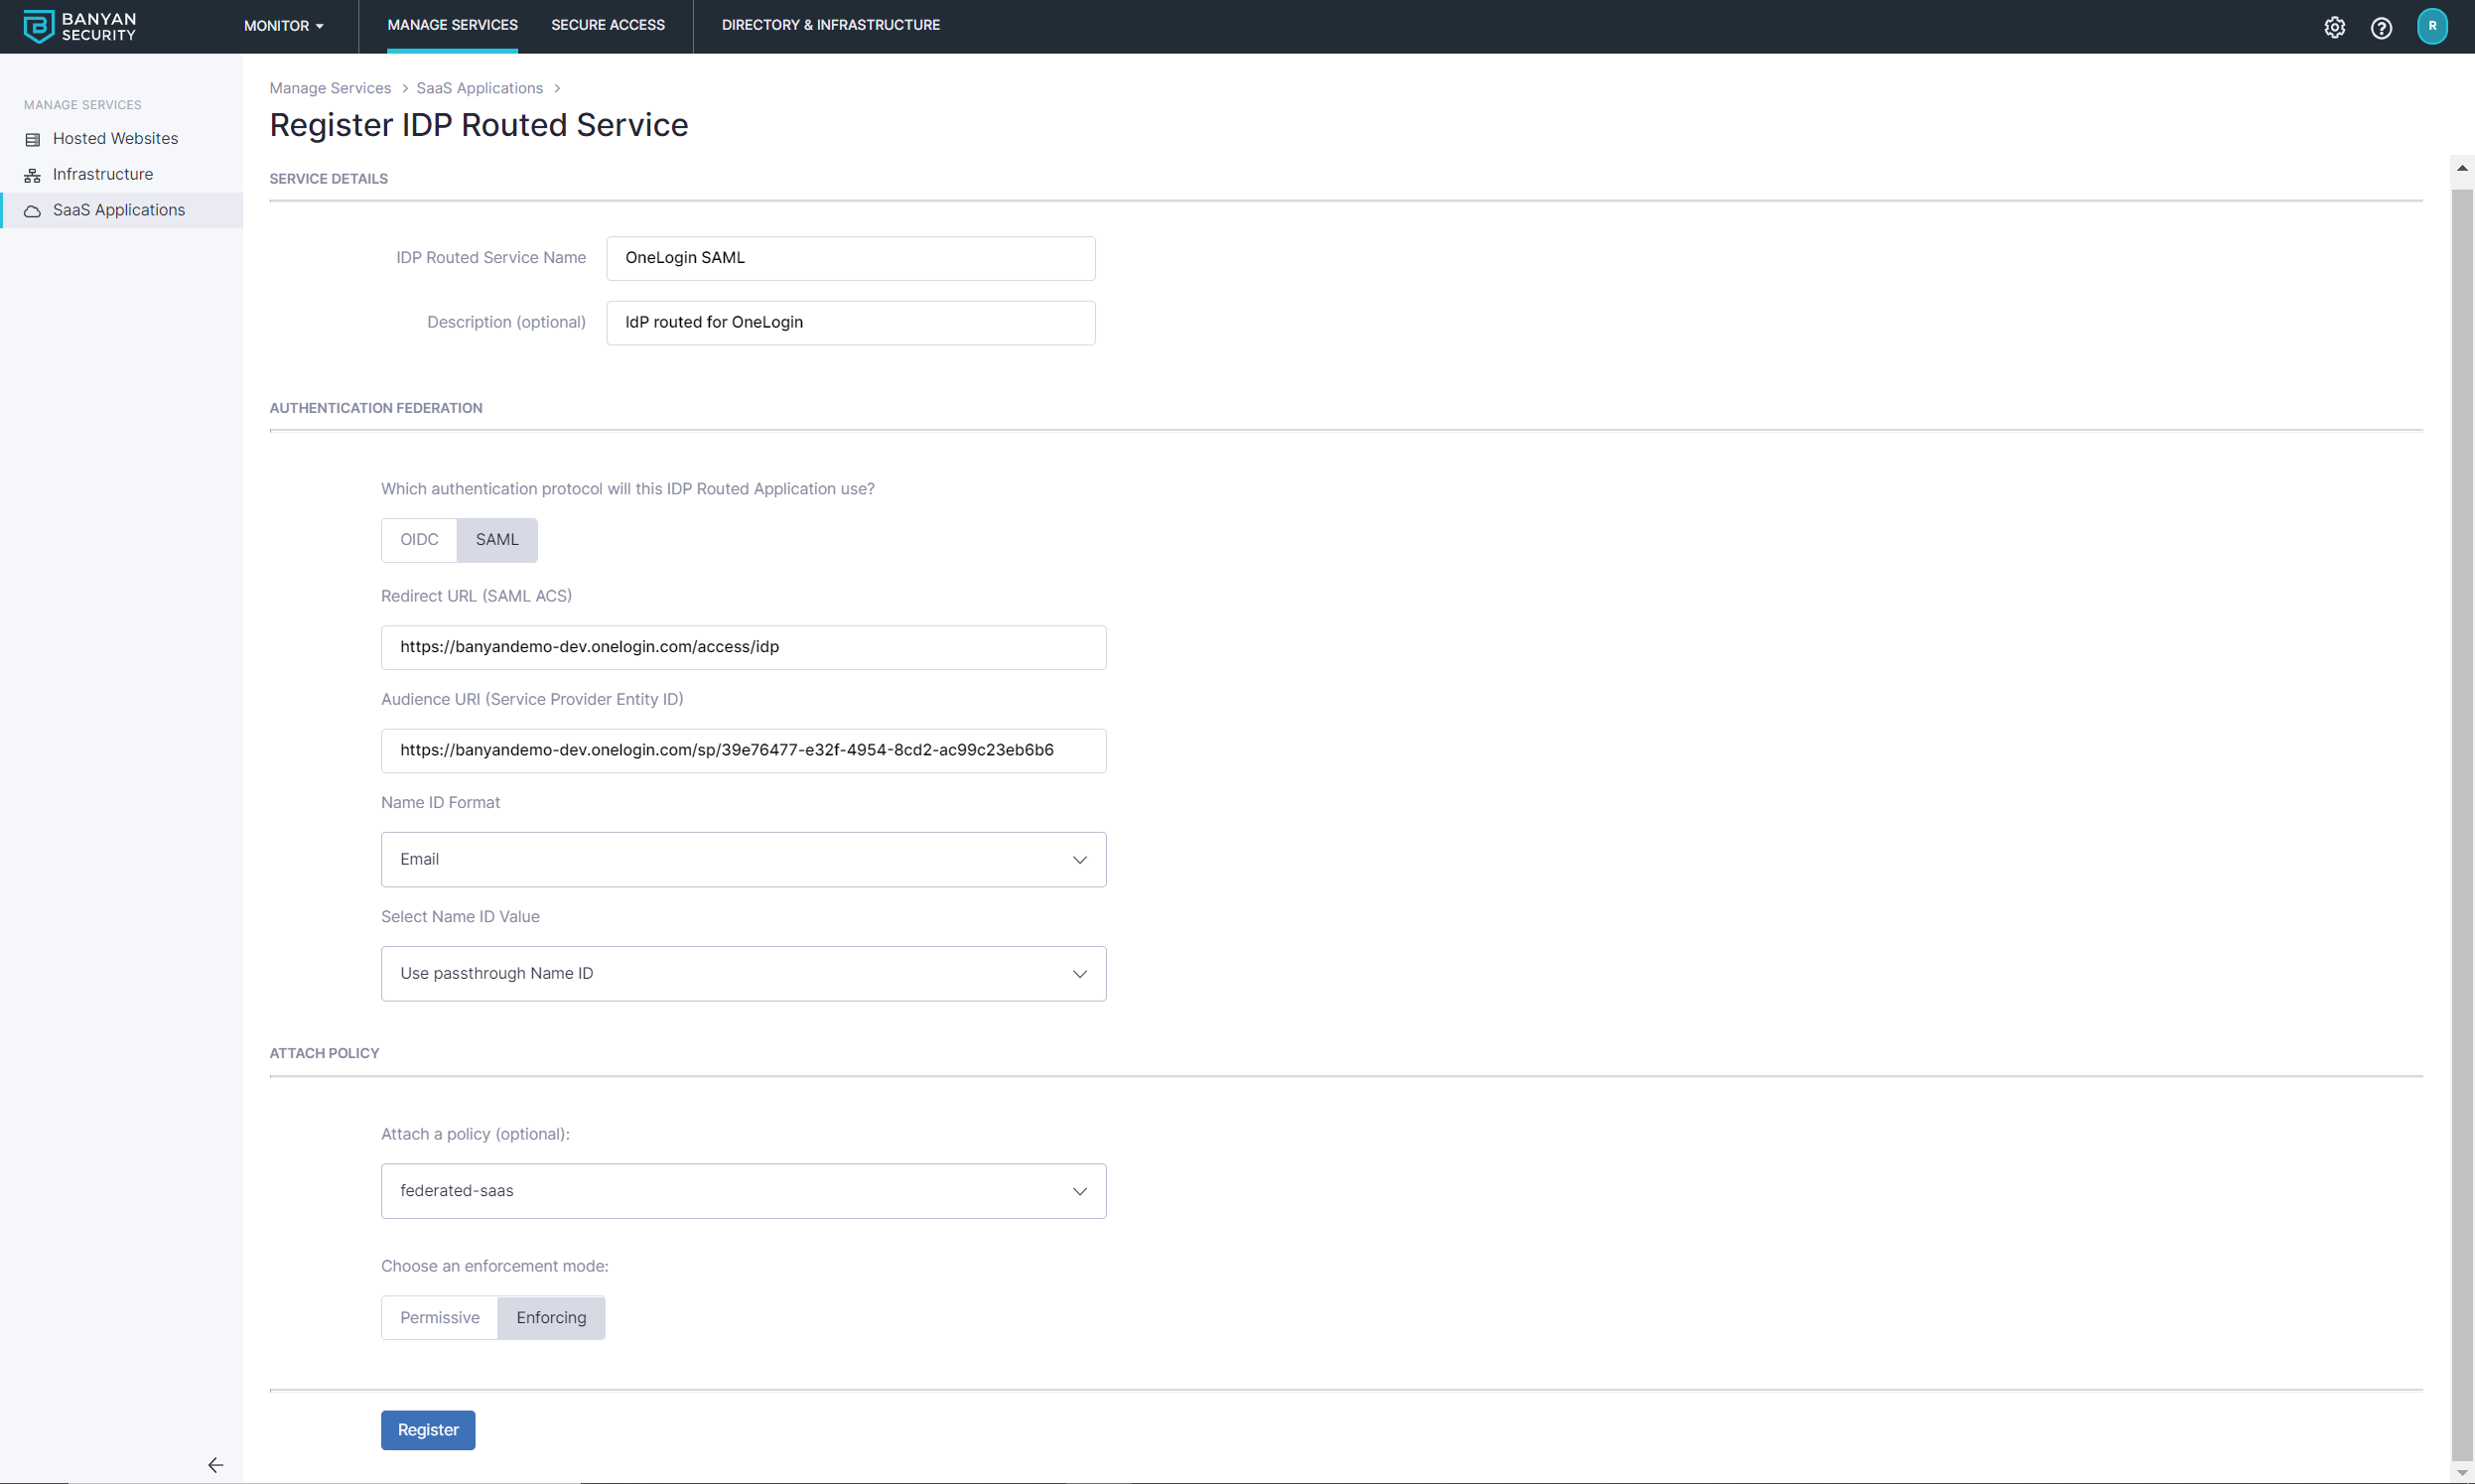
2.3 Enter the service details shown below.
- Enter a IdP Routed Service Name (such as “OneLoginSAML”) and Description
- Set the authentication protocol to SAML
- For Redirect URL (the SAML ACS URL), enter
https://<your-subdomain>.onelogin.com/access/idp(replace<your-subdomain>with your OneLogin subdomain) - For Audience URI (Service Provider Entity ID), enter the OneLogin Trusted IdP SP Entity ID (copied in step 1.3)
- Set Name ID Format to Email
- Set Name ID Value to Legacy compatibility mode
- Attach an applicable Web Policy. If you have not yet created one, navigate to Private Access > Access Policies, select + Create Policy, and create a Web Policy that defines your zero trust requirements. Begin with the policy in Permissive mode, which allows devices that do not meet the policy to fall back, and switch to Enforcing mode only after you validate the sign-in flow (see Verify the Sign-In)
2.4 Register.
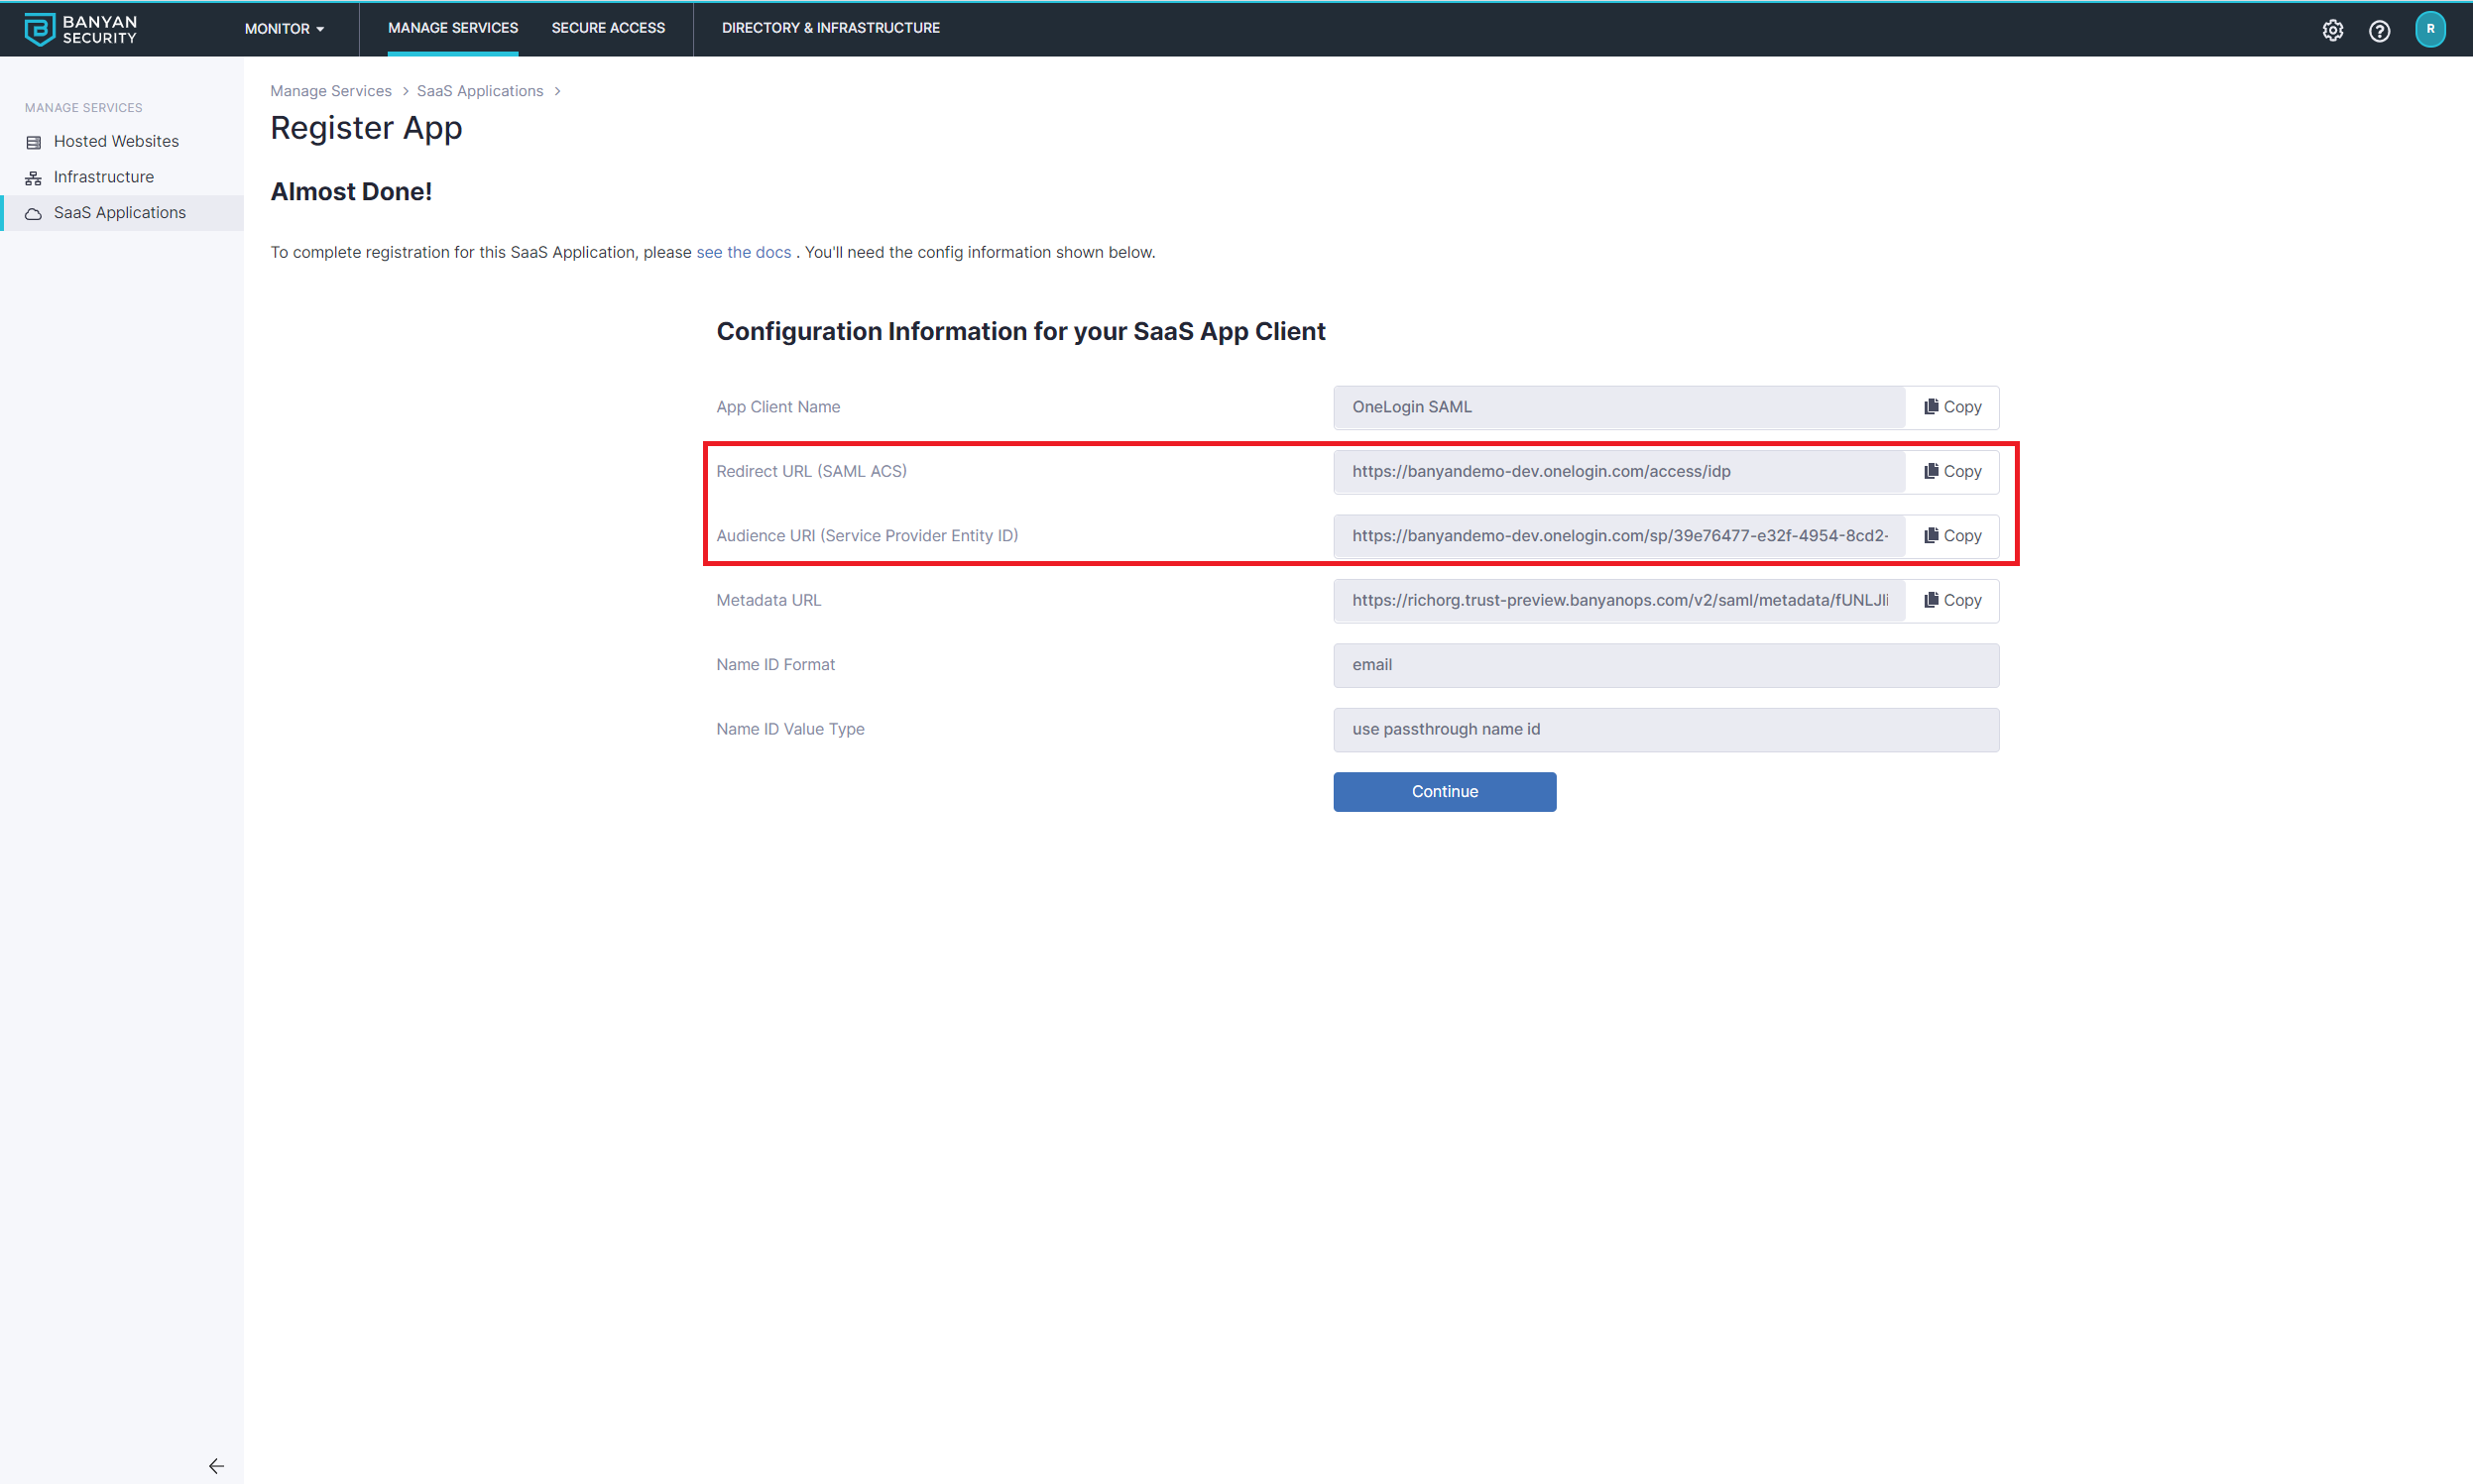
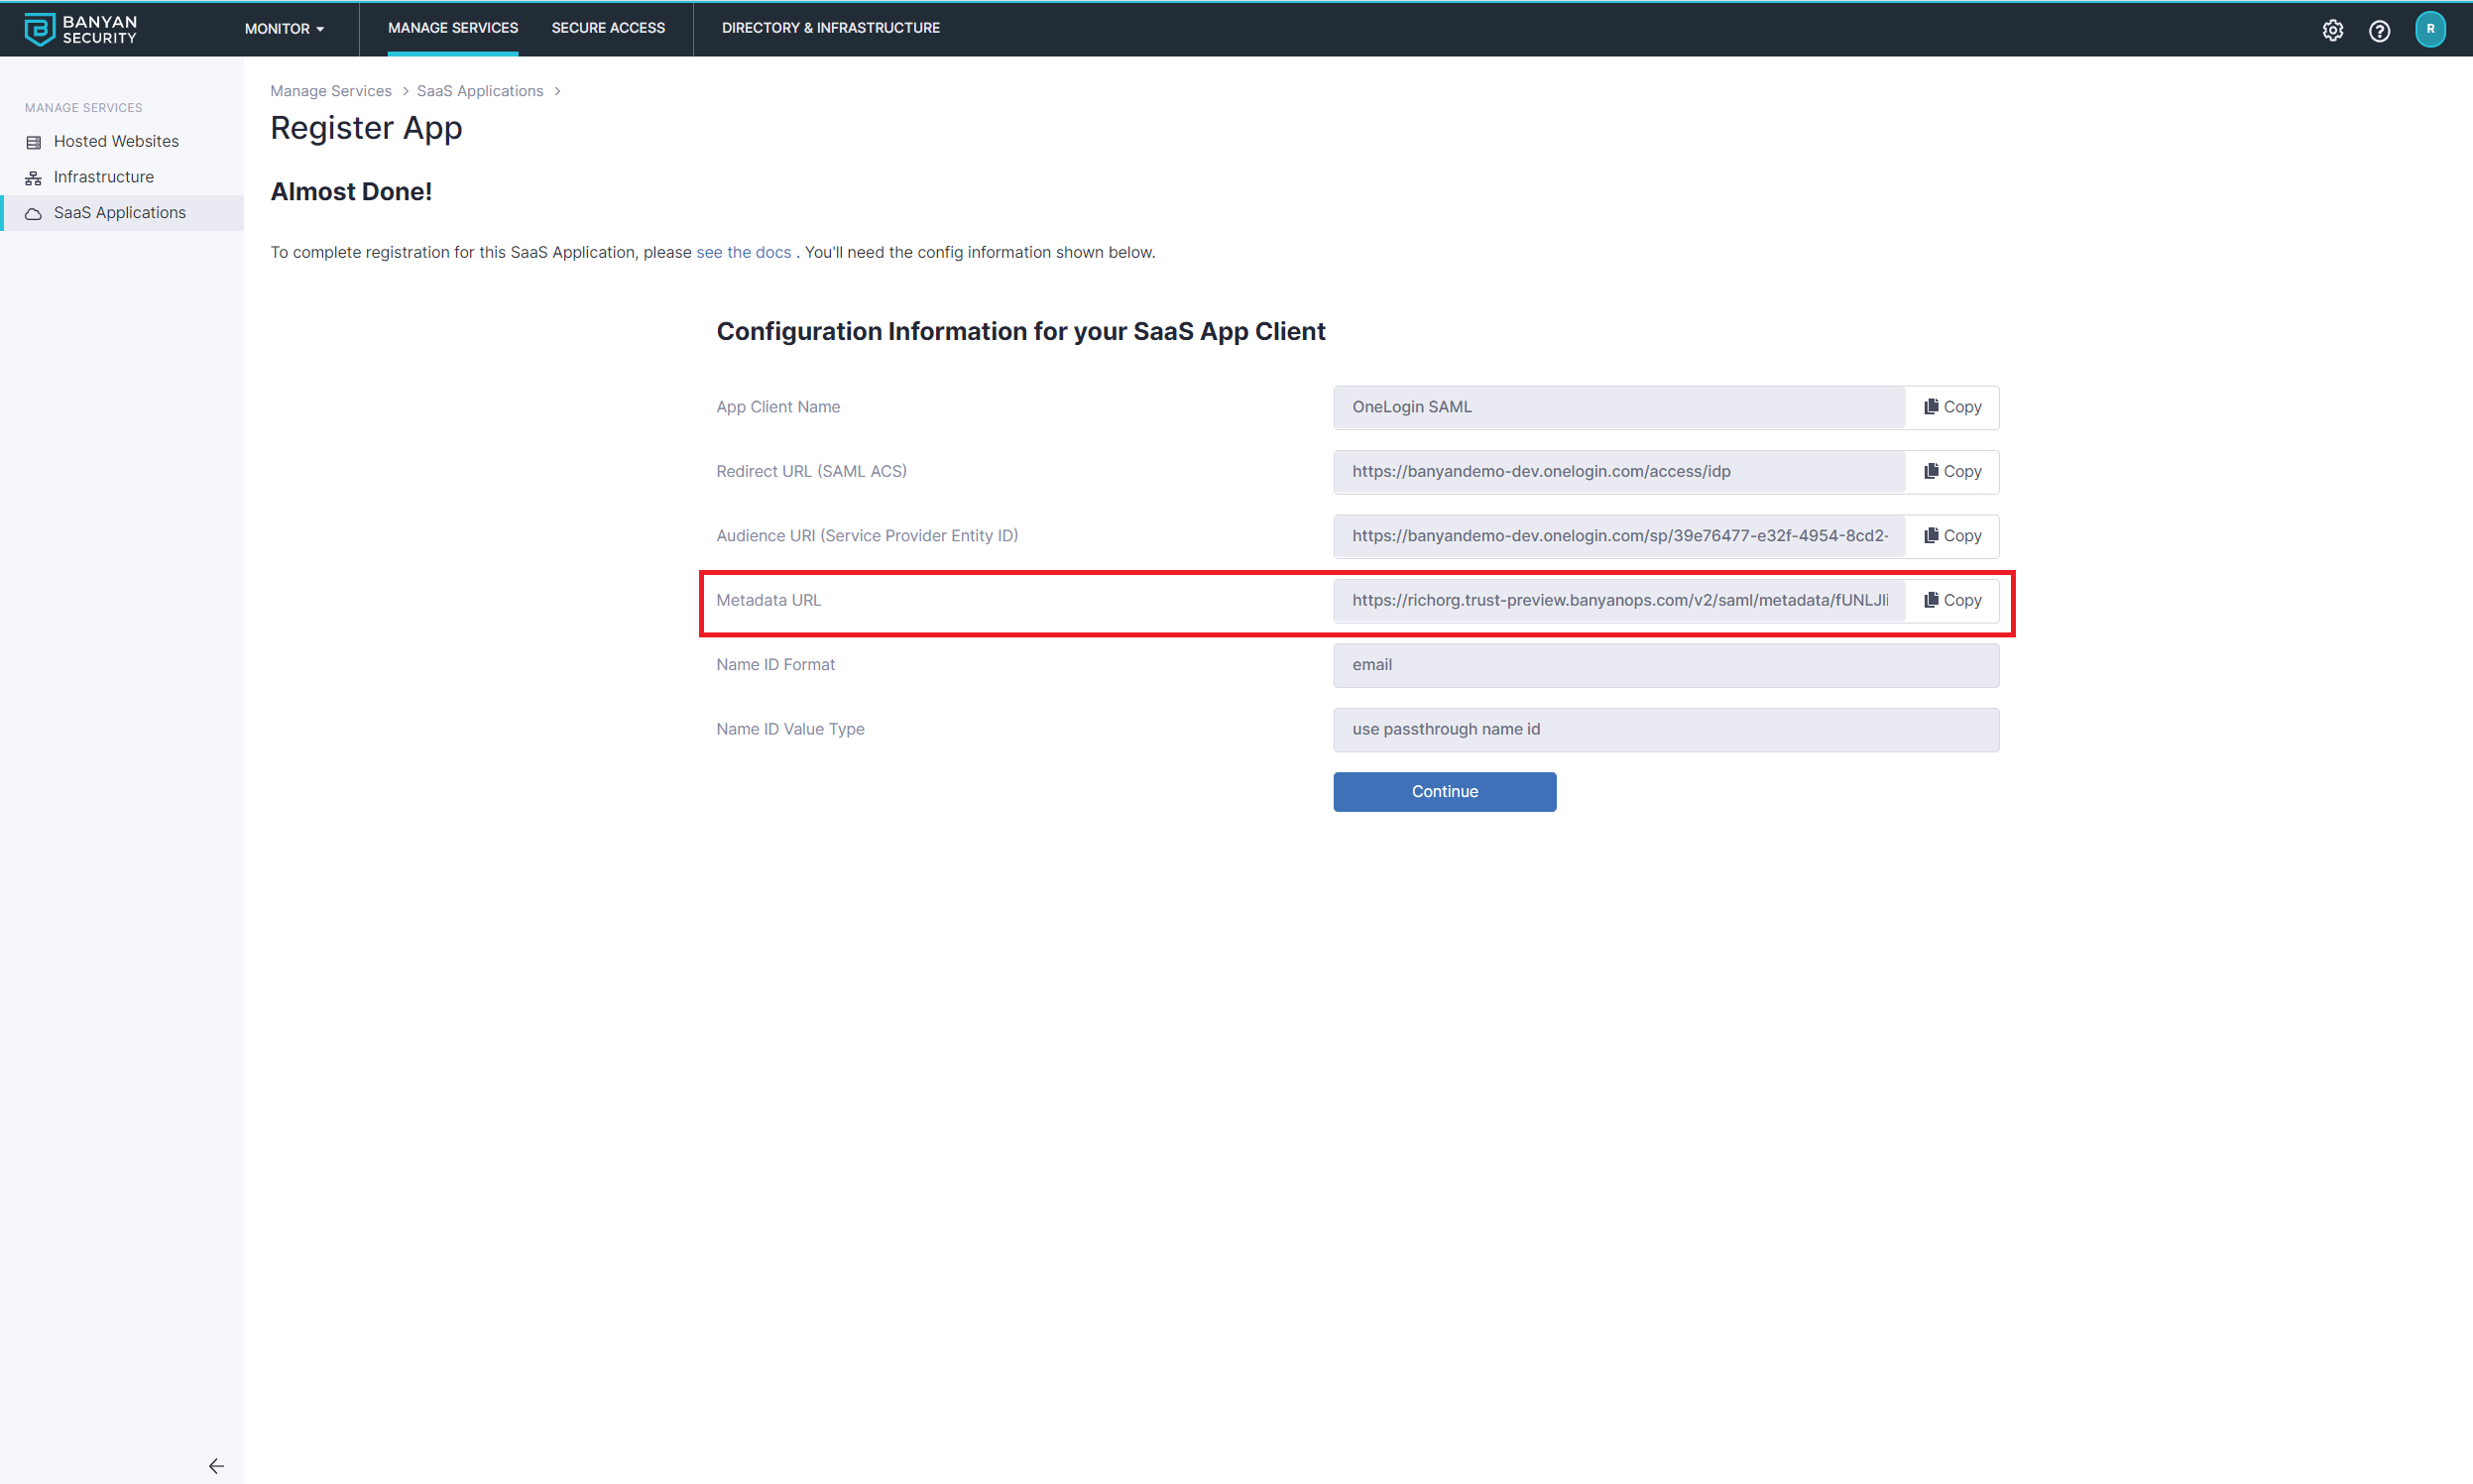
2.5 Make note of the configuration values shown on the Almost Done! screen after registration, under Configuration Information for your SaaS App Client (App Client Name, Client ID, Client Secret, and Redirect URL), as you will use them in Step 6.5. If you dismiss this screen, the same values remain available on the application’s Overview tab under SAAS CLIENT APPLICATION CONFIGURATION.
2.6 Also, copy the Metadata URL, paste it in your browser search bar and then press enter to download the xml file. You will use the information in this file to configure SSO in OneLogin.
Step 3. Prepare your CSE-registered App Details for OneLogin
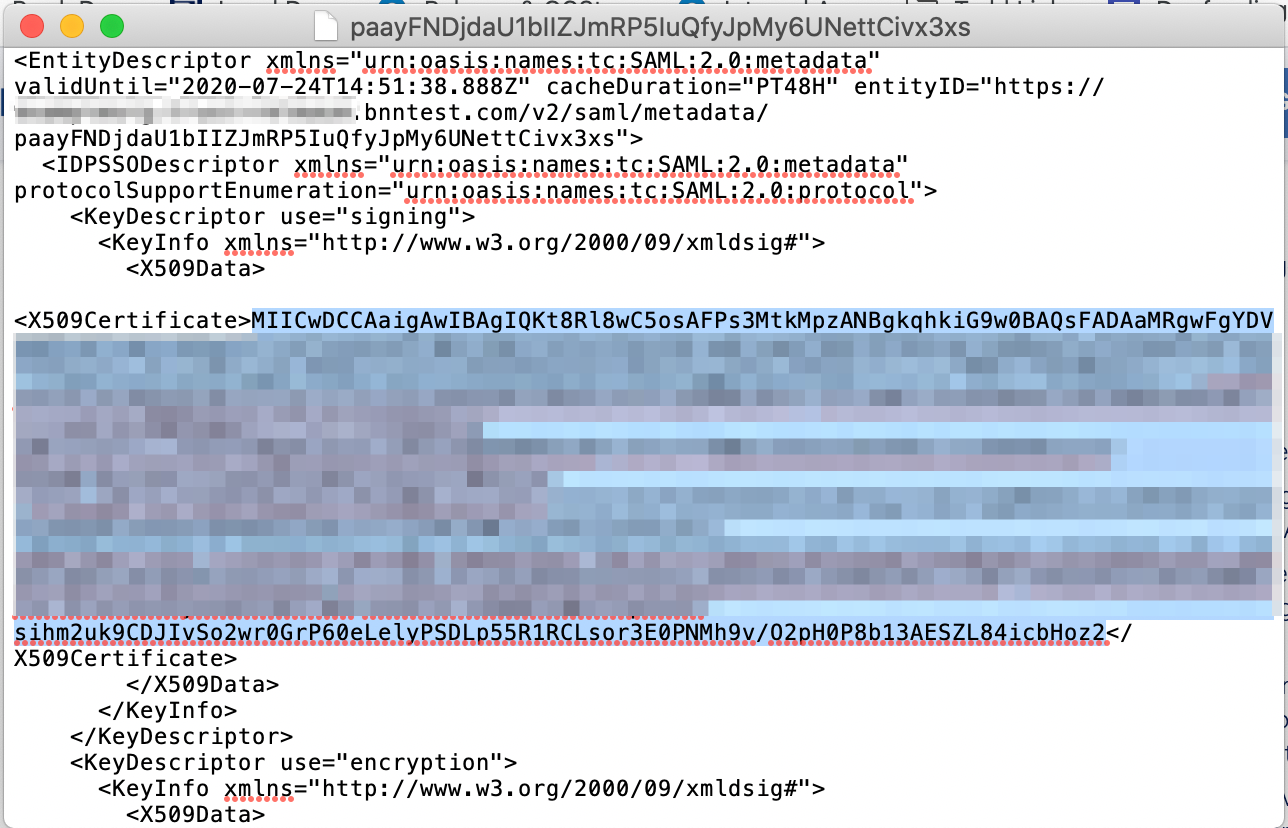
3.1 Open the metadata xml file downloaded in Step 2.6 in your preferred text editor.
3.2 Locate and copy the X509Certificate string, and then paste it in a separate, new text editor file.
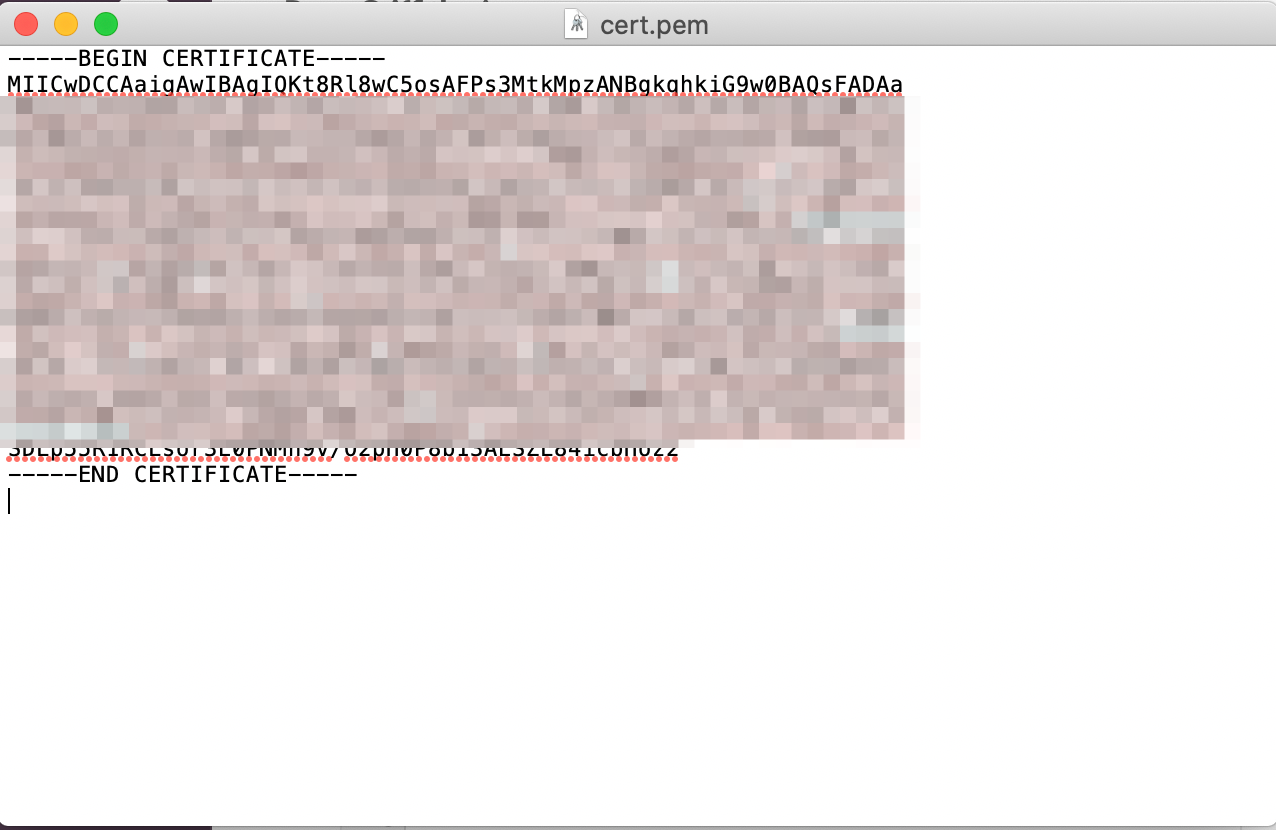
3.3 Format the string and then save it as a pem file. You will paste this formatted certificate in Step 4.1.
- Ensure you add the header (
-----BEGIN CERTIFICATE-----) to the first line. - Ensure you add the footer (
-----END CERTIFICATE-----) to the last line. - Ensure you add line breaks so that each line is no longer than 64 characters max.
- The formatted pem file should look like the example below:
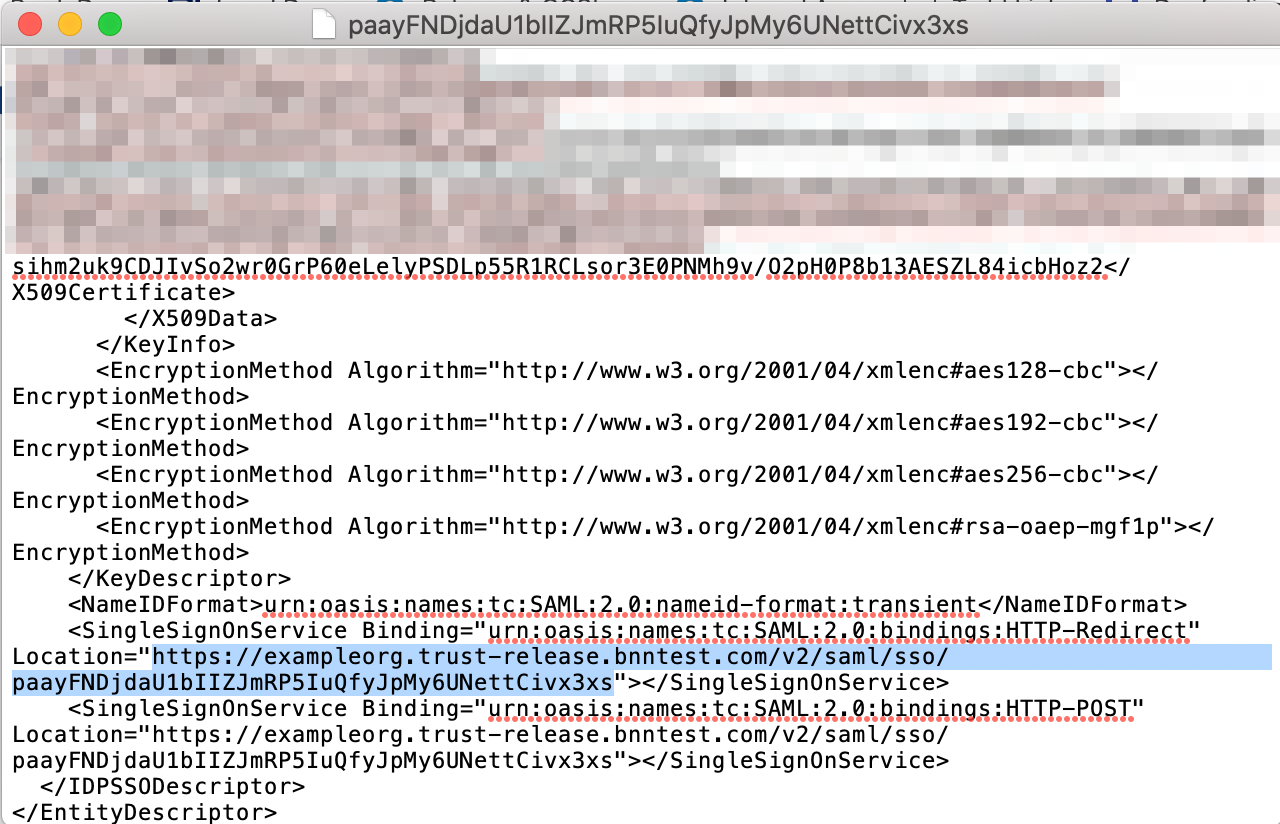
3.4 Also in the downloaded metadata xml file, locate and take note of the <SingleSignOnService Location> string. You will enter this value in Step 4.1.
Step 4. Update OneLogin Trusted IdP Configuration
This step completes the trust relationship by loading the CSE-issued certificate, Issuer, and SSO URL into the OneLogin Trusted IdP, so OneLogin will federate authentication to CSE TrustProvider. These are OneLogin console fields; if a label differs in your tenant, consult OneLogin’s documentation.
4.1 Navigate to Settings and then update following fields:
- Login Options
- Show in Login Panel - Unchecked
- Login Icon - Enter a publicly accessible URL for your login icon (for example, your organization’s logo or an official SonicWall CSE logo). Do not use internal lab or test-tenant URLs.
- Configurations
- Issuer - Enter the CSE SaaS Application Metadata Url (noted in step 2.6)
- Sign users into OneLogin - Checked
- Sign users into additional applications - Unchecked
- Send Subject Name Id or Login Hint in Auth Request - Checked
- User Attribute
- User Attribute Mapping - set to Email
- SAML Configurations
- IdP Login Url - Get SingleSignOnService Url from CSE SaaS Application metadata Url (noted in step 3.4)
- X.509 Certificate - Paste the formatted certificate (from Step 3.3) in the relevant box
- Enable/Disable
- Enable Trusted IdP - Checked
Note: For SAML, the Enable Trusted IdP checkbox remains unselectable until the X.509 certificate has been pasted.
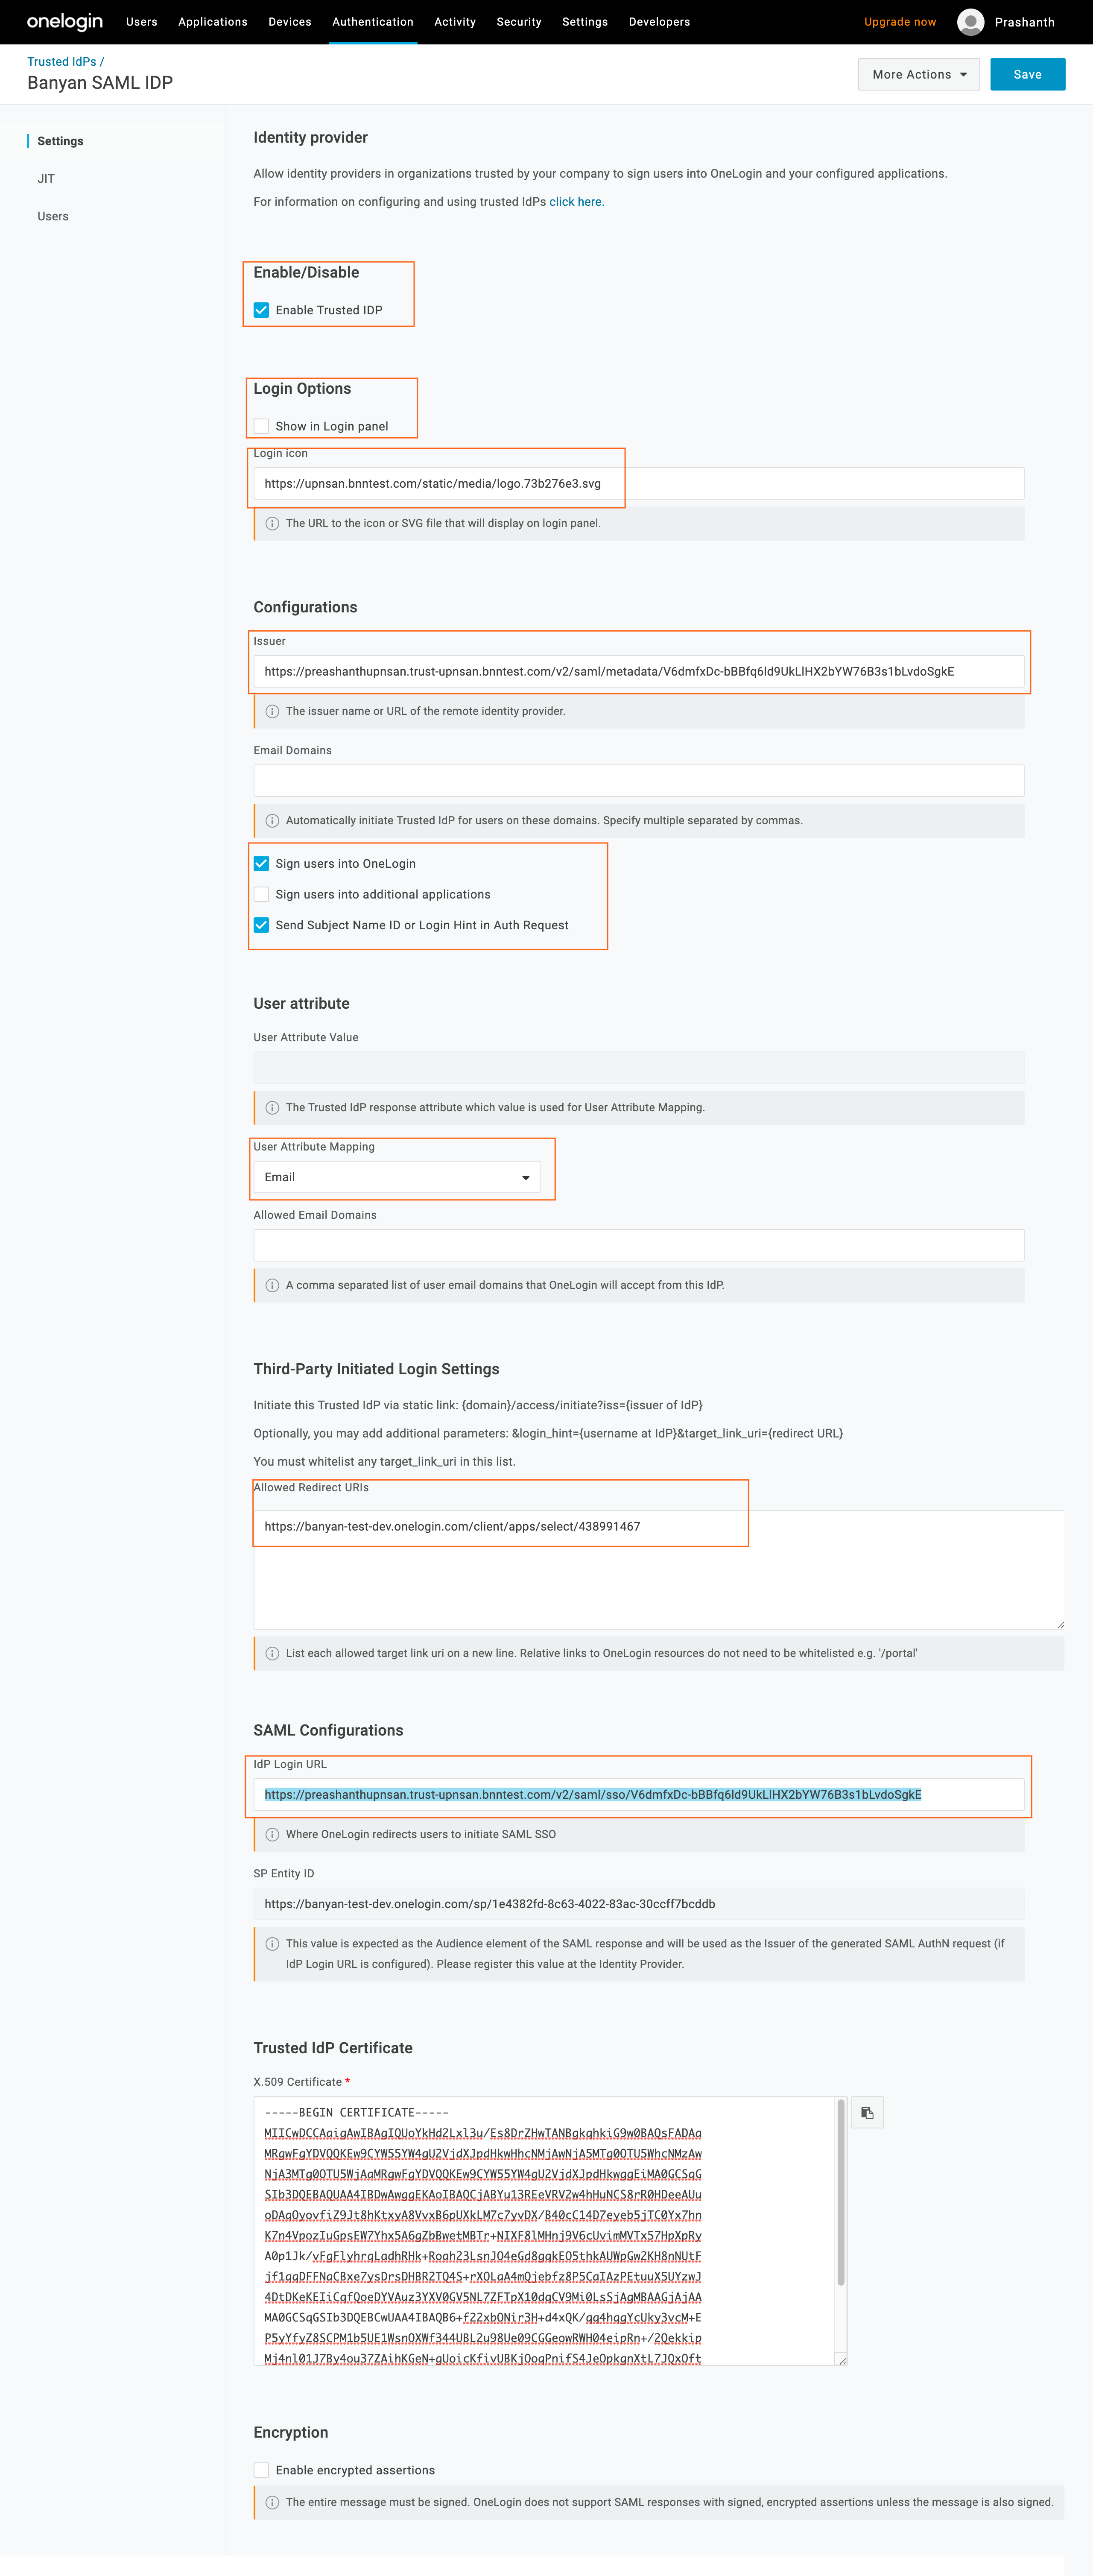
4.2 Click Save.
Phase 2. Configure SP-initiated Access
Step 5. Configure SaaS Application SSO
This step points the SaaS application’s SSO at OneLogin in a way that routes sign-in through the CSE Trusted IdP, so that Service Provider-initiated logins are subject to Zero Trust policy. The Slack admin fields below are vendor UI; see Slack’s own SSO documentation for the authoritative field locations.
This step uses Slack as an example.
Plan device onboarding before repointing SSO. After this step, every sign-in to the SaaS application routes through CSE TrustProvider, and a user whose device is not yet registered with CSE fails the device-trust check. Register pilot devices before repointing the SaaS application’s SSO, and keep the attached Web Policy in Permissive mode until your device fleet is registered.
5.1 Log in to Slack as an admin and then open your Workspace settings (on Enterprise Grid, use your organization settings).
5.2 Navigate to Security > SSO & authentication and then select Configure SAML.
5.3 Update the fields accordingly:
-
SAML 2.0 Endpoint URL - This value is not copied directly from OneLogin. You build it so that OneLogin routes the sign-in through the CSE Trusted IdP. Use the following format:
{onelogin-domain}/access/initiate?iss={issuer}&target_link_uri={endpoint}Replace each placeholder as described below:
Placeholder What to enter Where to find it {onelogin-domain}Your OneLogin instance base URL, including https://.For example, https://example.onelogin.com.{issuer}The Issuer value configured on the CSE Trusted IdP. Authentication > Trusted IdPs > [CSE SAML IdP] > Settings > Configurations > Issuer. This is the CSE SaaS app Metadata URL you entered in Step 4.1. {endpoint}The OneLogin app’s SAML 2.0 Endpoint (HTTP). Applications > [your app, e.g. Slack] > SSO > SAML 2.0 Endpoint (HTTP). Append the
{issuer}value to the?iss=parameter, then add a&target_link_uri=parameter set to the{endpoint}value. URL-encode both theissandtarget_link_urivalues. A completed URL looks like this:https://example.onelogin.com/access/initiate?iss=https%3A%2F%2Fexample.trust.banyanops.com%2Fapi%2Fv1%2Fsaml_metadata&target_link_uri=https%3A%2F%2Fexample.onelogin.com%2Ftrust%2Fsaml2%2Fhttp-post%2Fsso%2FabcdefTip: After you save, validate the URL with a test sign-in. If OneLogin does not route through the CSE Trusted IdP, confirm that the
issvalue exactly matches the Trusted IdP Issuer and that both query-string values are URL-encoded. - Identity Provider Issuer URL - Enter the Issuer URL from the OneLogin app’s SSO tab (Applications > [your app] > SSO).
- x.509 Certificate - Enter the X.509 Certificate from the OneLogin app’s SSO tab (Applications > [your app] > SSO > View Details).
- Sign In Button Label - Enter “OneLogin”.
5.4 Select Test Configuration to verify the settings, and then turn on SSO (Turn on SSO, or Add SSO on some plans) to complete the setup.
Phase 3. Configure IdP-initiated Access
Step 6. Configure Proxy SaaS Application
This step builds a OneLogin proxy app (using the SAML Custom Connector) that launches from the OneLogin catalog and passes the target redirect URL and CSE serviceId to TrustProvider as SAML assertion claims, so catalog-initiated logins are also policy-checked. These are OneLogin console steps; refer to OneLogin’s documentation for the custom connector’s field details.
6.1 In OneLogin, navigate to Applications and then select Add App.

6.2 In the application catalog search box, enter SAML Custom Connector (Advanced), select that connector, and then click Save.
6.3 Navigate to the Info tab and then update the following fields:
- Display Name - Enter the app name (such as “Slack”)
- Visible in portal - Checked/enabled
- Square Icon - Upload the app logo icon (such as the Slack logo icon)
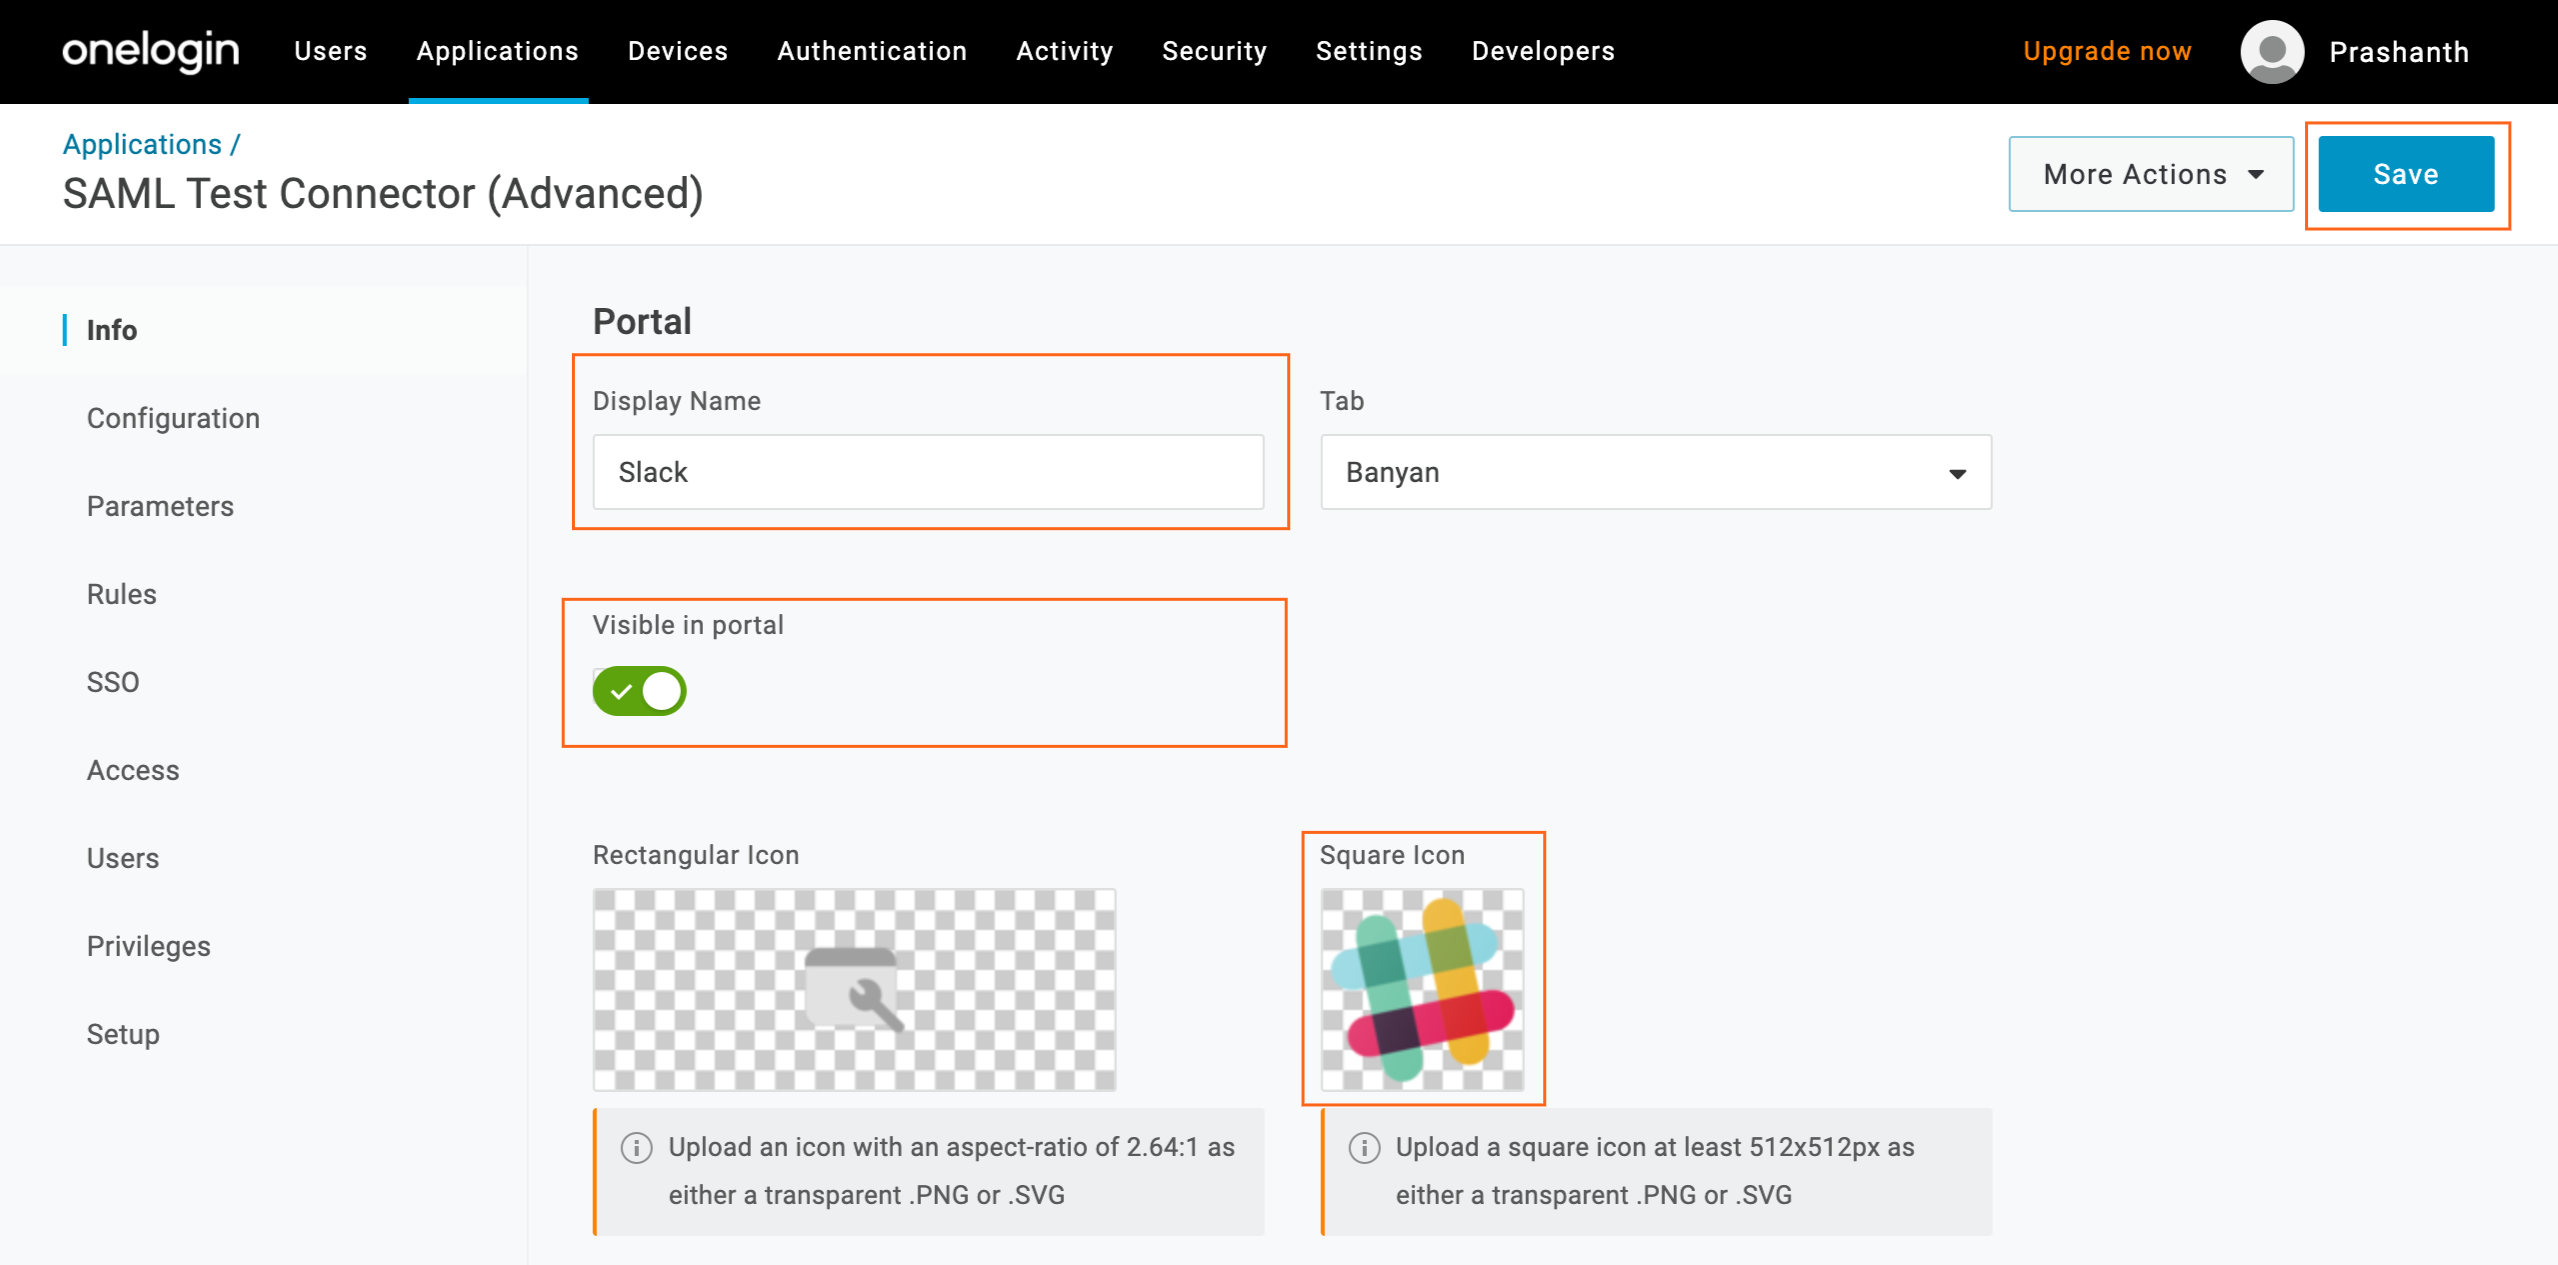
6.4 Save.
6.5 Navigate to the Parameters tab and then add redirect url and serviceId.
- To add
redirectUrl, select the Plus icon and enter:- Name - Enter “redirectUrl”, then click Save
- Value - Select Macro and then enter the application’s SAML 2.0 Endpoint (HTTP) URL
- Flags - Check the Include in SAML assertion checkbox
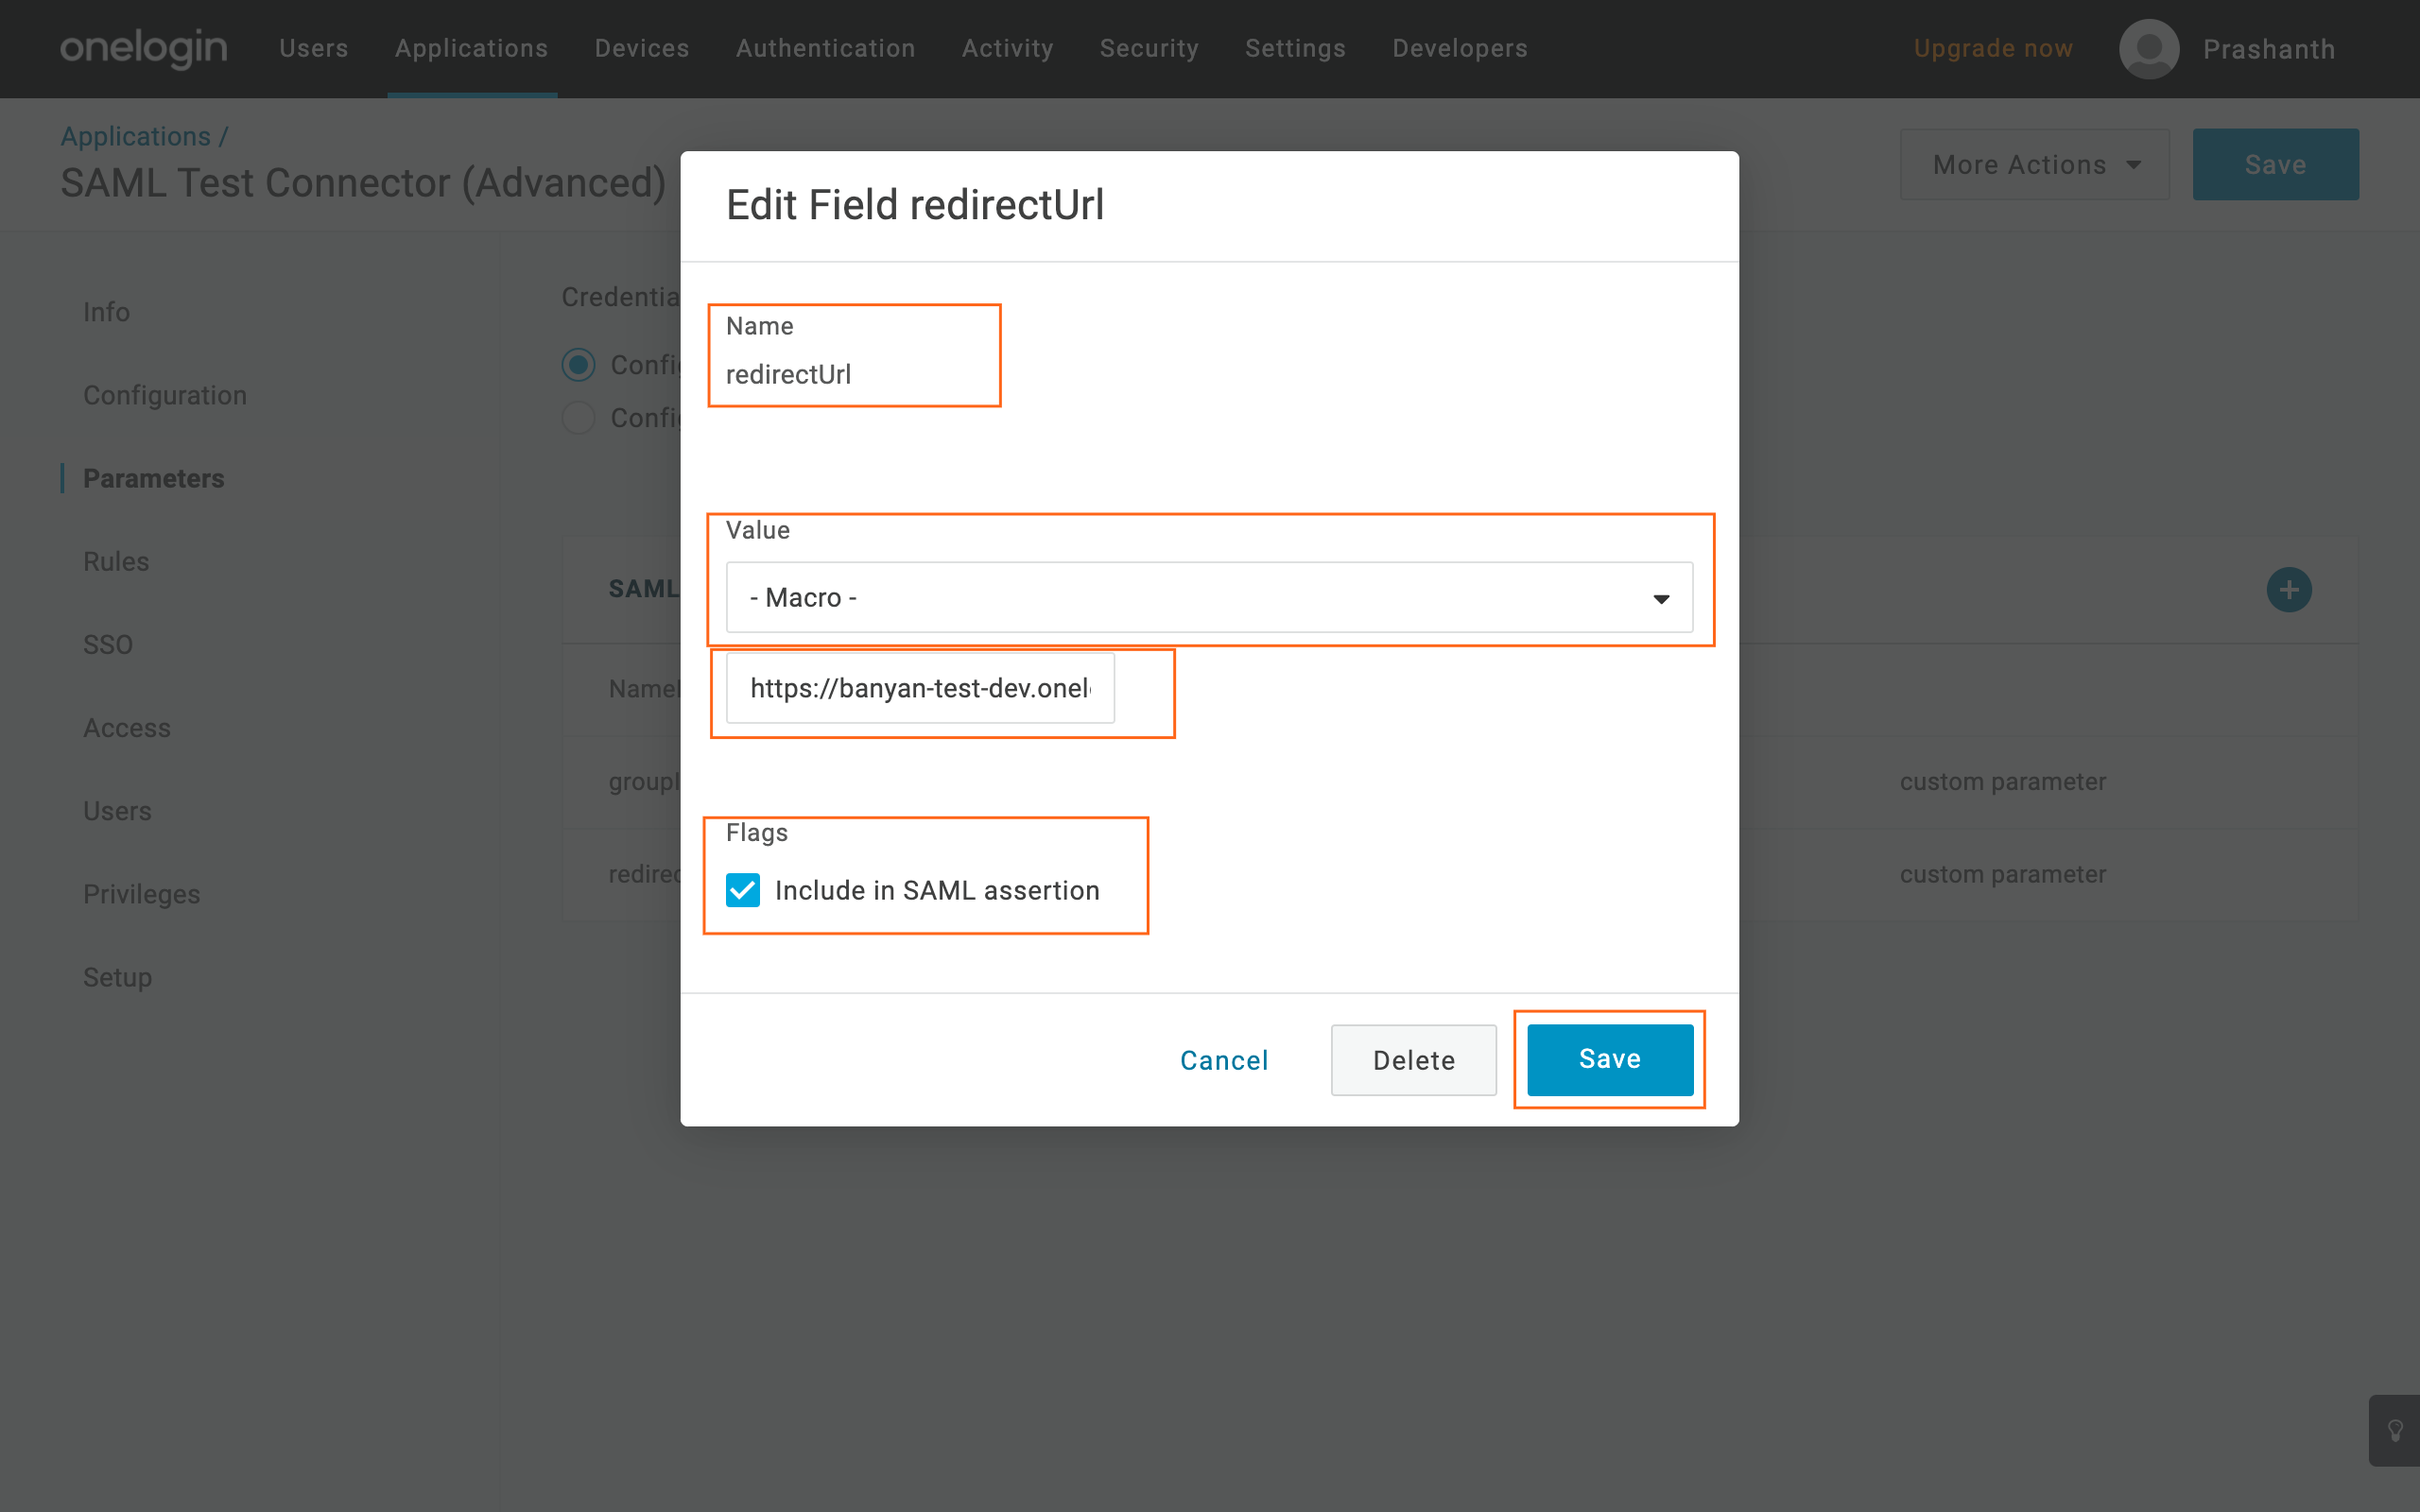
- To add
serviceId, select the Plus icon and enter:- Name - Enter
serviceId, then click Save - Value - Select Macro and then enter your SaaS Application ID from the CSE Command Center.
- Flags - Check the Include in SAML assertion checkbox
- Name - Enter
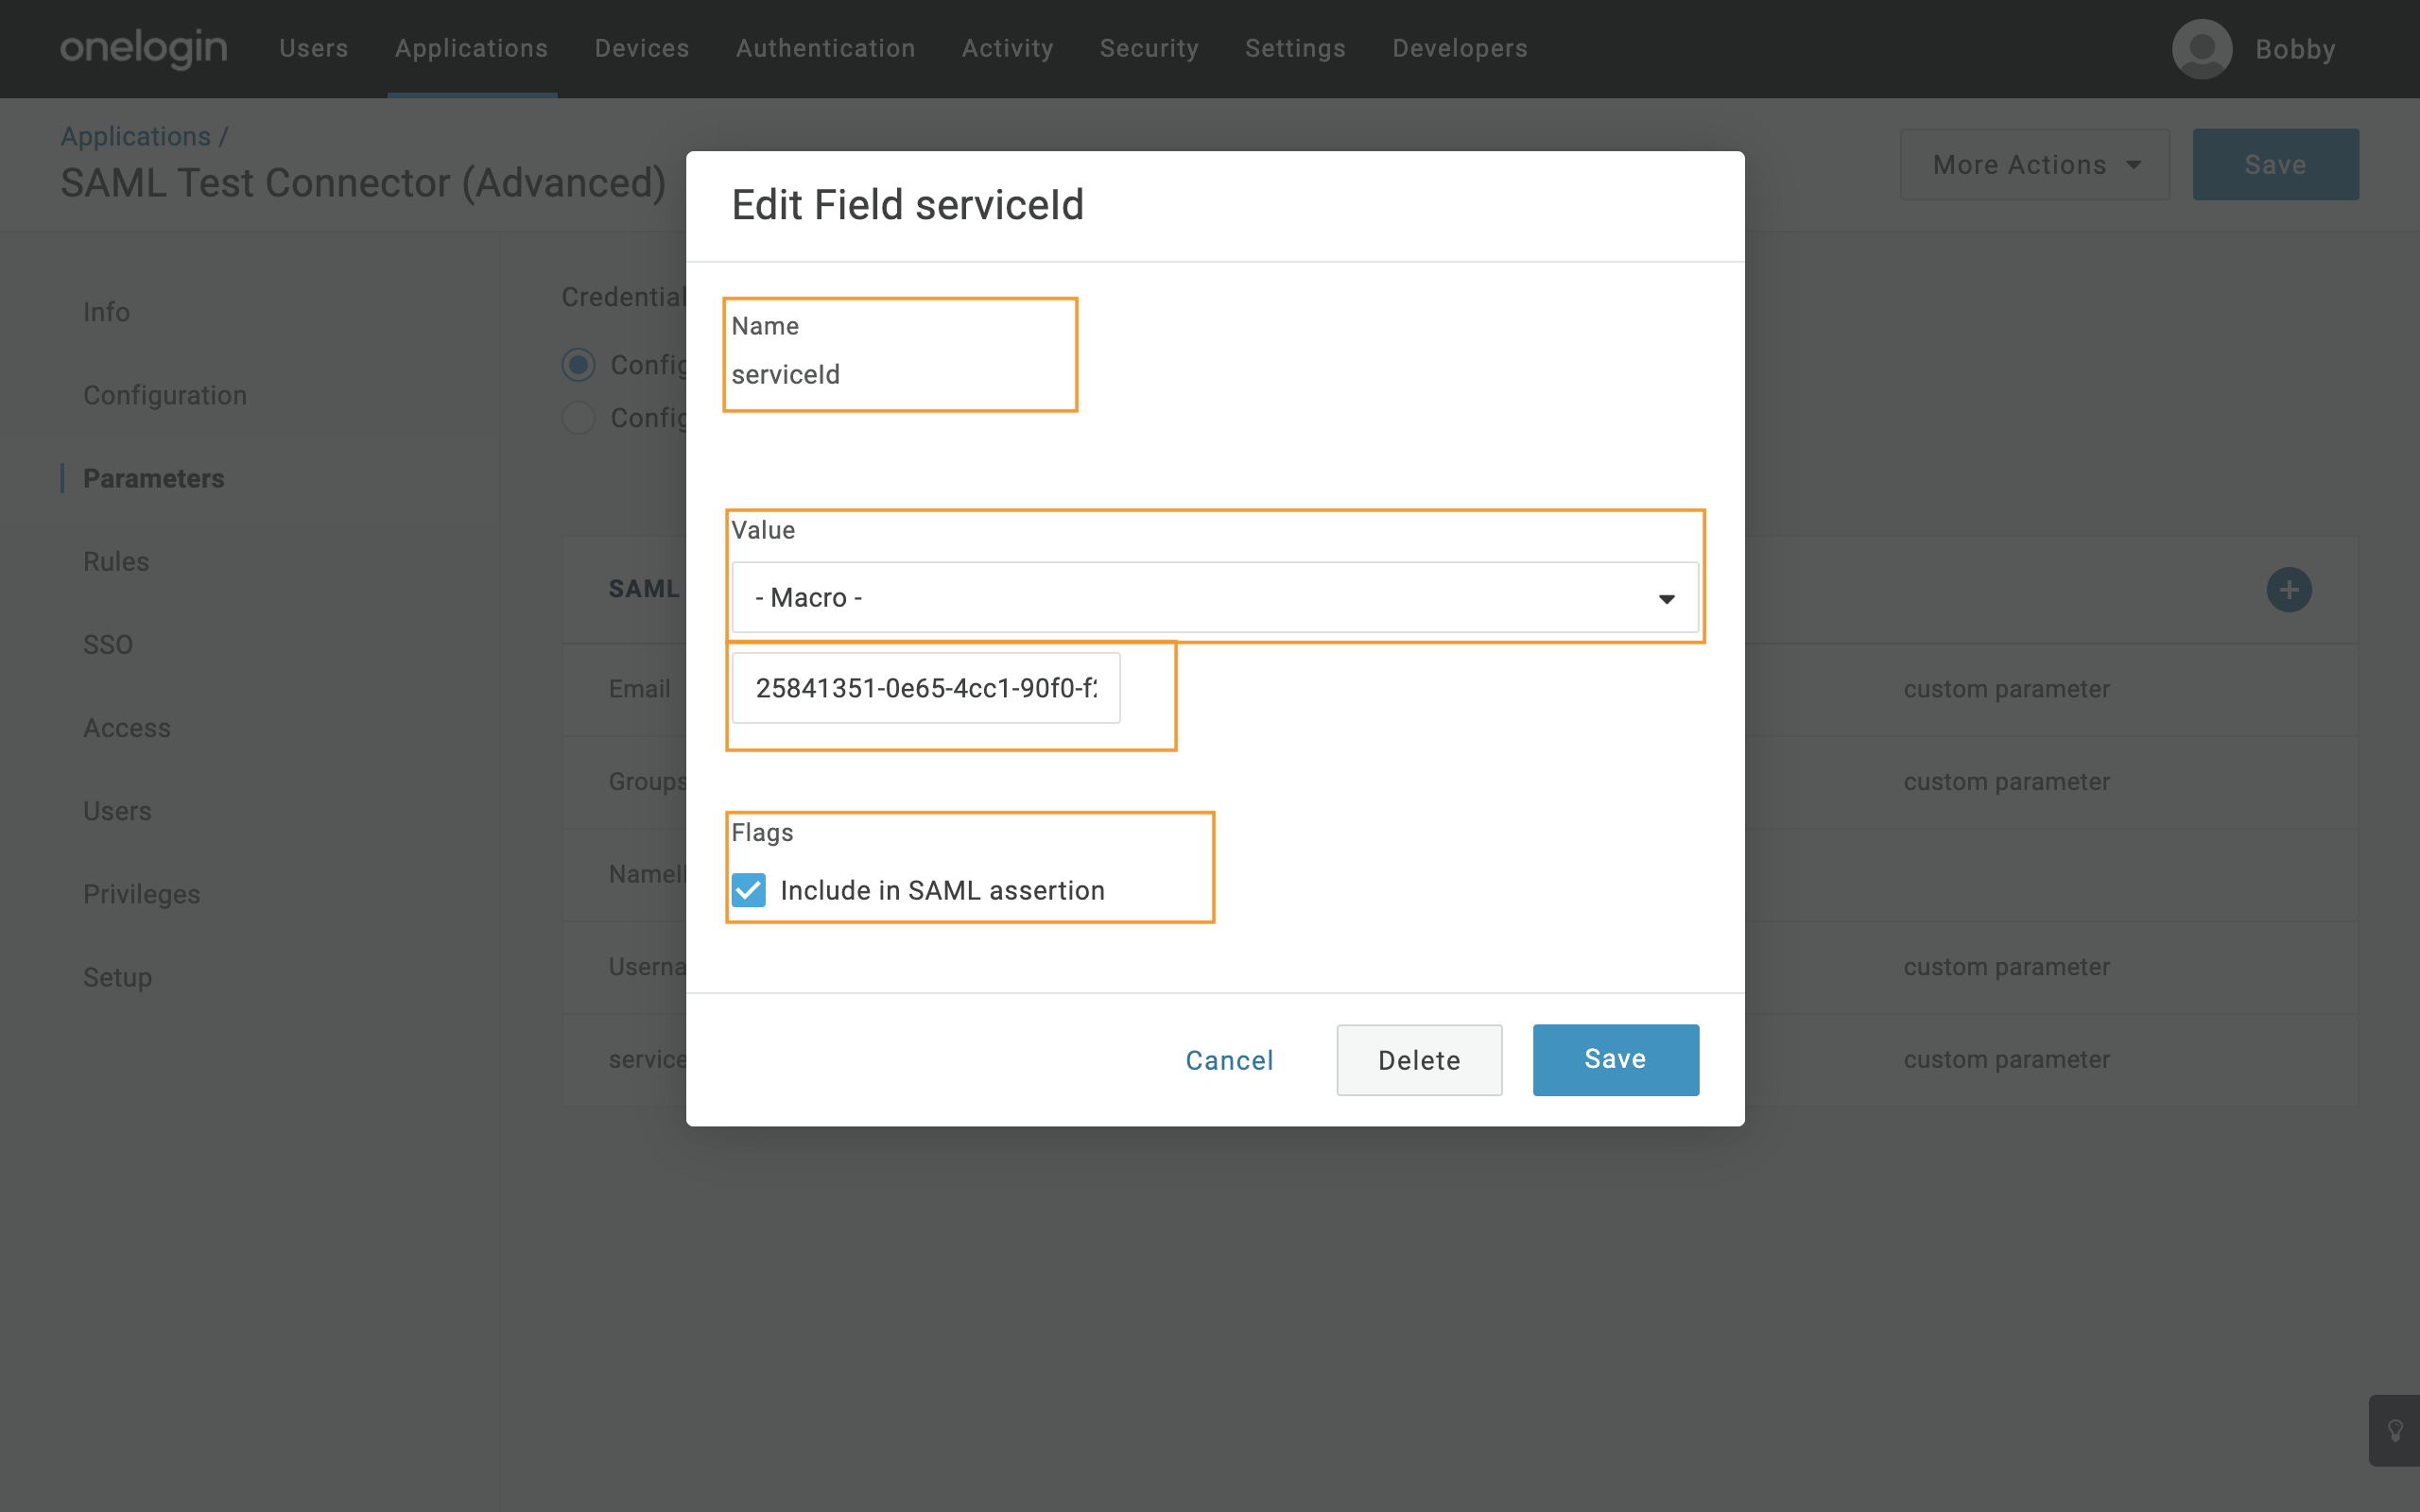
6.6 Save, and then select Save again to update the parameters.
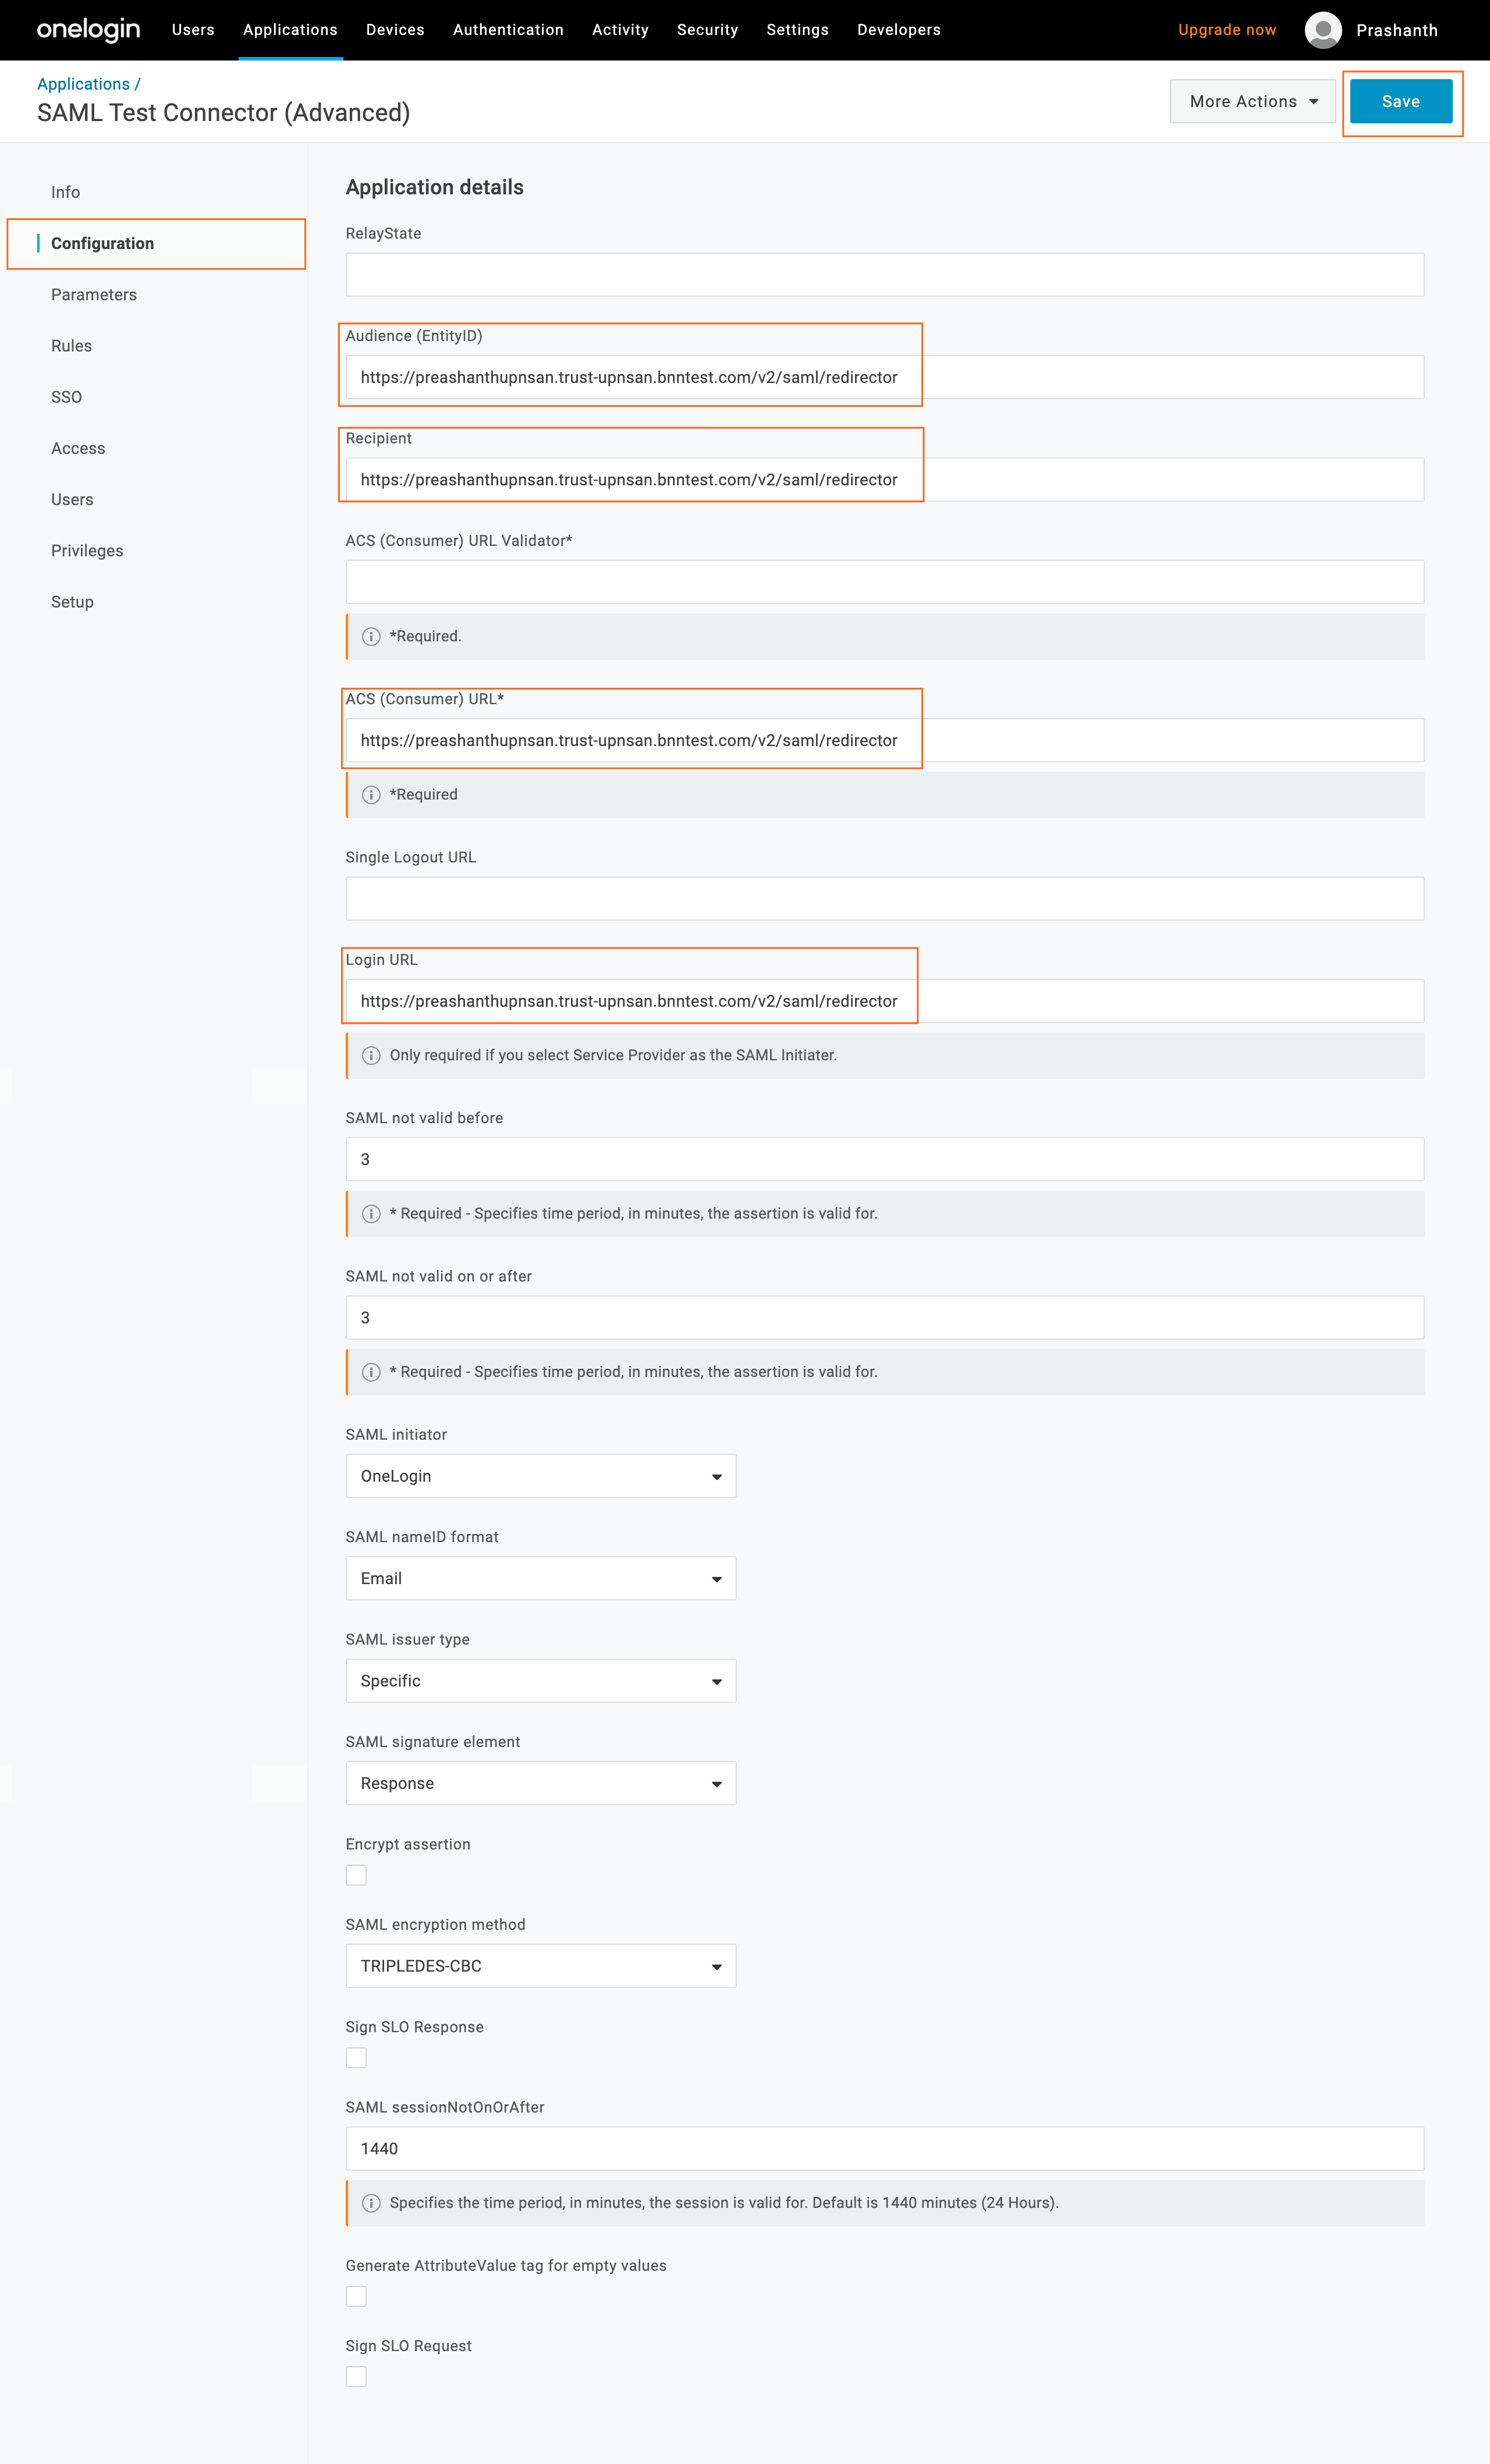
6.7 Navigate to the Configuration tab and complete the following fields using the SAML Proxy URL and Audience (Entity ID) values from the IdP Routed App in the CSE Command Center:
- Audience (EntityID) - Enter the Audience / Entity ID of the IdP Routed App.
- Recipient - Enter the SAML Proxy URL.
- ACS (Consumer) Url - Enter the SAML Proxy URL.
- Login Url - Enter the SAML Proxy URL.
6.8 Save.
Step 7. Assign Users to Application
This step entitles users to both the original app and its proxy in OneLogin, so the proxy app appears in their catalog and routes through TrustProvider.
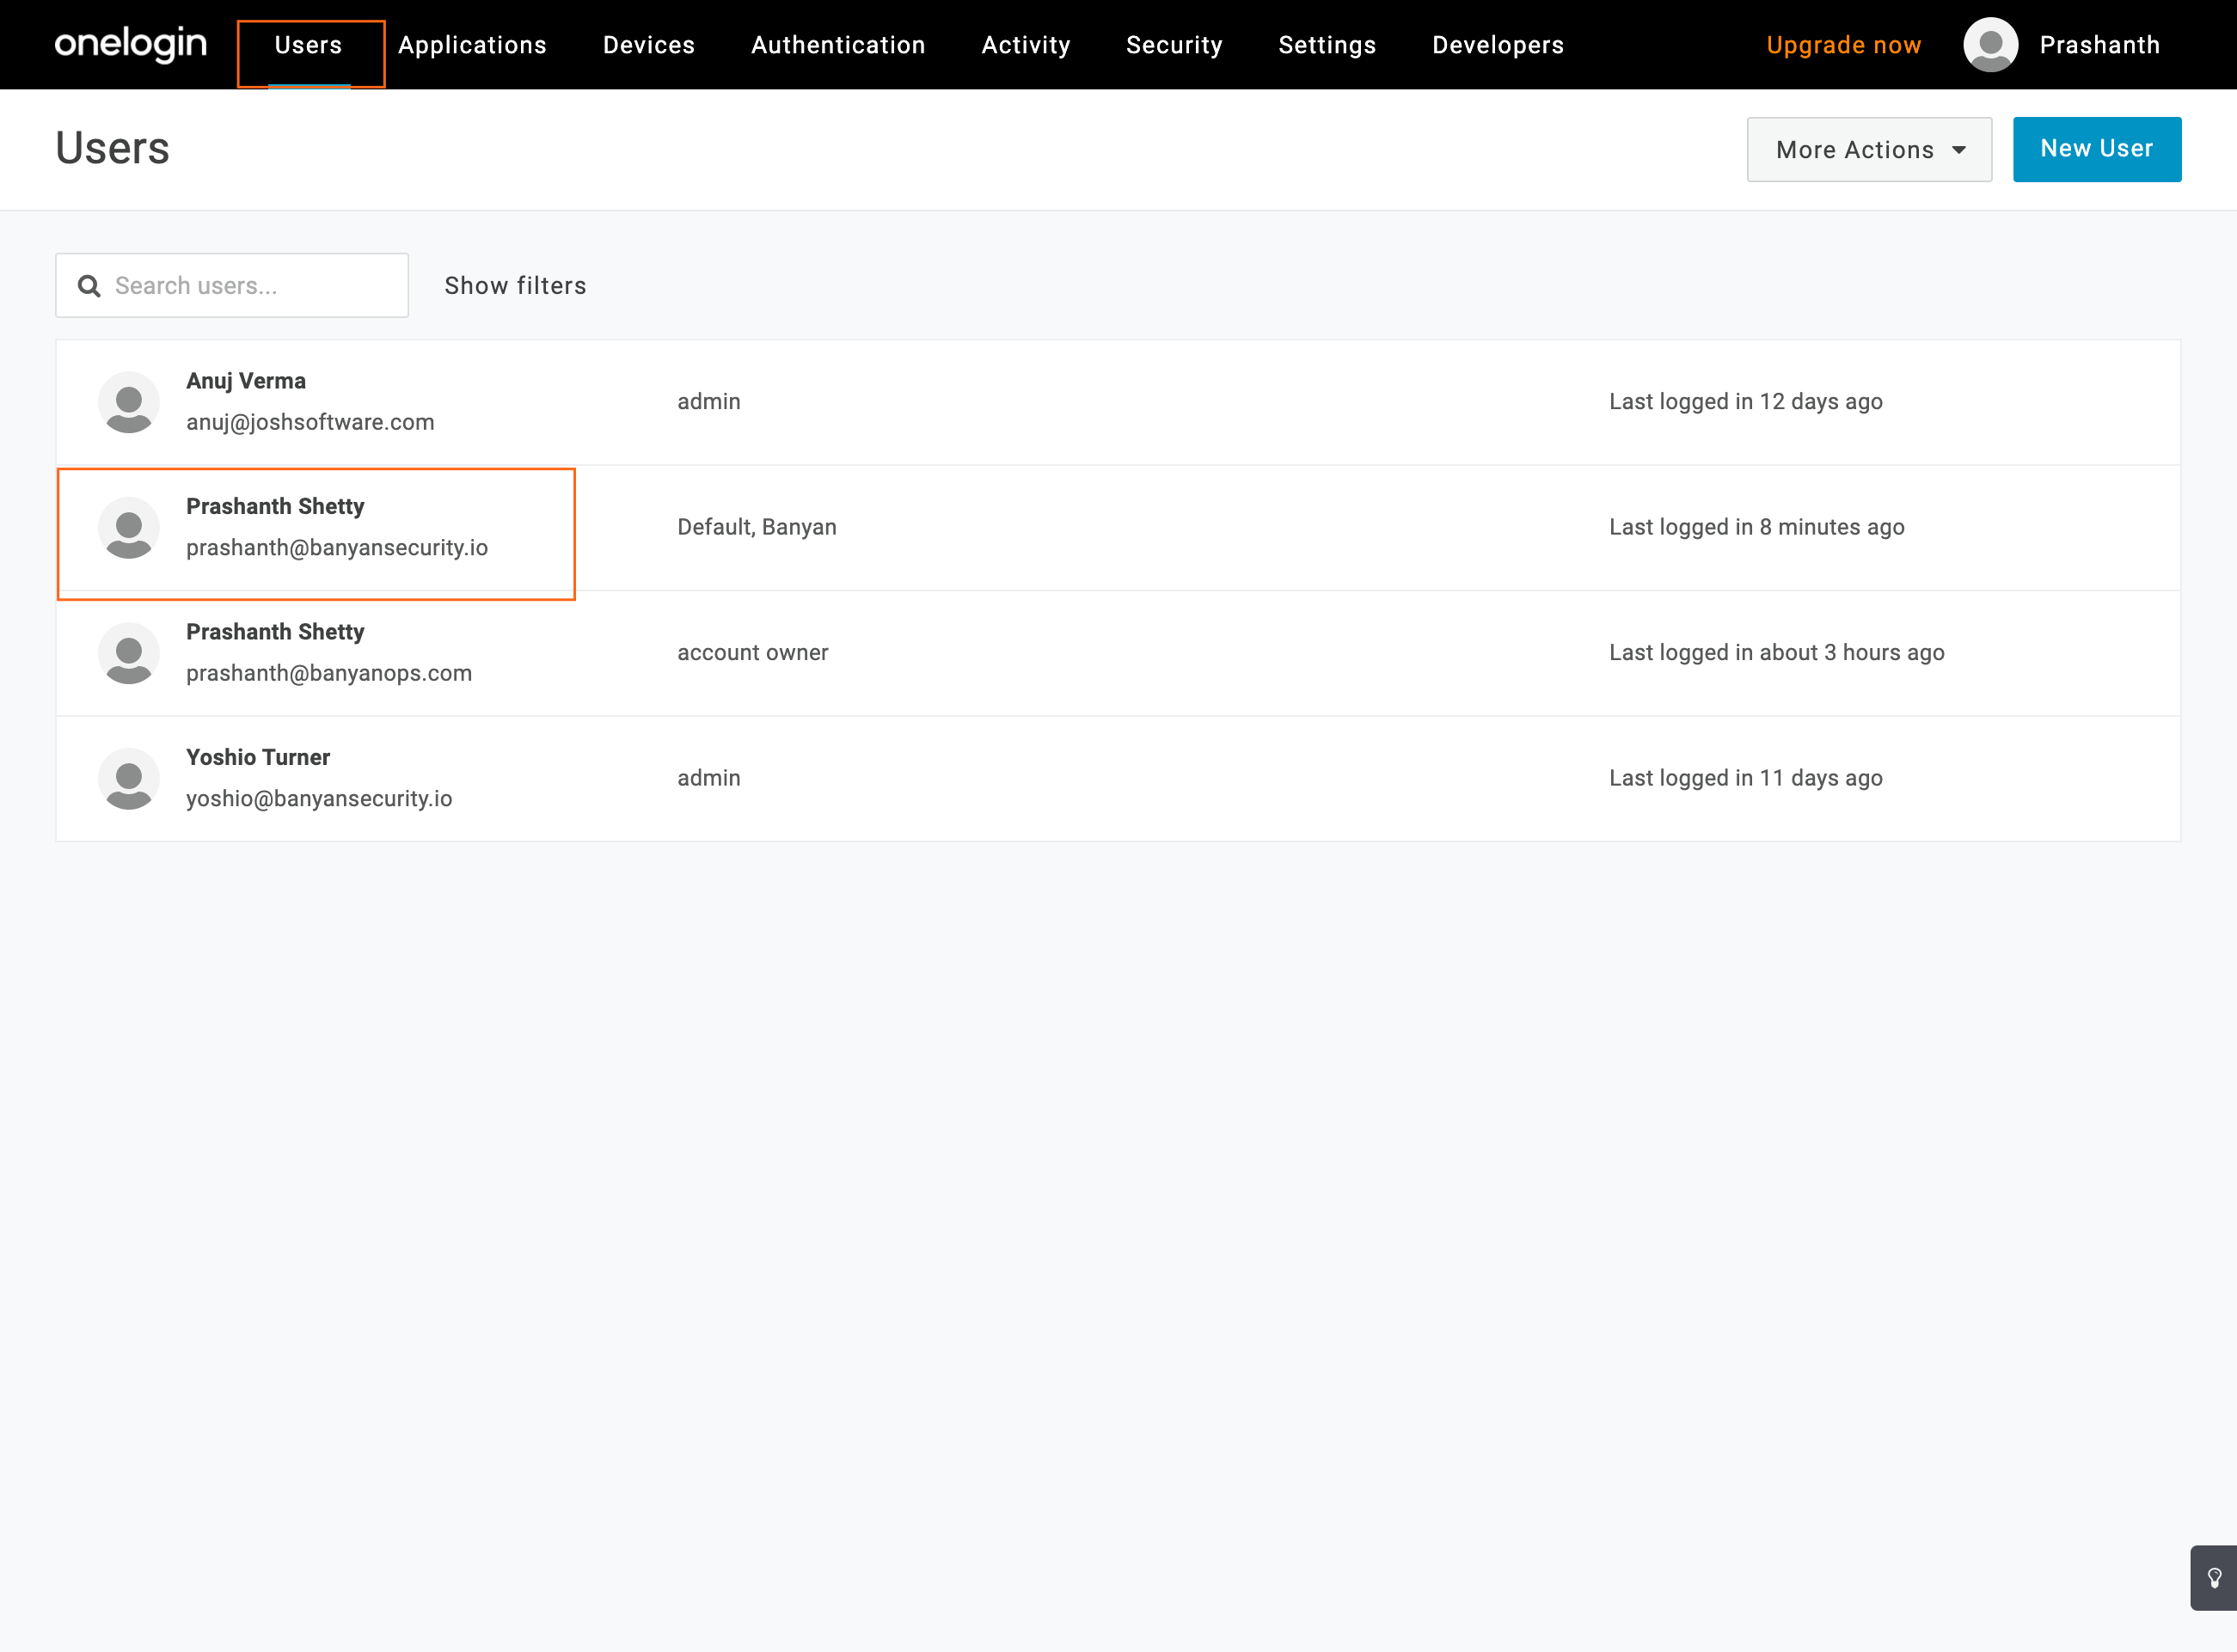
7.1 In OneLogin, navigate to Users and then select a User.
7.2 Navigate to the Applications tab and then click the plus icon (+) to add a new Application.
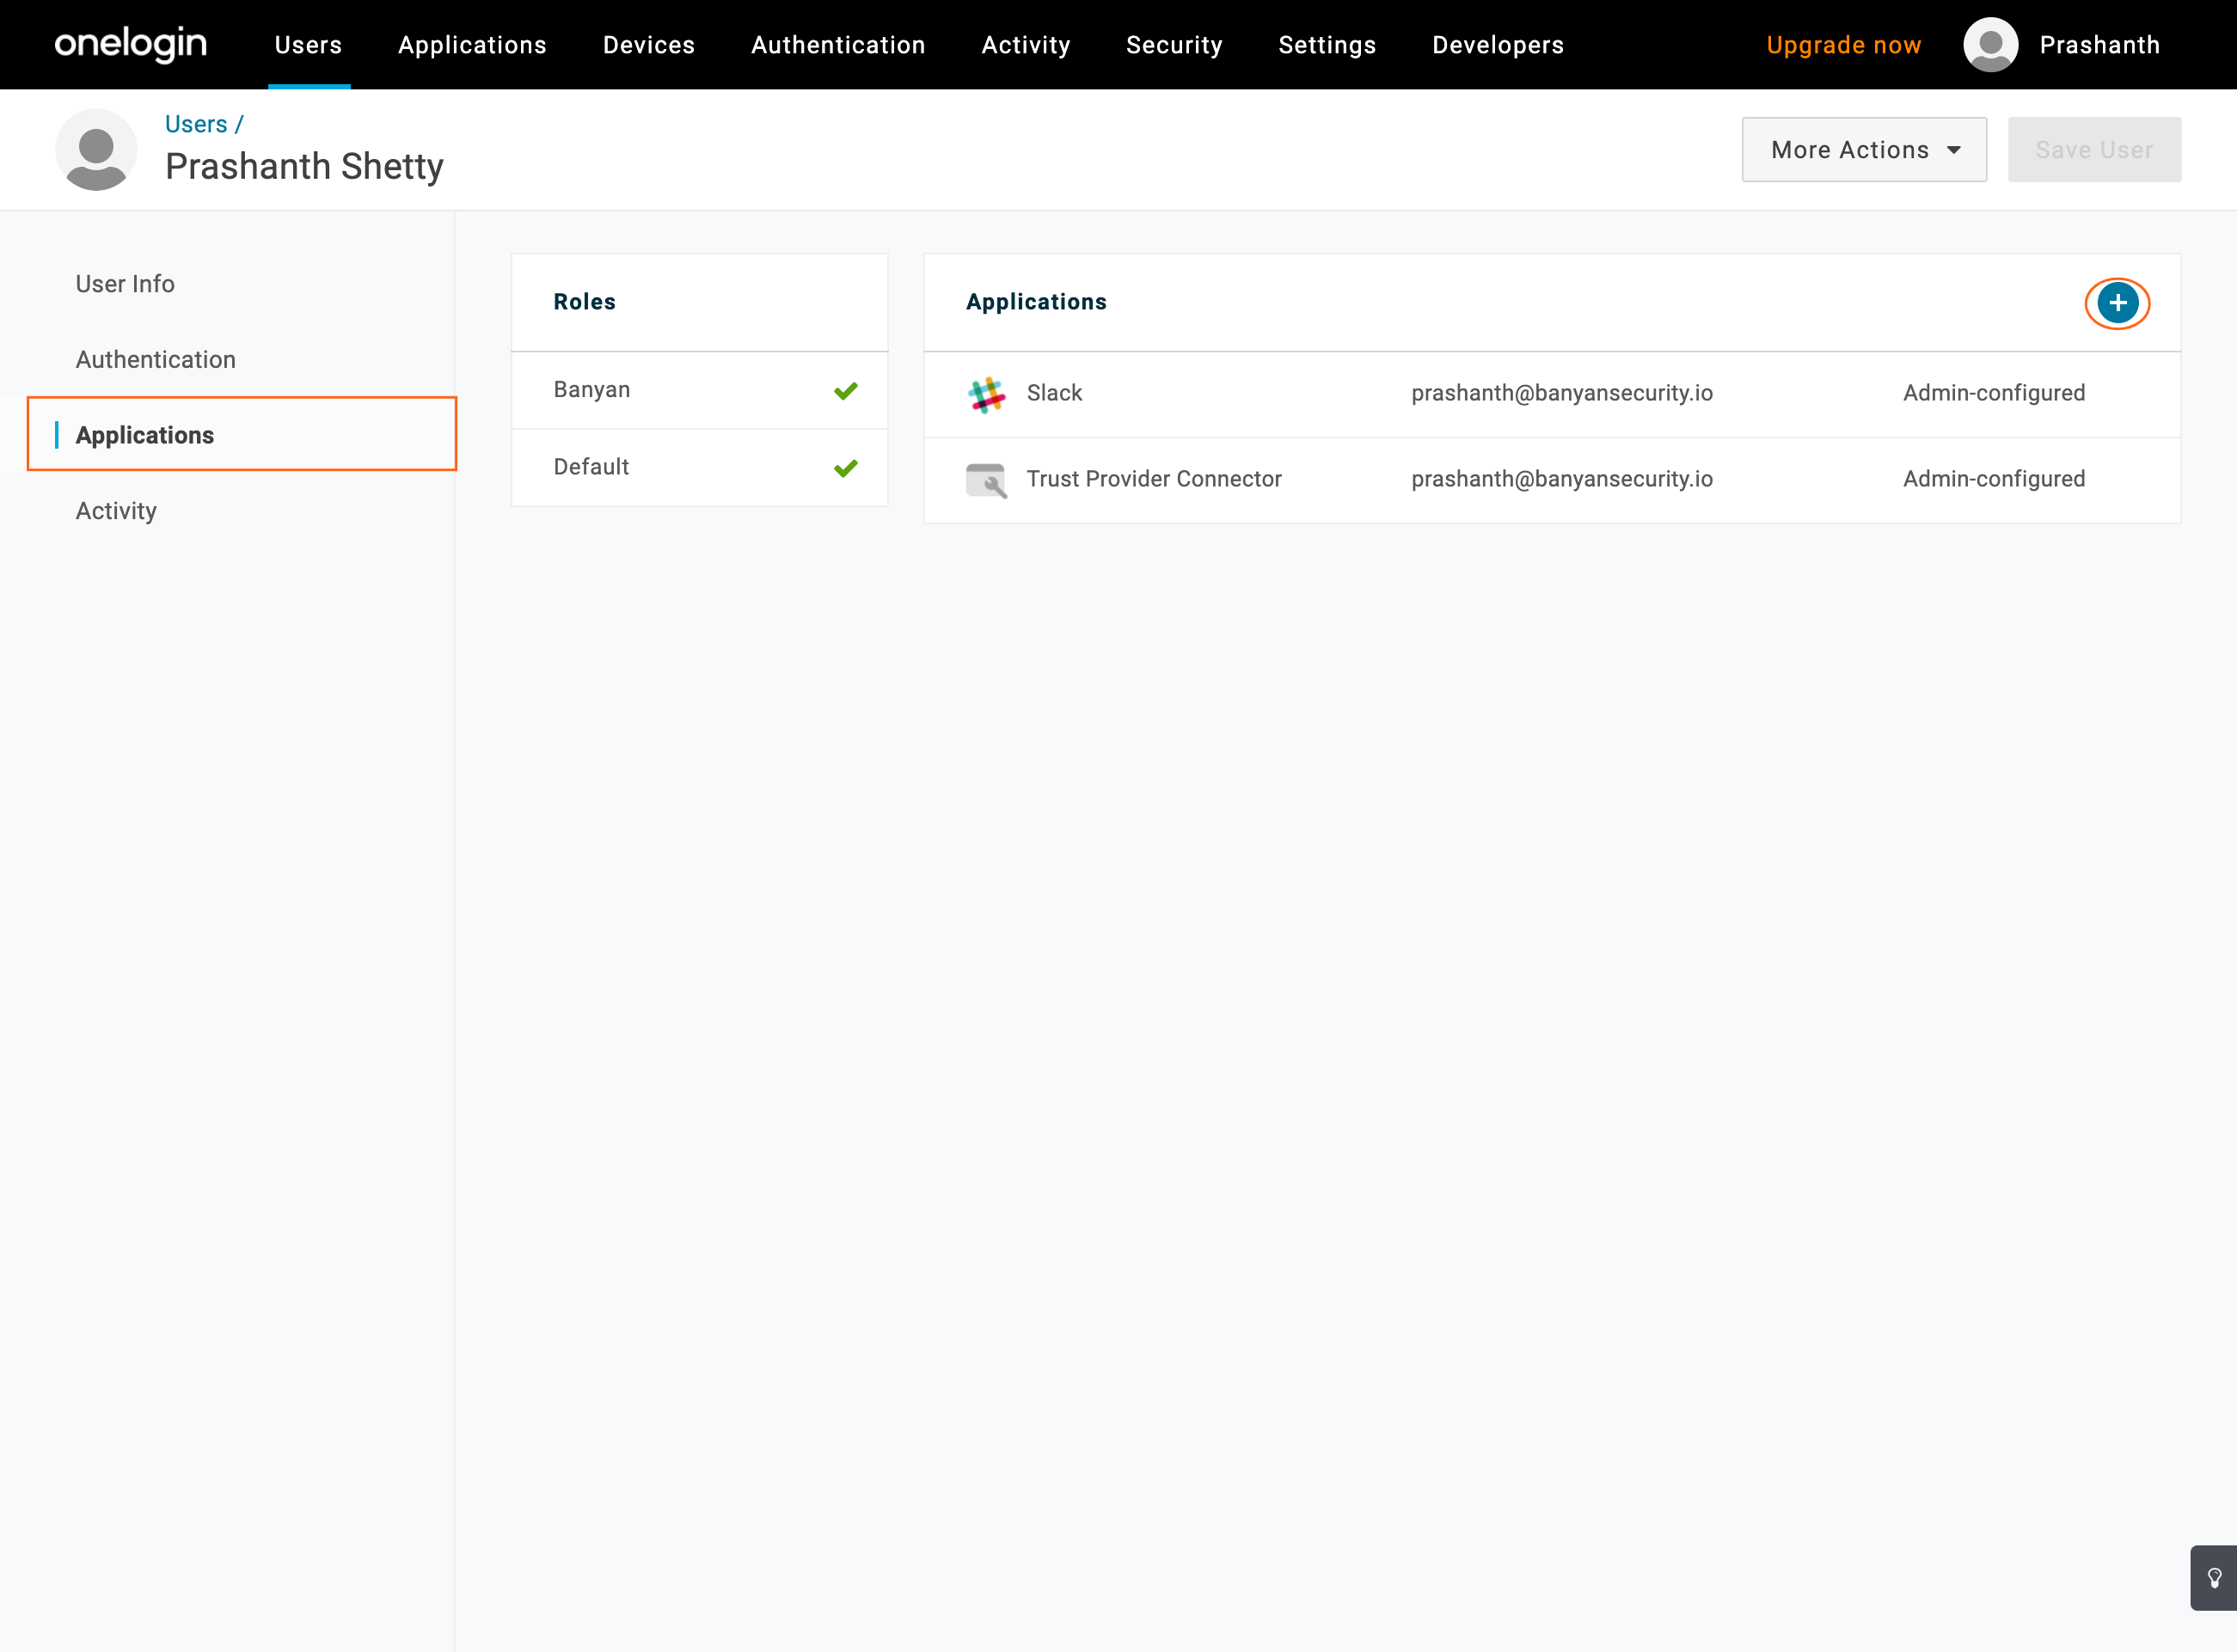
7.3 Add Slack and Slack proxy application to the user.
7.4 Click Save User.
Step 8. Disable Original Application from OneLogin Catalog
Hiding the original (non-proxied) app ensures users launch only the proxy app, so every catalog-initiated sign-in passes through CSE TrustProvider rather than bypassing policy enforcement.
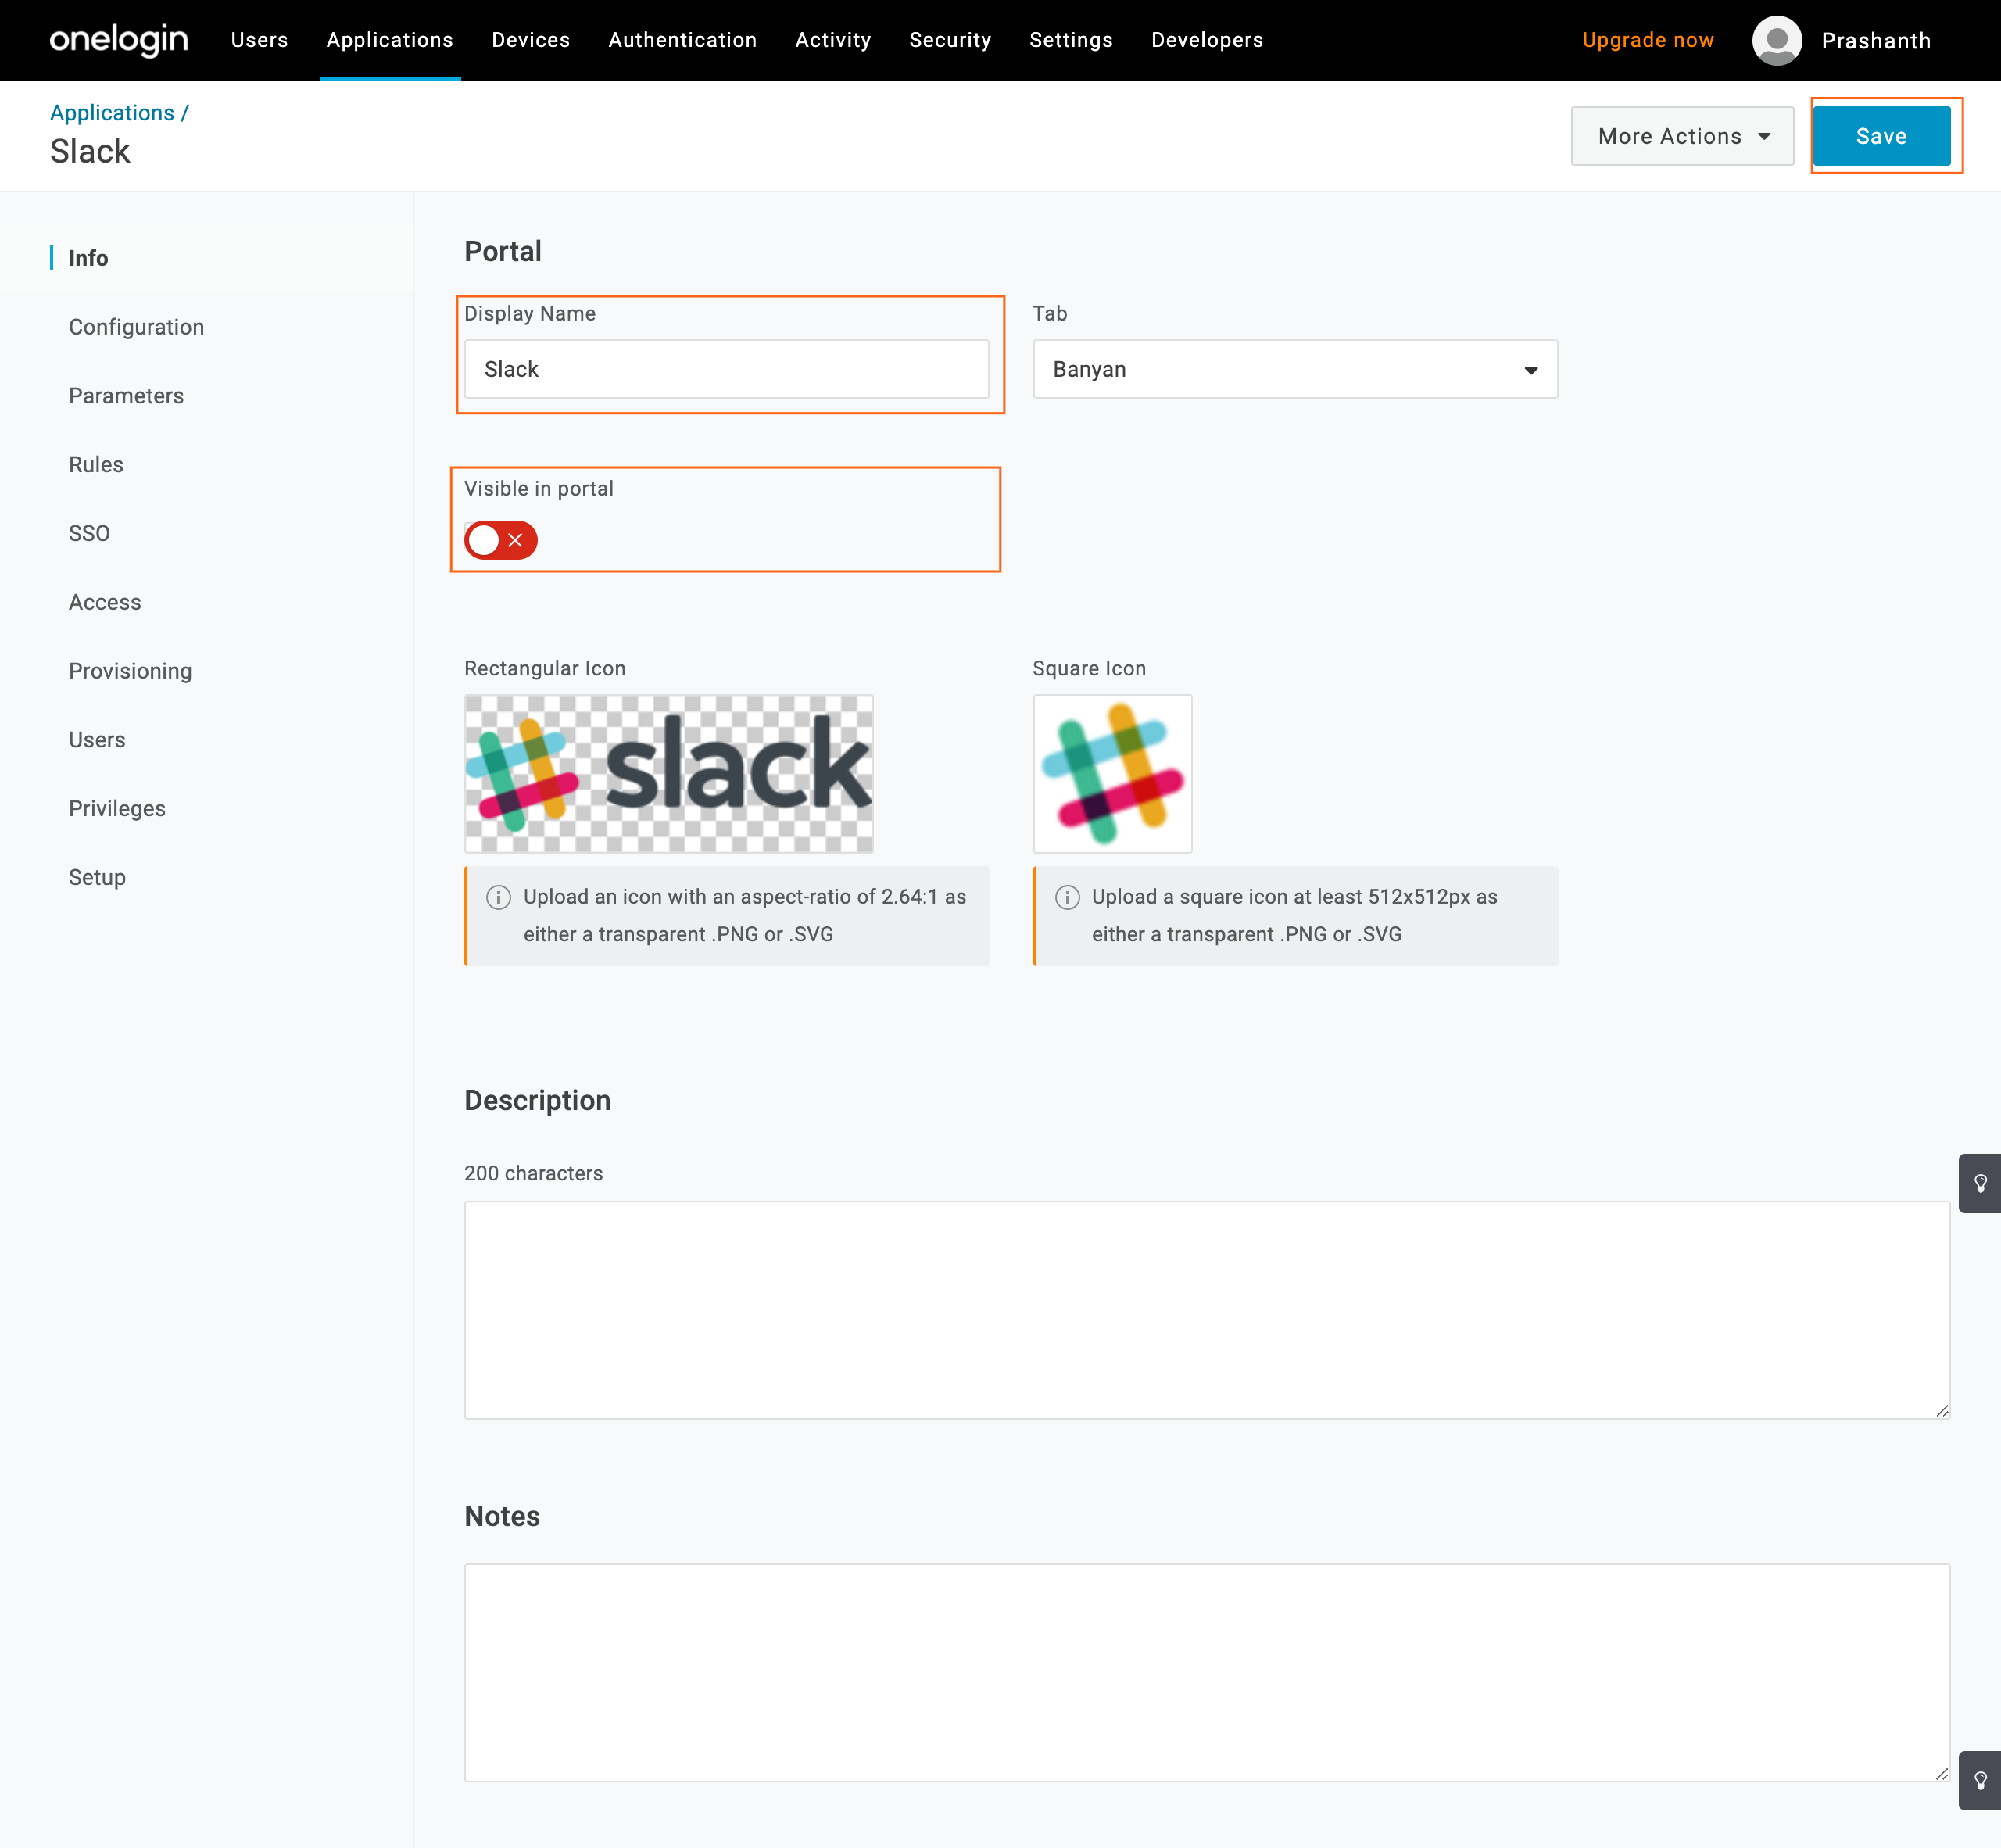
8.1 Navigate to Info and then disable Visible in portal.
Enable Passwordless
Passwordless is recommended to provide an optimal user experience when accessing applications on CSE registered devices. If Passwordless is not enabled, end users will default to OneLogin’s authentication methods.
Passwordless authentication with CSE leverages the fact that the trusted Device Certificate includes the user’s email address in the UserPrincipalName SAN extension field.
When passwordless is enabled, the device certificate that is presented during device trust will be used to extract the user who is attempting to authenticate. The identified user will be issued a TrustToken without requiring username and password. The user will then proceed with OneLogin’s authentication configurations for the user selected application such as adding MFA.
1. Edit the existing CSE IdP Routed Service for OneLogin (Step 2.3).
2. Enable the Passwordless Authentication toggle, located under the application’s Advanced Configurations on the Edit IdP Routed Service screen.
Verify the Sign-In
After completing the phases above, validate the flow on both sign-in paths before broadening the rollout:
- On a registered, trusted device (register the device with the CSE desktop app beforehand), open a fresh incognito/private browser window and launch the SaaS application directly (for Slack, the workspace sign-in page). Confirm that the initiate URL configured in Step 5.3 routes the sign-in through the CSE Trusted IdP, the device-trust check passes, and the sign-in returns through OneLogin and completes.
- If you configured Phase 3, sign in to the OneLogin Portal on the same registered device and launch the proxy application created in Step 6. Confirm that the sign-in routes through CSE TrustProvider and reaches the SaaS application (see the note in How It Works about relaunching the application).
- Repeat both tests from an unregistered device (or one that fails policy) and confirm that sign-in is blocked at CSE (with an Enforcing-mode policy) or falls back per your Permissive-mode design.
- Confirm the sign-in events in the OneLogin Admin Portal event log (Activity > Events), and review the events recorded for the IdP Routed application in the CSE Command Center.
Sessions persist. The federation is evaluated only at sign-in. Users who are already signed in to OneLogin or to the SaaS application keep their sessions until sign-out or session expiry — an already-signed-in tester sees no redirect (a false negative), and devices that fail CSE policy are not cut off immediately after rollout. Test in a fresh incognito/private window, and force re-authentication where needed by signing the test user out of OneLogin and the SaaS application.